
Introduction
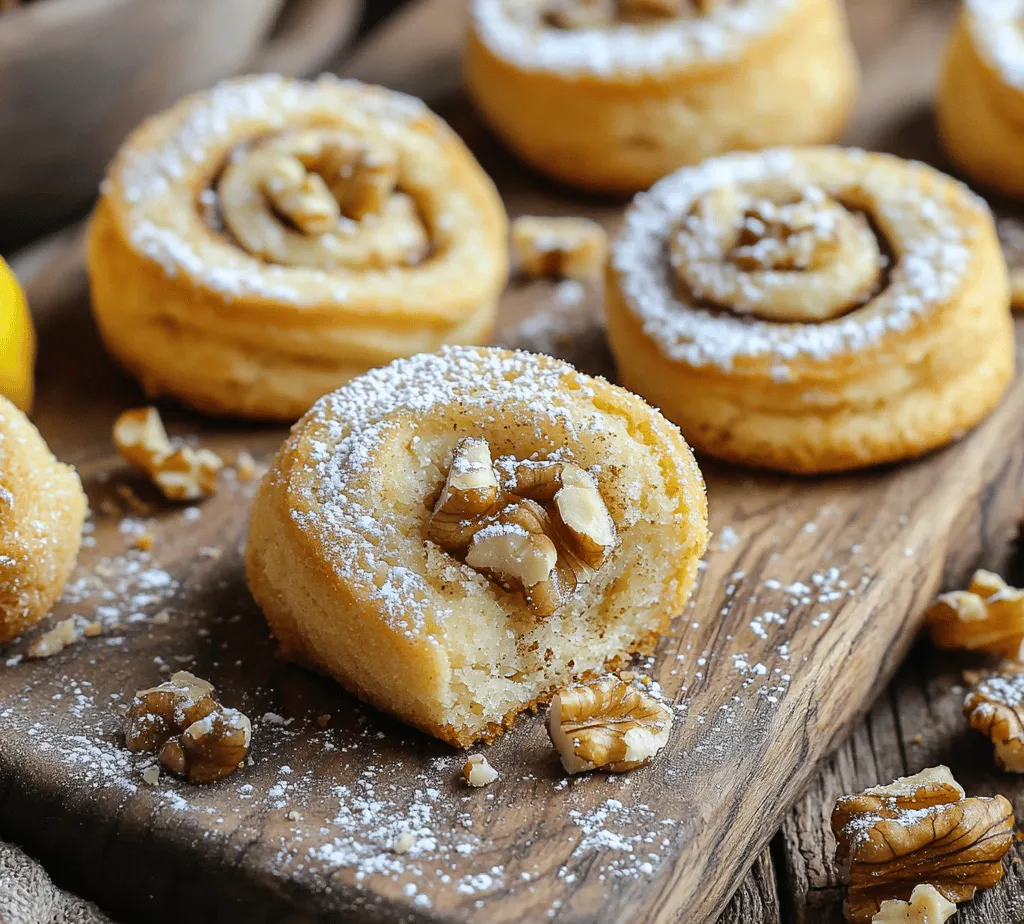
Italian Nut Roll Cookies, or “Nocciolini,” are a cherished part of Italian culinary tradition, often evoking fond memories of family gatherings and festive occasions. These delicate cookies, wrapped around a luscious filling of finely chopped nuts, typically walnuts or hazelnuts, showcase the rich flavors and textures that characterize Italian baking. With their origins rooted deep in Italian heritage, these cookies have become a symbol of love and celebration, frequently appearing on dessert tables during holidays, weddings, and special family events.
What makes Italian Nut Roll Cookies so appealing is not just their delightful taste but also their unique texture. The exterior offers a satisfying crunch, while the nutty filling provides a rich, buttery flavor that melts in your mouth. Baking these cookies at home is an enjoyable experience, allowing you to create a treat that delights both the eyes and the palate. The hands-on process of rolling and filling each cookie is not only rewarding but also a perfect opportunity to involve family members or friends in the kitchen, making it a fun bonding experience.
One of the best aspects of this recipe is its accessibility for bakers of all skill levels. Whether you’re a seasoned home baker or a novice just starting out, the ingredients are simple to find, and the steps are straightforward. Italian Nut Roll Cookies are perfect for any occasion, be it a holiday gathering, a potluck, or simply a cozy afternoon at home. They are sure to impress your guests and provide a delightful treat for yourself and your loved ones.
Understanding the Ingredients
To achieve the perfect Italian Nut Roll Cookies, it’s essential to understand the role each ingredient plays in the recipe. Here’s a breakdown of the key components that come together to create these delightful cookies:
All-Purpose Flour
All-purpose flour is the backbone of this cookie recipe, providing the necessary structure and stability. The gluten in the flour helps bind the ingredients together, ensuring that the cookies hold their shape during baking. When measuring flour, it’s important to avoid packing it down; instead, spoon it into the measuring cup and level it off for accuracy. This will ensure your cookies have the right texture—soft and tender rather than dense.
Unsalted Butter
Unsalted butter is crucial for both flavor and texture in Italian Nut Roll Cookies. It adds richness and creaminess, which enhances the overall taste of the cookie. Using unsalted butter allows you to control the saltiness of the dough, ensuring a well-balanced flavor profile. For optimal results, it’s best to use butter at room temperature, as this allows for easier creaming with sugar, resulting in a light and airy cookie.
Granulated Sugar
Granulated sugar not only sweetens the cookies but also contributes to their browning during baking. The sugar caramelizes as the cookies bake, creating a beautiful golden exterior and enhancing the flavor. It’s important to cream the sugar with the butter until light and fluffy, as this process incorporates air into the mixture, helping the cookies rise and achieve that perfect texture.
Salt
While it may seem counterintuitive, salt is essential in cookie recipes. It enhances the sweetness of the sugar and balances the overall flavors in the dough. A pinch of salt in the mixture elevates the taste, making the cookies more flavorful. Using fine sea salt or kosher salt is ideal, as these dissolve more easily into the dough.
Vanilla Extract
Adding vanilla extract introduces a warm, aromatic quality to the cookies. It provides depth to the overall flavor and complements the nuttiness of the filling. Opt for pure vanilla extract for the best taste; imitation vanilla can sometimes impart an artificial flavor that doesn’t do justice to these delightful cookies.
Egg
In this recipe, the egg serves as a binding agent, helping to hold the dough together. It also adds moisture, contributing to a tender cookie. When incorporating the egg, ensure it’s at room temperature to mix more seamlessly with the other ingredients.
Chopped Walnuts or Hazelnuts
The star of the filling, chopped walnuts or hazelnuts, provides the distinctive flavor and texture that Italian Nut Roll Cookies are known for. These nuts add a delightful crunch and a rich, buttery taste. Toasting the nuts before chopping them can enhance their flavor, bringing out their natural oils and adding depth to the filling.
Confectioners’ Sugar
Confectioners’ sugar, or powdered sugar, is often used to dust the finished cookies, giving them a beautiful, snowy appearance. It adds a touch of sweetness without being overpowering, making it the perfect finishing touch. When dusting the cookies, use a fine mesh sieve to achieve an even coating.
Optional Ingredients: Ground Cinnamon and Lemon Zest
While the classic version of Italian Nut Roll Cookies focuses on the nutty filling, you can enhance the flavor profile by adding optional ingredients like ground cinnamon or lemon zest. Ground cinnamon adds warmth and spice, while lemon zest introduces a bright, citrusy note that complements the richness of the nuts. These additions can elevate the cookies and personalize the recipe to your taste.
Preparation Steps for Italian Nut Roll Cookies
Now that you understand the role of each ingredient, it’s time to delve into the preparation process for Italian Nut Roll Cookies. Follow these detailed steps to ensure a successful baking experience:
Mixing the Dough
1. Creaming Butter and Sugar: Begin by preheating your oven to 350°F (175°C) and lining a baking sheet with parchment paper. In a large mixing bowl, combine the room-temperature unsalted butter and granulated sugar. Using an electric mixer or a wooden spoon, cream the butter and sugar together until the mixture is light and fluffy. This process typically takes about 3-5 minutes. The goal is to incorporate air into the mixture, which will help create a tender cookie texture.
2. Adding the Egg and Vanilla: Once the butter and sugar are well-combined, add the egg and vanilla extract to the bowl. Mix until fully incorporated. The mixture should appear smooth and creamy. If using, this is the time to add any optional ingredients like ground cinnamon or lemon zest, which will infuse additional flavor into the dough.
3. Incorporating Dry Ingredients: In a separate bowl, whisk together the all-purpose flour and salt. Gradually add the dry ingredients to the wet mixture, mixing on low speed or with a spatula until just combined. Be careful not to overmix, as this can lead to tough cookies. The dough should come together into a soft, pliable consistency.
4. Preparing the Nut Filling: While the dough is resting, prepare the nut filling. Finely chop the walnuts or hazelnuts and place them in a small bowl. If you desire a richer flavor, consider toasting the nuts in a dry skillet over medium heat for a few minutes until fragrant. Allow them to cool before mixing them into the filling.
5. Assembling the Cookies: Once the dough is combined, divide it into smaller portions for easier handling. Roll each portion into a rectangle on a lightly floured surface. Aim for a thickness of about 1/8 inch. Spread a thin layer of the chopped nuts evenly over the dough, leaving a small border around the edges. Gently roll the dough into a log, tucking in the filling as you go, and seal the edges to prevent the nuts from spilling out during baking.
With these initial steps, you are well on your way to creating delicious Italian Nut Roll Cookies that will surely impress. The careful attention to detail in preparing the dough and filling sets the foundation for a delightful baking experience. In the following sections, we will explore further preparation techniques and baking instructions, ensuring that your cookies turn out perfectly every time.
Incorporating Eggs and Flavorings
When making Italian Nut Roll Cookies, the incorporation of eggs and flavorings is crucial for achieving a smooth and cohesive dough. Start by ensuring your eggs are at room temperature; this step is vital as it helps the eggs blend more easily into the mixture, creating a uniform texture. In a separate bowl, whisk the eggs lightly before adding them to your butter and sugar mixture. This method not only enhances the mixture’s smoothness but also allows for better emulsification, which is key for achieving a tender cookie.
For flavorings, traditional recipes often call for vanilla extract, but feel free to explore other options such as almond extract or a hint of citrus zest. When adding these flavorings, start with a teaspoon and adjust to your taste. Remember, it’s easier to add more than to reduce an overpowering flavor. Aim for a balanced flavor profile that complements the nut filling you will be using.
Combining Dry and Wet Ingredients
Combining your dry and wet ingredients requires careful attention to avoid overmixing, which can lead to dense cookies. Begin by sifting together your dry ingredients, including flour, baking powder, and salt, in a separate bowl. This not only aerates the flour but also ensures an even distribution of the leavening agent.
Once your wet and dry ingredients are prepared, gradually add the dry mixture to the wet mixture. Use a spatula or wooden spoon to gently fold the ingredients together. This technique helps maintain a lighter texture. Mix just until the flour is incorporated; a few lumps are acceptable. Overmixing can develop gluten, leading to tougher cookies instead of the tender, flaky texture characteristic of Italian Nut Roll Cookies.
The Importance of Chilling the Dough
Chilling the dough is an essential step that cannot be overlooked. Not only does it allow the flavors to meld, but it also helps the dough firm up, making it easier to handle. After mixing your dough, shape it into a disc, wrap it in plastic wrap, and refrigerate for at least one hour. This resting period is critical for achieving the right texture and preventing the cookies from spreading excessively during baking.
Chilling solidifies the fats in the dough, which results in a more stable shape as the cookies bake. Additionally, it enhances the flavor as the ingredients have time to meld together. If you’re short on time, a 30-minute chill can suffice, but for the best results, aim for a full hour or more.
Shaping and Baking the Cookies
Step-by-Step Guide on Rolling and Filling
Once your dough is chilled, it’s time to shape the cookies. Begin by generously dusting your work surface with flour to prevent sticking. Take a portion of the dough and roll it out to about 1/8 inch thick. Aim for a rectangular shape that will allow for easy filling.
Spread your desired nut filling evenly over the rolled-out dough, leaving a small border around the edges. Typical fillings include a mixture of ground nuts, sugar, and spices like cinnamon. After spreading the filling, carefully roll the dough away from you, starting at the long edge. This method helps create a tighter roll, which is important for the final cookie shape.
Techniques for Rolling Dough Evenly and Cutting into Rectangles
To ensure even rolling, use a rolling pin with guides or measure the thickness with a ruler if necessary. Once rolled, cut the log into equal rectangles, typically around 1-2 inches wide, depending on your preference. For a uniform look, use a sharp knife or a pastry cutter.
Tips for Sealing the Edges to Prevent Filling Leakage
After cutting the rectangles, it’s crucial to seal the edges properly to prevent the filling from leaking during baking. Use your fingers to pinch the edges together firmly, ensuring there are no gaps. For added security, you can brush the edges with a little beaten egg, which acts as a glue and gives the cookies a beautiful golden sheen.
Baking Instructions
Preheat your oven to 350°F (175°C) and line a baking sheet with parchment paper. Place the shaped cookies onto the sheet, ensuring they have enough space between them to allow for slight expansion during baking. Bake for 15-20 minutes or until the cookies are lightly golden around the edges. Keep a close eye on them as oven temperatures can vary.
To ensure even baking, consider rotating the baking sheet halfway through the baking time. Once done, remove the cookies from the oven and allow them to cool on the baking sheet for a few minutes before transferring them to a wire rack to cool completely.
Cooling and Finishing Touches
Cooling the cookies is essential before adding any finishing touches. Allow them to cool completely on a wire rack; this helps them firm up and enhances their texture. Dusting the cookies with confectioners’ sugar while they are still warm can lead to a lovely, melted effect, but for a more distinct presentation, wait until they are completely cooled.
Creative Ideas for Presentation
When it comes to presentation, consider adding additional nut toppings for extra crunch and flavor. Chopped pistachios, walnuts, or hazelnuts can be sprinkled on top for a beautiful and delicious finish. You might also consider drizzling a light glaze made from powdered sugar and milk for a decorative touch. For serving suggestions, arrange the cookies on a decorative platter and pair them with a hot cup of coffee or tea for a delightful treat.
Cultural Significance of Nut Roll Cookies
Italian Nut Roll Cookies are steeped in cultural significance and are often associated with family gatherings and holiday celebrations. Traditionally, these cookies are made during Christmas and Easter, where families come together to bake and share their cherished recipes.
Many Italian families have their variations of the nut roll, passed down through generations. For instance, some might include chocolate or dried fruits in the filling. The process of baking together not only creates delicious treats but also strengthens family bonds and preserves cultural heritage.
Sharing stories around the kitchen table, reminiscing about past gatherings, and enjoying the fruits of your labor are integral to the experience of making nut roll cookies. As you bake these cookies, think of the traditions you are continuing and the memories you are creating.
Nutritional Information
For those mindful of nutritional content, here’s a brief breakdown of the calorie count and nutritional information per cookie:
– Calories: Approximately 120 calories
– Fat: 7g
– Carbohydrates: 12g
– Protein: 2g
– Fiber: 1g
It’s important to note that these cookies contain nuts, so they may not be suitable for those with nut allergies. If you’re looking for gluten-free options, consider substituting all-purpose flour with a gluten-free blend. Be sure to check that all other ingredients are gluten-free as well, especially the baking powder.
Conclusion
Making Italian Nut Roll Cookies is not just about baking; it’s about embracing the joy of creating something delicious to share with family and friends. The process brings together tradition, creativity, and the warmth of home. As you embark on this baking adventure, remember to savor each moment—from the aroma of the rolled dough to the sight of the finished cookies dusted with confectioners’ sugar.
Encourage your loved ones to join you in the kitchen and experience the delightful process of shaping, filling, and baking these cookies. Embrace the mess, enjoy the laughter, and celebrate the sweet results of your efforts. With each bite, you’ll find not just a cookie, but a connection to a rich culinary tradition that warms the heart.


