Introduction
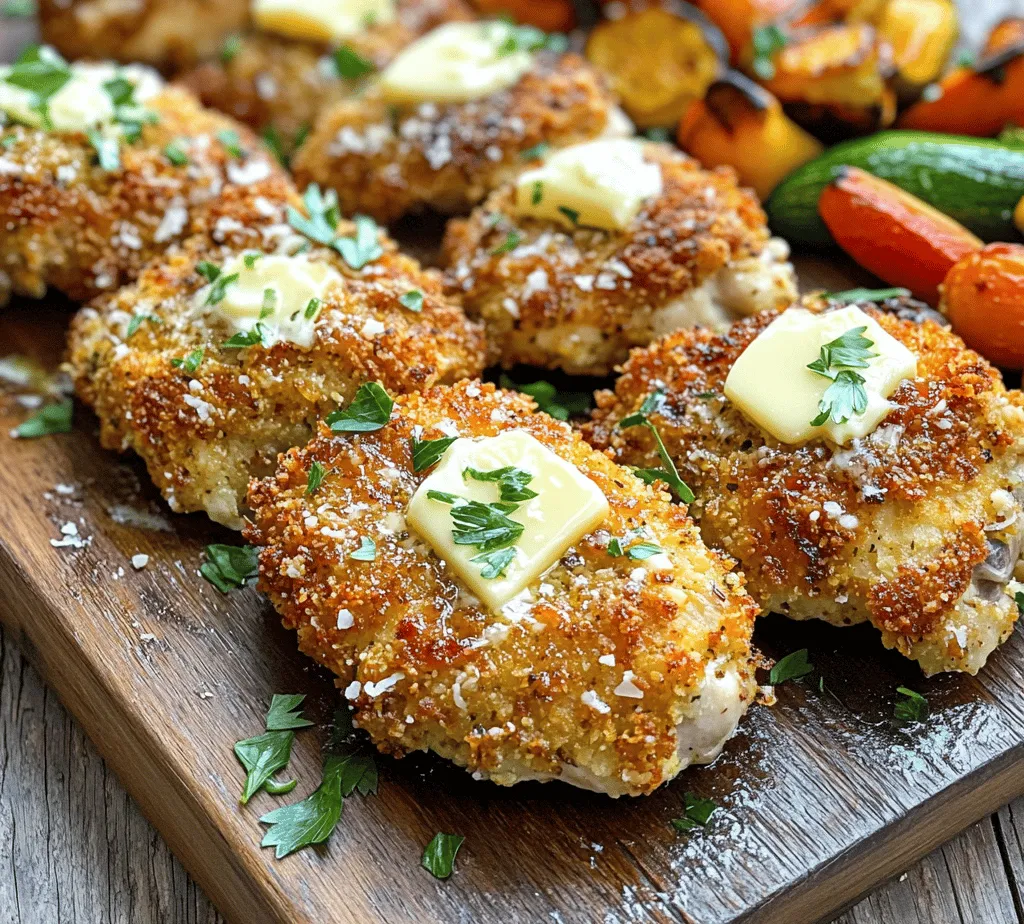
Chicken is one of the most beloved proteins around the globe, celebrated for its versatility and ability to absorb flavors beautifully. Whether grilled, roasted, or fried, chicken can satisfy a wide range of culinary cravings, making it a staple in many households. Among the myriad of chicken recipes available, Garlic Parmesan Crusted Chicken stands out as a simple yet incredibly flavorful dish that can elevate any weeknight dinner into something special.
This recipe is not just about convenience; it’s about using fresh, high-quality ingredients to create a meal that tastes like it came from a gourmet kitchen. The combination of garlic, parmesan, and herbs creates a savory crust that perfectly complements the moist chicken beneath. This dish is not only easy to prepare but also impressive enough to serve to guests, making it a fantastic choice for any occasion, from family dinners to get-togethers with friends.
In this article, we aim to provide a comprehensive guide to making Easy Garlic Parmesan Crusted Chicken. We will delve into the essential ingredients that make this dish exceptional, outline the preparation steps in detail, and offer valuable tips for achieving the perfect bake. So, roll up your sleeves and get ready to transform your weeknight dinners with this delightful recipe!
Understanding the Ingredients
To truly appreciate the depth of flavor in Garlic Parmesan Crusted Chicken, it’s essential to understand the role each ingredient plays in the dish. From the chicken itself to the herbs and spices, each component contributes to the overall taste and texture.
Boneless, Skinless Chicken Breasts
The foundation of this recipe is boneless, skinless chicken breasts. This cut of meat is favored for its lean quality and versatility. When selecting chicken breasts, look for those that are plump and have a pinkish hue. Avoid any that appear dull or have dark spots. Fresh chicken not only enhances the flavor of your dish but also ensures a tender and juicy outcome. If you have time, consider brining the chicken in a simple saltwater solution for a few hours before cooking. This process helps the meat retain moisture during baking.
Breadcrumbs (Panko)
When it comes to achieving a perfect crust, the type of breadcrumbs you use matters significantly. Panko breadcrumbs, which are lighter and flakier than traditional breadcrumbs, are preferred for this recipe due to their superior texture and crunch. They create a delightful contrast with the tender chicken, resulting in a satisfying bite. You can find panko in most grocery stores, and if you want to add a personal touch, try seasoning them with additional herbs or spices before coating the chicken.
Parmesan Cheese
Parmesan cheese is another star ingredient in this dish. While pre-grated parmesan is convenient, using freshly grated cheese can make a noticeable difference in flavor. Fresh parmesan has a richer taste and melts beautifully, forming a golden crust as it bakes. When selecting parmesan, opt for a block that you can grate yourself. This will ensure that you capture all the nuances of flavor that make this dish so special.
Garlic
Garlic is the hero of this recipe, providing a robust flavor that elevates the chicken to new heights. Besides its culinary benefits, garlic also boasts numerous health advantages, including anti-inflammatory properties and heart health benefits. For the best results, use fresh garlic cloves, finely minced or pressed, to maximize their flavor. If you prefer a milder garlic taste, consider roasting whole cloves before adding them to the breadcrumb mixture.
Dried Italian Herbs
To bring an aromatic quality to the dish, dried Italian herbs such as oregano, basil, and thyme are added to the breadcrumb mixture. These herbs complement the garlic and parmesan perfectly, creating a cohesive flavor profile that is both comforting and familiar. Feel free to experiment with your favorite herbs or even add a dash of red pepper flakes for an extra kick.
Paprika and Black Pepper
A touch of paprika and freshly cracked black pepper adds depth and subtle heat to the crust. Paprika not only contributes a vibrant color to the final dish but also enhances the overall flavor without overpowering the other ingredients. Black pepper provides a gentle spiciness that balances the richness of the cheese and butter.
Unsalted Butter
Butter plays a crucial role in both flavor and moisture. Using unsalted butter allows you to better control the salt levels in the dish, ensuring that the flavors meld perfectly without being overly salty. The butter mixture is brushed over the chicken before applying the breadcrumb coating, helping to achieve a beautifully golden, crispy crust.
Fresh Parsley
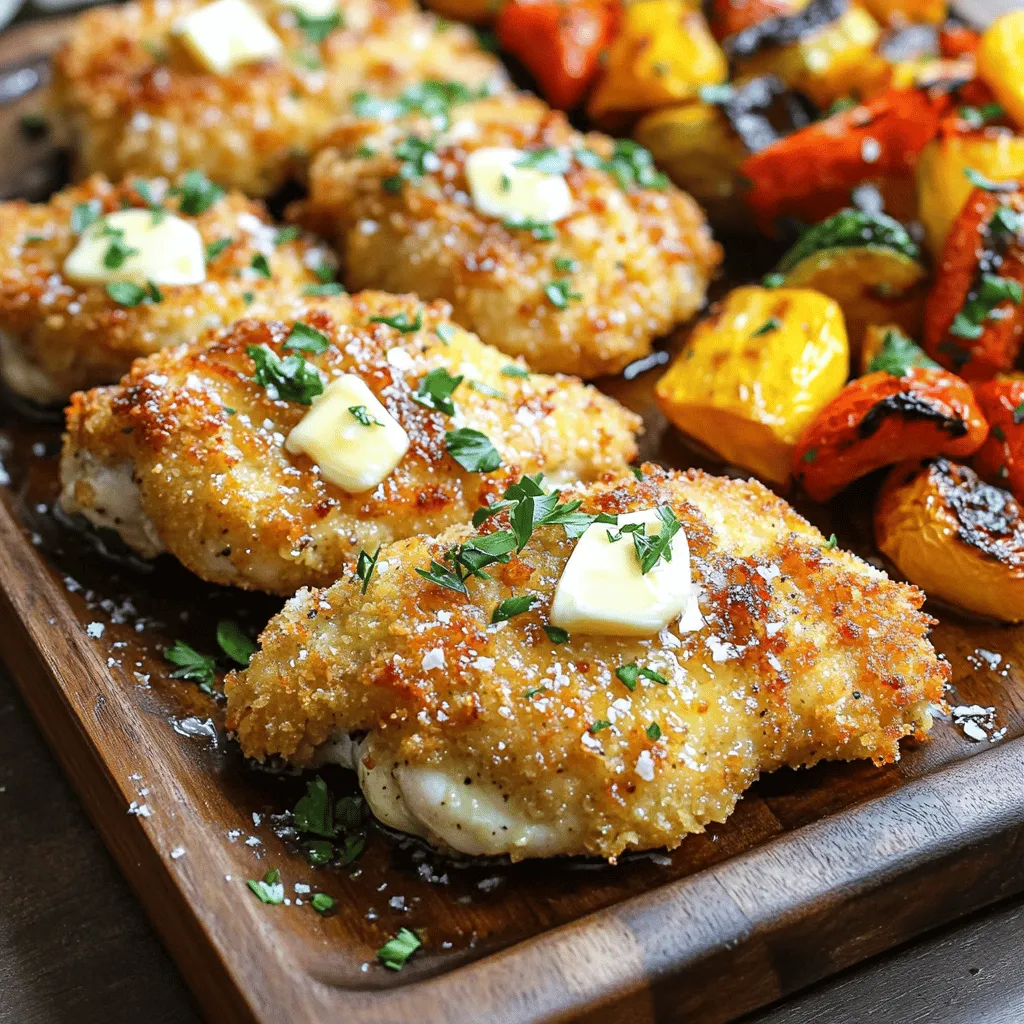
Finally, fresh parsley is used for garnish, adding a pop of color and a hint of freshness to the dish. It’s a simple yet effective way to elevate the presentation and make your Garlic Parmesan Crusted Chicken look as delicious as it tastes. A sprinkling of chopped parsley just before serving can brighten up the dish and make it visually appealing.
Preparation Steps Explained
Now that we’ve explored the ingredients, it’s time to dive into the preparation steps to ensure your Garlic Parmesan Crusted Chicken turns out perfectly every time.
Preheat the Oven and Prepare the Baking Sheet
Before you start assembling the dish, it’s important to preheat your oven to 400°F (200°C). Preheating ensures that the chicken cooks evenly and helps achieve that desirable crispy crust. While the oven is heating, prepare a baking sheet by lining it with parchment paper or lightly greasing it with cooking spray. This will prevent the chicken from sticking and make cleanup a breeze.
Combine the Breadcrumb Mixture
In a medium-sized mixing bowl, combine the panko breadcrumbs, freshly grated parmesan cheese, minced garlic, dried Italian herbs, paprika, and black pepper. Mix these ingredients thoroughly to ensure an even distribution of flavors. The combination of crispy panko, savory cheese, and aromatic herbs will create a delicious crust that clings beautifully to the chicken.
Coat the Chicken
Once your breadcrumb mixture is ready, it’s time to coat the chicken breasts. Start by patting the chicken dry with paper towels; this helps the coating adhere better. In a separate bowl, melt the unsalted butter and brush a generous amount over each chicken breast. Make sure to cover the entire surface to ensure a flavorful crust.
Next, take one butter-coated chicken breast and press it into the breadcrumb mixture, ensuring that it is fully coated. Use your hands to gently press the breadcrumbs onto the chicken, which helps create a thick, even layer. Repeat this process for each chicken breast, and arrange them on the prepared baking sheet.
Tips for Ensuring an Even Bake and Avoiding Sogginess
For the best results, it’s important to avoid overcrowding the baking sheet. Leave space between each piece of chicken to allow hot air to circulate, promoting even cooking and browning. If you have a smaller baking sheet, consider baking the chicken in batches.
To prevent sogginess, it’s crucial to avoid letting the coated chicken sit for too long before baking. The moisture from the butter and the chicken can cause the breadcrumbs to become damp if they sit too long. Aim to bake the chicken immediately after coating it for optimal texture.
Baking Process
Now that the chicken is coated and ready to go, place the baking sheet in the preheated oven. Bake for about 20-25 minutes, depending on the thickness of your chicken breasts. The chicken is done when it reaches an internal temperature of 165°F (75°C) and the crust is a beautiful golden brown.
Baking at a high temperature ensures that the chicken cooks through while allowing the coating to crisp up nicely. Keep an eye on the chicken towards the end of the cooking time to prevent over-browning. If you find that the crust is browning too quickly, you can loosely cover the chicken with aluminum foil for the last few minutes of baking to prevent burning.
As the chicken bakes, the kitchen will be filled with a mouthwatering aroma that will have everyone eagerly anticipating dinner.
Stay tuned for the second part of this article, where we will explore serving suggestions, variations, and tips for making this dish your own!