Introduction
In the ever-evolving world of quick meals, tortilla pockets have carved out a niche as a favored option for busy families and snack enthusiasts alike. These versatile wraps, made from soft tortillas filled with a medley of ingredients, are the epitome of convenience and satisfaction. Their portability makes them ideal for lunch boxes, picnics, or even a last-minute dinner solution. Among the many flavor combinations available, none hold a candle to the classic pairing of ham and cheese. This timeless duo has graced tables around the world, offering a comforting blend of savory and creamy goodness that can please even the pickiest of eaters.
This recipe for Toasted Ham & Cheese Tortilla Pockets is not only quick and easy to prepare but also customizable, making it perfect for a variety of occasions. Whether you’re hosting a casual gathering, planning a family dinner, or simply craving a delicious snack, these tortilla pockets deliver on all fronts. With just a handful of ingredients, you can whip up a batch that tantalizes the taste buds and provides a satisfying experience.
Understanding the Ingredients
To truly master the art of creating mouthwatering tortilla pockets, it’s essential to understand the key ingredients that will bring your dish to life. Each component plays a vital role in achieving the perfect balance of flavor and texture.
High-Quality Tortillas
The foundation of any tortilla pocket is, of course, the tortilla itself. Opting for high-quality tortillas is crucial, as they will determine the overall texture and integrity of your pockets. Flour tortillas are the most common choice due to their soft, pliable nature, which makes them easy to fold and seal. However, you might also consider whole wheat or corn tortillas for a healthier twist. Ensuring that your tortillas are fresh will help prevent tearing and will enhance the final presentation of your meal.
Cheese Selection
When it comes to cheese, the options are virtually endless. However, for the classic ham and cheese experience, two types of cheese stand out: cheddar and mozzarella.
– Cheddar Cheese: Known for its rich, sharp flavor, cheddar adds a depth of taste that complements the saltiness of the ham beautifully. It melts well, creating that desirable gooey texture that everyone loves in a cheese-filled dish.
– Mozzarella Cheese: On the other hand, mozzarella brings a milder flavor and a stretchiness that is simply irresistible. Its creamy consistency makes it a perfect pairing with cheddar, providing a balanced flavor profile and a delightful mouthfeel.
Feel free to experiment with other cheese varieties, such as Swiss or pepper jack, to create your unique blend. The key is to choose cheeses that melt well and enhance the overall flavor of the filling.
Cream Cheese
In addition to your main cheeses, cream cheese plays a pivotal role in this recipe. It adds a luscious creaminess that helps bind the filling together while also enhancing the flavor. Cream cheese is excellent at balancing the saltiness of the ham and the sharpness of the cheddar, providing a smooth texture that elevates the entire dish. Make sure the cream cheese is softened before mixing it with the other ingredients to ensure even distribution.
Dijon Mustard
A lesser-known hero in this recipe is Dijon mustard. This ingredient may seem small, but its tangy flavor can transform your tortilla pockets from ordinary to extraordinary. The mustard adds a zesty kick that cuts through the richness of the cheese and ham, providing a delightful contrast that keeps each bite interesting. Adjust the amount to your preference; whether you prefer a subtle hint or a more pronounced flavor, Dijon mustard can elevate the overall taste profile.
Preparation Steps for Perfect Tortilla Pockets
Now that we understand the ingredients, let’s dive into the preparation steps to create these delectable toasted ham and cheese tortilla pockets.
Preparing the Filling
The first step in crafting your tortilla pockets is preparing the filling. Begin by gathering your ingredients: diced ham, shredded cheddar cheese, shredded mozzarella cheese, softened cream cheese, and Dijon mustard.
1. Mixing the Ingredients: In a mixing bowl, combine the diced ham, shredded cheddar, shredded mozzarella, and softened cream cheese. The cream cheese should be at room temperature for easier mixing. Add in Dijon mustard to taste. Start with a teaspoon, and adjust according to your flavor preference.
2. Thorough Mixing: Use a spatula or spoon to thoroughly mix the ingredients until they are evenly distributed. This step is essential as it ensures that every bite of your tortilla pocket is packed with flavor.
3. Seasoning: Taste the mixture and season as necessary. Depending on your preference for saltiness and tang, you can add a pinch of salt, black pepper, or even a sprinkle of garlic powder for an additional layer of flavor.
Assembling the Tortilla Pockets
Once your filling is prepared, it’s time to assemble the tortilla pockets.
1. Filling the Tortillas: Lay a tortilla flat on a clean surface. Spoon a generous amount of the ham and cheese filling onto one half of the tortilla. Be careful not to overfill, as this can make sealing the pocket difficult.
2. Folding: Carefully fold the tortilla over the filling, creating a half-moon shape. Press down gently to secure the filling inside.
3. Sealing the Edges: To prevent any filling from escaping during cooking, it’s important to seal the edges of the tortilla pocket. You can do this by pressing the edges together with your fingers or using a fork to crimp them, creating a decorative edge while ensuring a tight seal.
Visual Cues for Cooking Readiness
As you prepare your tortilla pockets, keep an eye on visual cues to determine their readiness for cooking. The tortillas should look pliable and slightly warm. If you notice any cracks or tears, it may be worth discarding those tortillas and opting for fresh ones to ensure a successful outcome. The filling should be well mixed and cohesive, allowing for easy assembly without falling apart.
Cooking Techniques for Crispy Tortilla Pockets
With your tortilla pockets assembled and ready, the final step is to cook them to perfection. The cooking method is key to achieving crispy, golden-brown pockets that are sure to impress.
1. Preheating Your Pan: Start by preheating a non-stick skillet or frying pan over medium heat. A well-heated pan will ensure that the tortillas crisp up nicely without burning.
2. Cooking the Pockets: Place the folded tortilla pocket in the skillet, seam side down. Allow it to cook for about 3-4 minutes, or until the bottom is golden brown and crispy.
3. Flipping: Carefully flip the pocket over using a spatula and cook the other side for another 3-4 minutes. You may need to adjust the heat to prevent burning.
4. Check for Doneness: The tortilla pockets are ready when both sides are golden and crispy, and the cheese has melted to create a gooey filling. If you want an extra crispy texture, consider finishing them in the oven for a few minutes after pan frying.
By following these steps, you’ll ensure that your toasted ham and cheese tortilla pockets are not only delicious but also visually appealing and satisfying to eat. Enjoy the process and get ready to savor the delightful flavors of this easy-to-make dish!
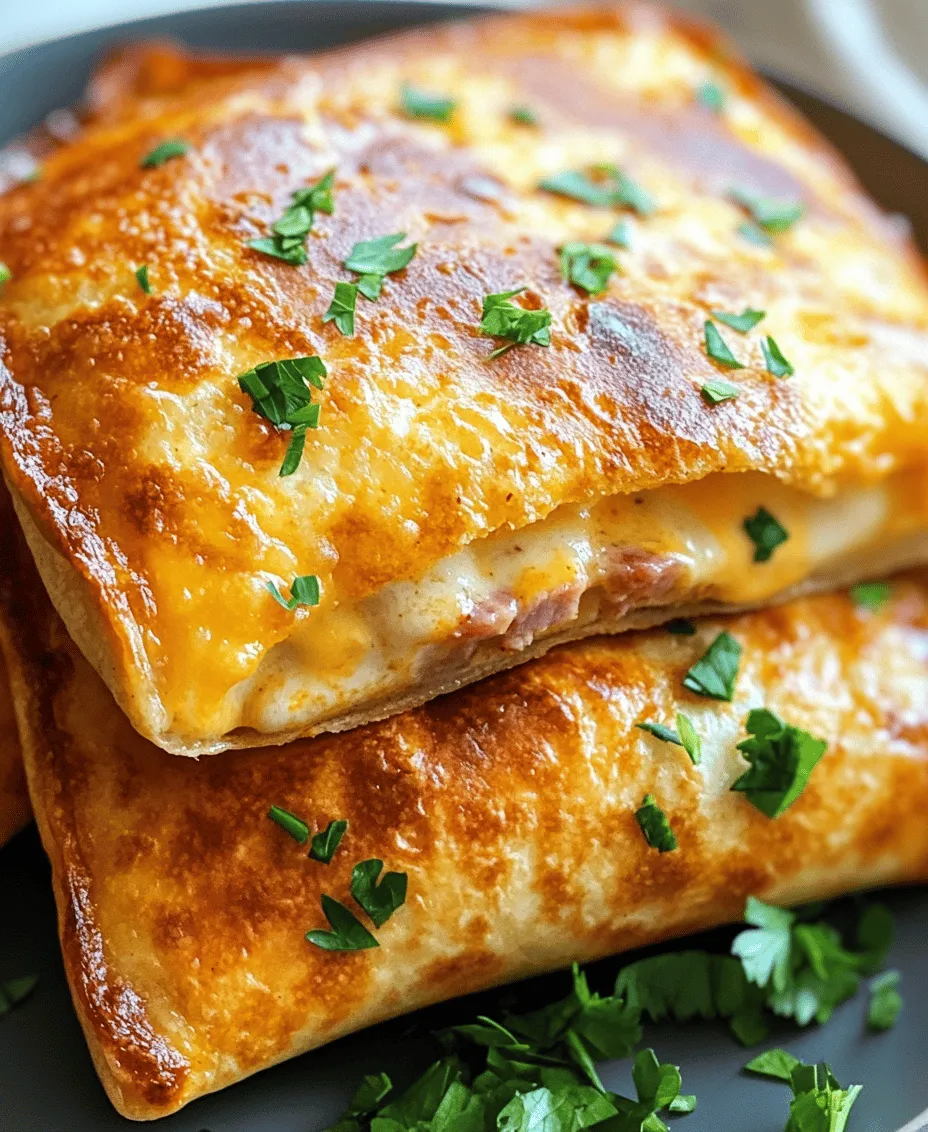
Toasting your Ham & Cheese Tortilla Pockets to perfection is a vital step in creating a delicious snack or meal. Properly heating your skillet and paying attention to cooking techniques will ensure that each pocket is golden brown and crispy on the outside while oozing with melted cheese and savory ham on the inside.
Heating the Skillet Properly
Before you begin toasting your tortilla pockets, it’s essential to preheat your skillet appropriately. Start by placing a non-stick skillet over medium heat. Allow it to warm for about 2-3 minutes. A well-heated skillet is crucial, as it helps achieve that desired crispy texture without burning the tortillas. If you’re unsure whether the skillet is hot enough, you can sprinkle a few drops of water onto the surface. If the water sizzles and evaporates almost immediately, the skillet is ready.
Step-by-Step Guide to Toasting the Pockets
1. Prepare Your Pockets: After assembling your tortilla pockets with ham and cheese, ensure the edges are pressed together firmly to prevent any filling from leaking out during cooking.
2. Add Butter or Oil: To enhance the flavor and crispiness, add a small amount of butter or oil to the skillet. Swirl it around to coat the surface evenly.
3. Place the Pockets in the Skillet: Gently place the tortilla pockets in the skillet, being careful not to overcrowd the pan. Cook in batches if necessary.
4. Toast the First Side: Allow the pockets to cook for about 2-3 minutes, or until the bottom side is golden brown. Avoid moving the pockets around during this time to ensure even browning.
5. Flip the Pockets: Once the first side is crispy, carefully flip each pocket using a spatula. This is where cooking at medium heat is critical. Too high of a heat can char the tortillas before the cheese has a chance to melt.
6. Cook the Other Side: Toast the other side for an additional 2-3 minutes. Keep an eye on them, as they can go from golden brown to burnt quickly.
7. Check for Crispiness: The best way to know when to flip the pockets is by observing their color. If they appear crispy and golden, it’s time to turn them over. You can also gently press down with the spatula to check their firmness.
Serving Suggestions and Pairings
Once your toasted ham and cheese tortilla pockets are ready, consider these serving suggestions to elevate your meal:
– Garnishing: Fresh herbs like parsley or chives can brighten up the dish. Simply chop them finely and sprinkle them over the pockets just before serving for an added flavor dimension.
– Dipping Sauces: Pair your tortilla pockets with a variety of dipping sauces. Salsa adds a refreshing kick, while ranch dressing brings a creamy contrast. You might also consider a homemade garlic aioli or honey mustard for a unique twist.
– Side Dishes: Complement your pockets with light and fresh sides. A simple green salad with a vinaigrette dressing or a platter of crunchy vegetable sticks (carrots, cucumbers, and bell peppers) will provide a nice balance to the richness of the tortilla pockets.
Nutritional Benefits of the Ingredients
The ingredients used in your toasted ham and cheese tortilla pockets are not only delicious but also offer several nutritional benefits:
– Ham and Cheese: Ham is a good source of protein, essential for muscle repair and growth, while cheese provides calcium, vital for bone health. Together, they create a satisfying filling that can keep you energized.
– Herbs and Spices: Incorporating garlic powder and smoked paprika not only enhances the flavor but also adds health benefits. Garlic is known for its immune-boosting properties, while smoked paprika can help in reducing inflammation.
– Portion Sizes and Meal Balance: When considering portion sizes, aim for two pockets per serving, accompanied by a side of salad or veggies. This ensures a balanced meal that combines protein, healthy fats, and fiber.
Variations and Customization Options
One of the best aspects of making ham and cheese tortilla pockets is the versatility they offer. Here are some ideas to customize your pockets:
– Alternative Fillings: Instead of ham, try turkey, chicken, or even a variety of roasted vegetables. You can mix and match cheeses too, using sharp cheddar, mozzarella, or pepper jack for a spicy kick.
– Add Extra Flavors: For those who enjoy a bit of heat, consider adding sliced jalapeños or sautéed onions inside the pockets. These additions can enhance the overall flavor profile and provide extra texture.
– Dietary Restrictions: If you or your guests have dietary restrictions, it’s easy to make gluten-free and dairy-free variations. Use gluten-free tortillas and substitute dairy cheese with plant-based alternatives. You can also create a fully vegetarian version by omitting the meat and adding more vegetables or plant-based proteins.
Conclusion
Toasted ham and cheese tortilla pockets are not only easy to prepare but also incredibly versatile. Whether you prefer classic flavors or are looking to experiment with new fillings and dips, these pockets can be tailored to suit any palate. Their satisfying crunch and gooey interior make them a comforting meal that can be enjoyed by the whole family. Encourage yourself to explore different flavor combinations, and remember that homemade meals provide a sense of satisfaction that takeout simply cannot match. So, roll up your sleeves, get creative in the kitchen, and enjoy the delightful experience of crafting your own toasted tortilla pockets!