Quesadilla Cones: A Fun Twist on a Classic Favorite

WANT TO SAVE THIS RECIPE?

Introduction

If you’re on the hunt for a unique and exciting recipe that combines the beloved flavors of traditional quesadillas with a playful presentation, look no further than Quesadilla Cones. This innovative dish takes the classic quesadilla and transforms it into a cone-shaped delight, perfect for both casual dinners and festive gatherings. Whether you’re hosting a party, enjoying a family meal, or simply craving something different, Quesadilla Cones stand out with their fun format and versatile filling options.

One of the best aspects of Quesadilla Cones is their adaptability to various dietary preferences. Whether you’re a meat lover seeking chicken or beef, or a vegetarian looking for hearty bean and vegetable options, this recipe has you covered. The appeal of Quesadilla Cones lies not only in their flavors but also in their ability to cater to diverse tastes, making them a hit with everyone from kids to adults.

What are Quesadilla Cones?

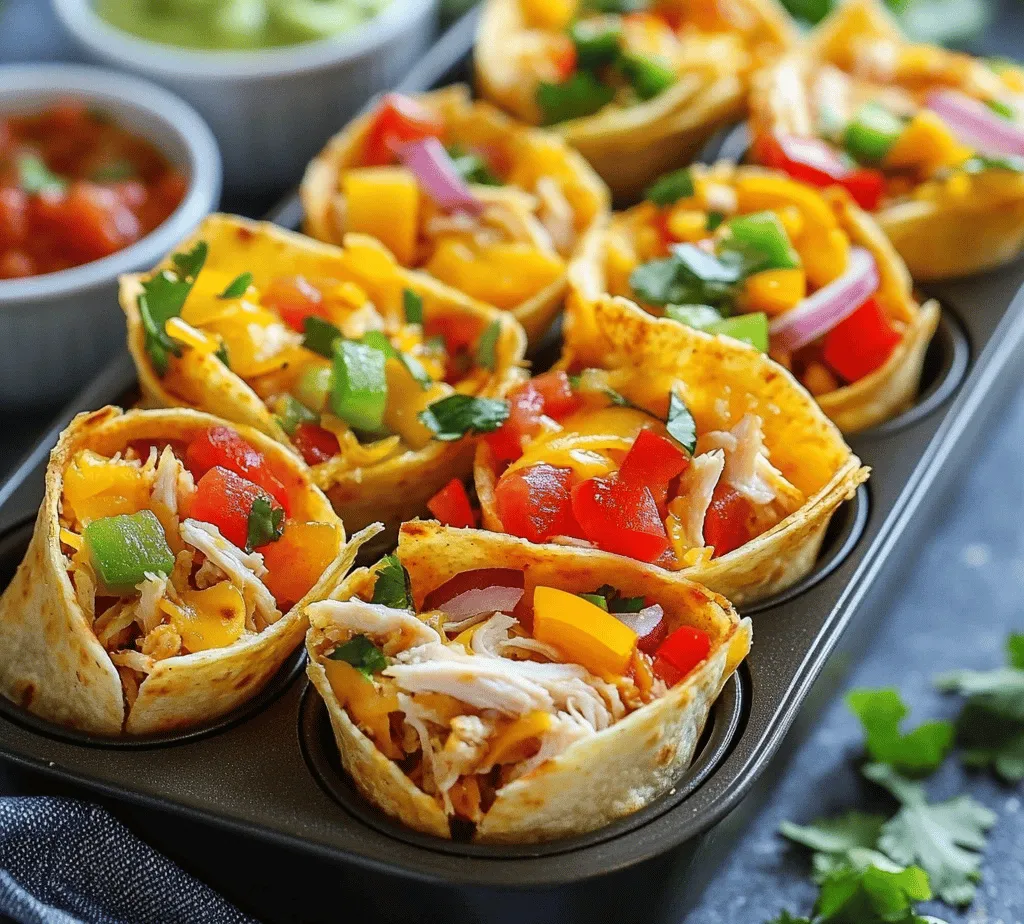
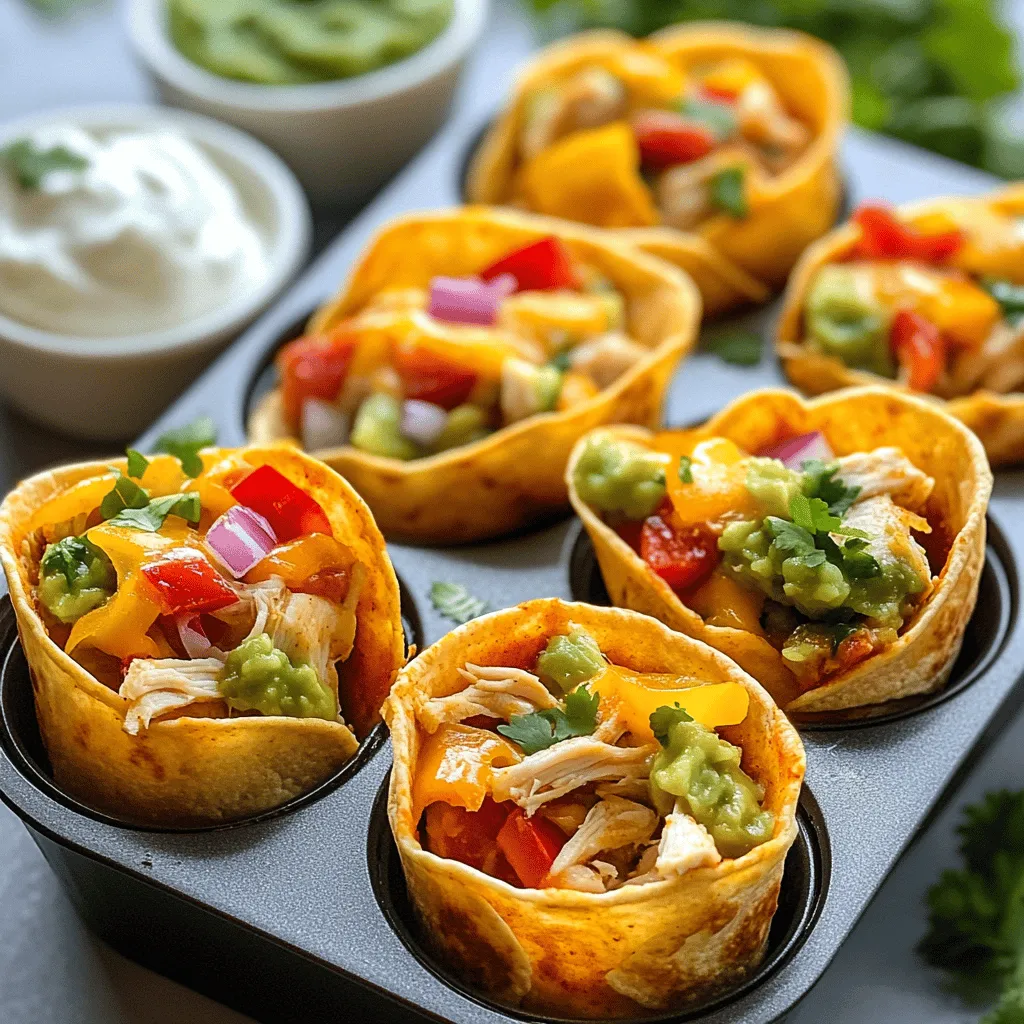
Quesadilla Cones are essentially quesadillas shaped like cones, filled with a delicious combination of cheeses, proteins, and vegetables. This modern twist offers a new way to enjoy a classic dish, allowing for easy handling and a fun presentation that’s sure to impress guests. Imagine biting into a crispy tortilla cone packed with gooey melted cheese, savory meats, fresh veggies, and a touch of spice – it’s a culinary experience that elevates the ordinary quesadilla to extraordinary heights.

The origins of quesadillas can be traced back to Mexico, where they have been a staple of the cuisine for centuries. Traditionally made with corn tortillas and filled with cheese, quesadillas have evolved over time to include a variety of fillings, from meats to vegetables. The introduction of flour tortillas and creative fillings in modern-day recipes showcases the versatility of this beloved dish. Quesadilla Cones represent a contemporary take on this classic, marrying tradition with innovation in a way that appeals to today’s food enthusiasts.

Ingredients Overview

Creating Quesadilla Cones requires a thoughtful selection of ingredients that contribute to both flavor and texture. Here’s a detailed breakdown of what you’ll need for this delicious dish:

Flour tortillas

Flour tortillas are crucial for maintaining the structural integrity of the cones. Their pliability allows them to be easily molded into a cone shape without cracking or breaking, making them the perfect choice for this recipe. A good quality flour tortilla will provide a soft yet sturdy base that holds all the delicious fillings together.

Cheddar and Monterey Jack cheese

For the ultimate cheese experience, a combination of Cheddar and Monterey Jack cheese works wonders. Cheddar adds a sharp, tangy flavor, while Monterey Jack brings a mild, creamy element that melts beautifully. Together, they create a rich, gooey filling that’s irresistible.

Protein options

You have the flexibility to choose your preferred protein for the filling. Options include grilled chicken, seasoned ground beef, or even black beans for a vegetarian version. Each choice brings its nutritional benefits and flavor variations, allowing you to customize the quesadilla cones to suit your taste.

Vegetables

Incorporating colorful vegetables such as bell peppers, red onions, and corn not only enhances the visual appeal of your Quesadilla Cones but also adds nutritional value and texture. These ingredients provide a fresh crunch that complements the richness of the cheese and proteins.

Taco seasoning

The magic of Quesadilla Cones lies in the seasoning. Taco seasoning, a blend of spices typically including chili powder, cumin, garlic powder, and paprika, elevates the flavor profile. It infuses the filling with warmth and depth, ensuring every bite is packed with flavor.

Optional toppings

To take your Quesadilla Cones to the next level, consider adding optional toppings such as sour cream, salsa, guacamole, or fresh cilantro. These toppings not only enhance the flavor but also add freshness and a touch of color to your dish.

Preparation Steps

Now that you have a grasp of the ingredients needed for your Quesadilla Cones, let’s dive into the preparation process. Here’s a step-by-step guide to help you create these delightful treats:

Preheating the Oven/Air Fryer

Before you start assembling your Quesadilla Cones, it’s essential to preheat your oven or air fryer. This step is crucial for achieving that perfect crispiness on the outside while ensuring the cheese melts beautifully inside. Aim for a temperature of around 375°F (190°C) for optimal cooking results.

Preparing the Filling

1. Cook your protein: Whether you’re using chicken, beef, or beans, start by cooking your protein of choice. If you’re using chicken, grill or sauté it until it’s cooked through, then shred it. For ground beef, brown it in a skillet, breaking it apart as it cooks. If you choose beans, simply drain and rinse them before using.

2. Add the vegetables: Once your protein is ready, it’s time to add the vegetables. Dice the bell peppers and red onions, and sauté them in a pan until they are tender. Add corn for an extra layer of sweetness and color. Mixing these ingredients with your cooked protein will create a well-rounded filling that bursts with flavor.

3. Season your mixture: To elevate the taste of your filling, sprinkle in the taco seasoning. This step is where your filling gets its signature flavor. Stir well to ensure that all the ingredients are evenly coated with the seasoning, allowing the flavors to meld together.

4. Mix in the cheese: Finally, add shredded Cheddar and Monterey Jack cheese to your filling mixture. As it warms, the cheese will begin to melt, binding all the ingredients together. Stir until the cheese is well incorporated, and set aside the filling to cool slightly before assembly.

With your filling prepared and your cooking appliance preheated, you’re now ready to assemble your Quesadilla Cones. The next steps will guide you through the fun and creative process of shaping and filling the tortillas, resulting in a dish that’s not only delicious but also visually stunning. Stay tuned for more details on assembling and cooking the cones for that perfect finish.

If you're on the hunt for a unique and exciting recipe that combines the beloved flavors of traditional quesadillas with a playful presentation, look no further than <strong>Quesadilla Cones</strong>. This innovative dish takes the classic quesadilla and transforms it into a cone-shaped delight, perfect for both casual dinners and festive gatherings. Whether you’re hosting a party, enjoying a family meal, or simply craving something different, Quesadilla Cones stand out with their fun format and versatile filling options.” /></p>
</p>
<h3>Shaping Tortillas Into Cones: Tips for Achieving the Perfect Cone Shape</h3>
</p>
<p>Creating the ideal cone shape for your quesadilla cones is crucial for both presentation and functionality. To achieve this, start with warm tortillas, as they are more pliable and easier to mold. When using corn or flour tortillas, consider slightly warming them in a skillet or microwave for a few seconds. This not only makes them flexible but also enhances their flavor.</p>
</p>
<p>When shaping the cones, take each tortilla and gently fold it in half without pressing too hard, as you want it to remain intact. Carefully roll the tortilla into a cone shape, ensuring that the bottom tip is pointed to hold in the filling securely. To keep the cone shape, you can place it in a muffin tin or a cone holder to help maintain its structure while you prepare the rest. If you find that the cones are not holding their shape well, you can use toothpicks or small skewers to secure the edges temporarily until they are baked or air-fried.</p>
</p>
<h3>Filling the Cones: Guidelines for Packing the Mixture Effectively</h3>
</p>
<p>Filling your quesadilla cones is where you can truly let your creativity shine. Start by preparing your filling mixture, which can include a variety of ingredients such as cheese, cooked meats, beans, vegetables, and spices. For a classic quesadilla flavor, a combination of shredded cheese (like Monterey Jack or cheddar) and cooked chicken or beef works beautifully.</p>
</p>
<p>When packing the filling into the cones, be generous but careful not to overstuff them. Overfilling can lead to spillage during cooking. Aim to fill each cone about three-quarters full, allowing enough space at the top for the tortilla to fold over securely. Use a spoon or small spatula to gently pack the mixture down, ensuring an even distribution of ingredients.</p>
</p>
<h3>Securing the Cones: Importance of Preventing Spillage During Cooking</h3>
</p>
<p>To prevent any unwelcome spillage while your quesadilla cones are cooking, securing them properly is essential. If you’ve opted to use toothpicks or skewers for shape, ensure they are not protruding excessively, as this can be a safety hazard. For added security, you can brush the edges of the tortilla with a bit of water or egg wash to help seal them together. This will help the edges stick and hold the filling inside during the cooking process.</p>
</p>
<p>Once your cones are filled and secured, place them upright in your chosen cooking method, whether it be a muffin tin for baking or an air fryer basket. This upright positioning allows for even cooking and helps maintain the integrity of the cone shape.</p>
</p>
<h3>Coating With Oil: Explanation of How This Affects Crispiness and Color</h3>
</p>
<p>Coating your quesadilla cones with a light layer of oil is a simple yet effective step that significantly impacts the final result. A light brushing of oil helps achieve a golden-brown color while enhancing the crispiness of the tortilla. You can use vegetable oil, olive oil, or even cooking spray for this purpose.</p>
</p>
<p>To coat the cones, use a pastry brush to apply a thin layer of oil to the outside of each cone. This will not only help with browning but will also create a barrier that prevents the tortillas from becoming soggy, especially if you’ve used moist fillings. Remember, the goal is to achieve that perfect crunch while maintaining the delicious flavors of the fillings within.</p>
</p>
<h3>Cooking Methods: Baking vs. Air Frying</h3>
</p>
<p>When it comes to cooking your quesadilla cones, you have two popular methods to choose from: baking and air frying. Both methods have their advantages and can yield delicious results, but they differ in techniques and outcomes.</p>
</p>
<h4>Baking: Pros and Cons, Suggested Equipment</h4>
</p>
<p>Baking is a traditional method that allows for even cooking and is great for larger batches. To bake your quesadilla cones, preheat your oven to 375°F (190°C). Place the filled and secured cones in a muffin tin to help them stand upright. This method typically takes about 15-20 minutes. The pros of baking include the ability to cook a larger quantity at once and the ease of preparation. On the downside, baking may take longer than air frying, and you might need to watch for an even crispiness.</p>
</p>
<h4>Air Frying: Benefits of Using an Air Fryer for Healthier Cooking</h4>
</p>
<p>Air frying is a fantastic alternative that offers a quicker cooking time and a healthier approach. Preheat the air fryer to 350°F (175°C), arranging the cones in a single layer without overcrowding. Cook for approximately 10-12 minutes, flipping halfway through to ensure even cooking. The air fryer circulates hot air around the cones, resulting in a crispy exterior without needing excessive oil. This method is ideal for those looking to enjoy a healthier version of their quesadilla cones while still achieving that satisfying crunch.</p>
</p>
<h4>Cooking Times and Visual Cues for Doneness</h4>
</p>
<p>Regardless of the method you choose, keep an eye on the cones as they cook. You’ll know they are done when the tortillas turn golden brown, and the cheese inside is melted and bubbly. If you’re using a baking method, you may want to rotate the muffin tin halfway through to promote even cooking. In the air fryer, flipping the cones is essential to ensure that all sides reach that perfect crispiness.</p>
</p>
<h3>Serving Suggestions</h3>
</p>
<p>Quesadilla cones make for a visually stunning and delicious party snack or meal option. To present them appealingly, consider arranging the cones upright in a decorative serving dish or on a platter. You can also place them in a tall glass or jar to add height and interest to your table setting.</p>
</p>
<h4>Ideal Side Dishes and Beverages That Pair Well</h4>
</p>
<p>As for side dishes, fresh guacamole, tangy salsa, or a zesty corn salad complement the flavors of the quesadilla cones beautifully. A refreshing side of Mexican street corn (elote) can elevate your meal, while a simple green salad with a citrus vinaigrette adds a light touch.</p>
</p>
<p>When it comes to beverages, consider serving classic Mexican drinks like horchata or agua fresca. If you prefer alcoholic options, margaritas or a light beer can balance the richness of the quesadilla cones perfectly.</p>
</p>
<h4>Exploration of Different Dipping Sauces and Their Flavor Profiles</h4>
</p>
<p>Dipping sauces are an essential component of enjoying quesadilla cones. Sour cream adds a creamy tang that beautifully complements the spices in the filling. Guacamole offers a rich and creamy texture with the addition of fresh avocados and lime juice. Salsa adds a fresh, zesty kick, and you can experiment with different types—such as pico de gallo, roasted tomato salsa, or even fruit salsa for a sweet twist.</p>
</p>
<p>For those who enjoy a bit of heat, consider offering a spicy chipotle sauce or a jalapeño crema. Each sauce brings its unique flavor profile, allowing your guests to customize their experience.</p>
</p>
<h3>Nutritional Information</h3>
</p>
<p>Understanding the nutritional value of your quesadilla cones is essential, especially if you’re conscious about healthy eating. A typical serving of quesadilla cones made with standard ingredients may contain approximately:</p>
</p>
<p>– <strong>Calories</strong>: 300-400 per cone, depending on the filling.</p>
<p>– <strong>Protein</strong>: 10-15 grams, primarily from cheese and meats.</p>
<p>– <strong>Fats</strong>: 15-20 grams, influenced by the type of cheese and oil used.</p>
<p>– <strong>Carbohydrates</strong>: 30-40 grams from the tortillas.</p>
</p>
<h4>Suggestions for Making the Dish Healthier</h4>
</p>
<p>To make your quesadilla cones healthier, consider opting for whole wheat tortillas, which offer more fiber and nutrients. You can also increase the vegetable content by adding diced bell peppers, zucchini, or spinach to your filling. Additionally, using low-fat cheese or a smaller amount of cheese can help reduce calories while still providing flavor.</p>
</p>
<h3>Conclusion</h3>
</p>
<p>Quesadilla cones are a delightful and versatile dish that brings a fun twist to classic Mexican flavors. Their unique shape not only makes them visually appealing but also allows for a variety of fillings, giving you the freedom to express your culinary creativity. Whether you choose to bake or air fry them, the satisfying crunch and gooey interior will surely impress your family and friends.</p>
</p>
<p>Encouraging you to experiment with different ingredients and flavors, these quesadilla cones can easily be tailored to suit your tastes. So gather your loved ones, whip up a batch of these scrumptious cones, and enjoy the joy of sharing delicious food together.</p>
</div>

If you're on the hunt for a unique and exciting recipe that combines the beloved flavors of traditional quesadillas with a playful presentation, look no further than Quesadilla Cones. This innovative dish takes the classic quesadilla and transforms it into a cone-shaped delight, perfect for both casual dinners and festive gatherings. Whether you're hosting a party, enjoying a family meal, or simply craving something different, Quesadilla Cones stand out with their fun format and versatile filling options.

Quesadilla Cones (Baked or Air Fried!)

Discover the fun and delicious world of Quesadilla Cones! This creative twist on the classic quesadilla offers a delightful cone-shaped treat that's perfect for parties and family dinners. Filled with gooey cheese, flavorful proteins, and colorful veggies, these cones cater to every palate. Bake or air fry them for a crispy finish and serve with your favorite dipping sauces. Get ready to impress your guests! #QuesadillaCones #Foodie #Yummy #MexicanFood #CulinaryCreativity #RecipeIdeas

Ingredients
  

4 large flour tortillas

1 cup shredded cheddar cheese

1 cup shredded Monterey Jack cheese

1 cup cooked chicken, shredded (or cooked beef, beans for vegetarian option)

1/2 cup bell peppers, diced

1/2 cup red onion, finely diced

1/2 cup corn kernels (fresh or frozen)

1 tablespoon taco seasoning

Salt and pepper to taste

Cooking spray or olive oil

Optional toppings: sour cream, guacamole, salsa, chopped cilantro

Instructions
 

Preheat Oven/Air Fryer: If using an oven, preheat it to 400°F (200°C). For an air fryer, preheat at the same temperature.

    Prepare Filling: In a large mixing bowl, combine the shredded chicken, cheddar cheese, Monterey Jack cheese, bell peppers, red onion, corn, taco seasoning, salt, and pepper. Mix until all ingredients are well incorporated.

      Shape Tortillas: To form the cones, you can roll the tortillas around a cone-shaped object (like a metal cone mold) or simply use aluminum foil to create cone shapes. If using foil, shape a 12-inch square into a cone and wrap tightly.

        Fill Tortilla Cones: Generously fill each tortilla cone with the cheesy chicken and veggies mixture. Pack it tightly but leave a little space at the top.

          Secure the Cones: If needed, use toothpicks to secure the opening of each cone so the filling does not fall out during baking or air frying.

            Coat with Oil: Lightly spray the outside of each cone with cooking spray or brush with olive oil. This helps them become golden and crispy.

              Bake or Air Fry:

                - Baking: Place the cones upright in a muffin tin to keep them stable. Bake for 15-20 minutes, or until the cheese is melted and the tortillas are crispy.

                  - Air Frying: Arrange the cones in the air fryer basket vertically and cook for 10-12 minutes, checking halfway through for crispiness and doneness.

                    Serve: Remove the cones from the oven or air fryer and let them cool slightly. Serve warm with a side of sour cream, guacamole, salsa, and fresh cilantro.

                      Prep Time, Total Time, Servings: 20 minutes | 35 minutes | 4 servings

                        WANT TO SAVE THIS RECIPE?

                        Leave a Comment

                        Recipe Rating