
Are you ready to indulge in a scrumptious dessert that’s both fun and delicious? The OREO DIRT CAKE is a delightful layered chocolate treat that will impress everyone. With creamy layers and crunchy Oreo crumbs, this dessert captures the spirit of childhood fun. I’ll guide you step-by-step through this easy recipe, turning your kitchen into a candy land. Let’s dig in and create a dessert that’s as delightful as it is playful!
Ingredients
Detailed List of Ingredients
– 1 package (14.3 oz) Oreo cookies
– 1 cup unsalted butter, softened
– 1 cup powdered sugar
– 1 package (8 oz) cream cheese, softened
– 1 package (3.9 oz) instant chocolate pudding mix
– 2 cups milk
– 1 tub (8 oz) whipped topping (Cool Whip)
– Gummy worms (for decoration)
– Fresh mint leaves (optional, for garnish)
When making Oreo Dirt Cake, these ingredients create a rich, creamy treat. The Oreos provide a crunchy texture, while the cream cheese and whipped topping add a silky smoothness. The chocolate pudding mix delivers a deep chocolate flavor that pairs perfectly with the sweet cream.
I love using fresh mint leaves as a garnish. They add a nice touch and a burst of color. Plus, kids enjoy placing gummy worms on top for a fun presentation. Just imagine the smiles when you serve this fun dessert!
Make sure you have everything ready before starting. It helps the process go smoothly. Each ingredient plays a key role in making this cake a delightful experience.
Step-by-Step Instructions
Crushing the Oreos
– Method 1: Food processor
Place the Oreo cookies in a food processor. Pulse them until they turn into fine crumbs. This method is quick and easy.
– Method 2: Rolling pin in a resealable bag
Seal the Oreo cookies in a resealable bag. Use a rolling pin to crush them until you have fine crumbs. This method is fun and makes less mess.
Preparing the Cream Mixture
– Mixing butter and cream cheese
In a large bowl, beat the softened butter and cream cheese together. Mix until the blend is smooth and creamy. This step gives the cake a rich flavor.
– Adding powdered sugar
Gradually add in the powdered sugar. Mix until it is fully combined. This makes the cream mixture sweet and fluffy.
Making the Pudding Mix
– Whisking instant chocolate pudding and milk
In another bowl, whisk the instant chocolate pudding mix with milk. Stir until it blends well.
– Allowing to thicken
Let the mixture sit for about five minutes. It will thicken up nicely, which adds to the cake’s texture.
Combining the Mixtures
– Folding the pudding into the cream mixture
Gently fold the pudding mixture into the butter and cream cheese blend. Be careful not to deflate the mixture.
– Incorporating whipped topping
Now, fold in the whipped topping. This will make the mixture fluffy and light.
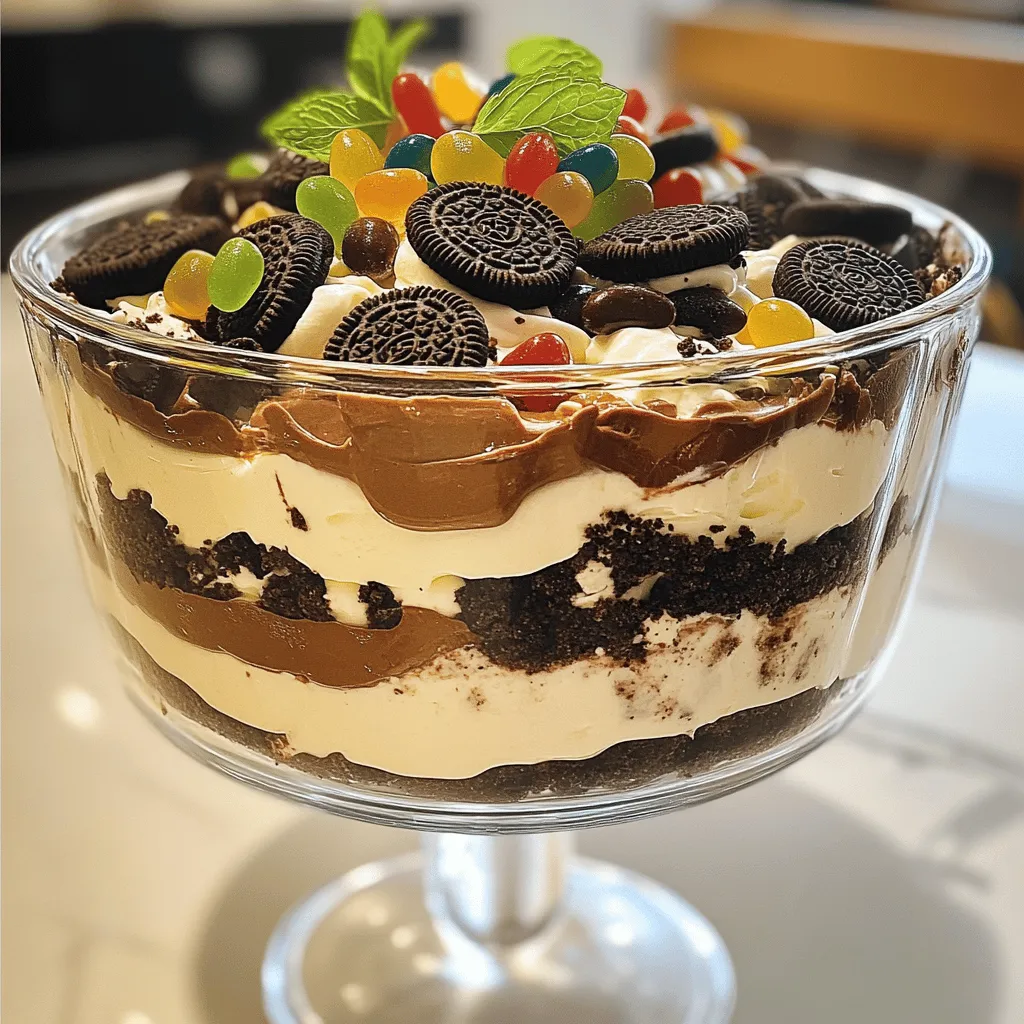
Layering the Cake
– Starting with Oreo crumbs
In a trifle dish or a large bowl, start with a layer of the reserved crushed Oreos. This will be your cake’s first layer.
– Alternate layers of cream and Oreos
Add a layer of the cream mixture, followed by another layer of crushed Oreos. Repeat this until all your ingredients are used. Finish with a layer of crushed Oreos on top.
Decorating and Serving
– Arranging gummy worms
Top the cake with gummy worms. Let some hang over the edges for a fun dirt look.
– Optional garnish with mint leaves
If you want to add color, scatter fresh mint leaves around the cake. This adds a fresh touch.
Chilling Time
– Importance of refrigeration
Refrigeration is key for this cake. It helps the flavors mix and the layers set properly.
– Recommended chilling duration
Chill the cake for at least four hours, but overnight is best. This waiting makes every bite even better.
Tips & Tricks
Ensuring Best Texture and Taste
To make Oreo Dirt Cake shine, use high-quality ingredients. Start with real Oreos, not generic brands. This choice impacts flavor and crunch. Softened butter and cream cheese blend better, giving a smooth mix. Chilling is also key. Refrigerate for at least four hours. Overnight chilling is best to set layers and deepen flavors.
Common Mistakes to Avoid
Many people overmix the cream mixture. This adds air and makes it fluffy, but too much can ruin the texture. Mix just until smooth. Another common mistake is skipping the chilling step. Without proper chilling, the layers won’t set. The cake will be runny instead of firm and layered.
Presentation Enhancements
Get creative with your cake’s look! Use gummy worms to add a fun touch. Let some dangle over the edges for a dirt effect. You can also use fresh mint leaves for color. As for serving dishes, a trifle dish works great. It shows off the layers beautifully. Individual jars also make for cute servings at parties!
Variations
Flavor Variations
You can switch up the flavors of your Oreo dirt cake to keep things fun. Try using different Oreo flavors like peanut butter or lemon. These variations add a new twist to the classic recipe. You can also change the pudding flavor. Instead of chocolate, consider vanilla or white chocolate for a lighter taste. Each choice brings a unique flavor that can surprise your taste buds.
Dietary Modifications
If you have dietary needs, there are options for you. For a gluten-free version, look for gluten-free Oreo cookies. They taste just as great and fit right into your dirt cake. If dairy is a concern, you can find dairy-free cream cheese and whipped topping. These swaps do not compromise flavor and let everyone enjoy this treat.
Unique Serving Ideas
Serving Oreo dirt cake can be just as fun as making it. One idea is to use small jars for individual servings. This way, each person has their own treat. You can also create layered parfaits. Alternate layers of the cream mixture and Oreo crumbs in a tall glass. This adds a beautiful touch and showcases the layers. Both ideas make the dessert more exciting and easy to serve.
Storage Info
Best Practices for Storing Oreo Dirt Cake
To keep your Oreo Dirt Cake fresh, use an airtight container. This prevents air from drying it out. A glass dish with a lid works well. If you do not have one, plastic wrap can also work. Wrap the cake tightly to keep it safe.
Store the cake in the refrigerator. This helps it stay moist and tasty. The cool temperature keeps the cream cheese and whipped topping fresh.
Shelf Life
When stored properly, Oreo Dirt Cake lasts about 3 to 5 days in the fridge. You can also freeze it if you want to keep it longer. Just make sure to wrap it well. Use plastic wrap, then foil, to hold in flavor.
If you choose to freeze the cake, it can last for about 2 to 3 months. However, the texture may change a bit after freezing.
Thawing Instructions
When you are ready to eat your frozen Oreo Dirt Cake, remove it from the freezer. Place it in the fridge to thaw overnight. This keeps it cool and helps the layers stay intact.
Expect a slight change in texture when thawed. The whipped topping may not be as fluffy, but it will still taste great. Enjoy your cake after it’s thawed for the best flavor!
FAQs
How long does it take to make Oreo Dirt Cake?
Making Oreo Dirt Cake takes about 20 minutes to prepare. After that, you need to chill it for at least 4 hours. For the best taste, let it chill overnight. This helps the flavors mix well and gives it a great texture.
Can I make Oreo Dirt Cake ahead of time?
Yes, you can make it ahead! It’s perfect for parties or gatherings. Just prepare it the day before and store it in the fridge. This way, you save time and still serve a tasty treat.
What can I substitute for cream cheese?
If you want a different taste, you can use Greek yogurt. This will give a tangy flavor. Another option is mascarpone cheese for a richer taste. Both alternatives work well in this recipe.
Is Oreo Dirt Cake suitable for parties?
Absolutely! Oreo Dirt Cake is a crowd-pleaser. Its layers look great in a trifle dish. Kids and adults love it. Plus, you can decorate it with gummy worms, which adds fun to the treat.
Can I use sugar substitutes?
You can use sugar substitutes if you want a lower-sugar option. Sweeteners like stevia or erythritol work well. Just make sure to follow the package instructions for the right amount to use.
How should I store leftover Oreo Dirt Cake?
Store any leftovers in an airtight container. It keeps well in the fridge for about 3-4 days. If you want to save it longer, you can freeze it. Just wrap it well to keep it fresh.
In this blog post, we explored the fun and easy steps to make Oreo Dirt Cake. From crushing Oreos to layering the cream mixture, each step is simple and rewarding. Remember, chilling is key for that perfect texture. You can also get creative with flavors and decorations. Whether for a party or a family treat, this dessert is sure to please. Enjoy making your delicious Oreo Dirt Cake, and don’t forget to share it with friends!


