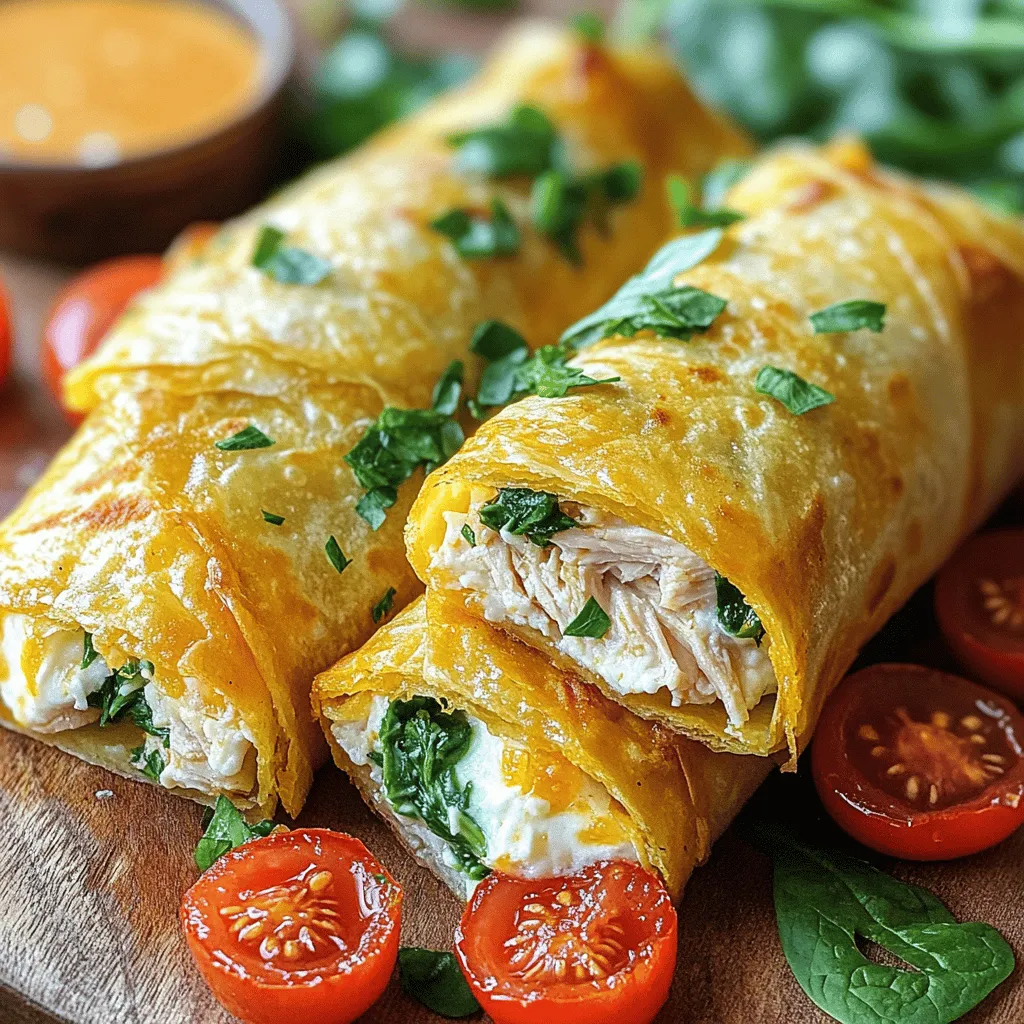
Looking for a tasty meal that’s quick and easy? Cheesy Garlic Chicken Wraps are what you need! This simple dish is packed with flavor, and I can show you how to make it in just a few steps. Whether you’re cooking for friends or just for yourself, these wraps are sure to impress. Let’s dive into the tasty details and get cooking!
Ingredients
List of Essential Ingredients
To make Cheesy Garlic Chicken Wraps, gather these key items:
– 2 cups cooked chicken, shredded
– 1 cup cream cheese, softened
– 1 cup shredded mozzarella cheese
– 2 cloves garlic, minced
– 1 teaspoon garlic powder
– ½ teaspoon paprika
– Salt and pepper to taste
– 4 large flour tortillas
– 1 cup spinach leaves
– ½ cup cherry tomatoes, halved
– 2 tablespoons olive oil
– Fresh parsley for garnish
Optional Ingredients for Customization
You can tweak this recipe to suit your taste. Here are some fun options:
– Add diced bell peppers for crunch.
– Use different cheeses like cheddar or gouda.
– Spice it up with jalapeños or hot sauce.
– Swap spinach for arugula or kale.
Tips for Choosing Fresh Ingredients
Fresh ingredients make your wraps taste better. Here are some tips:
– Look for chicken that is moist and cooked properly.
– Choose cream cheese that is smooth and creamy.
– Select mozzarella cheese that is fresh and has a good stretch.
– Pick firm tomatoes with a bright color.
– For spinach, choose vibrant green leaves without wilting.
– Always check the expiration date on dairy products.
Using these tips will help you create tasty Cheesy Garlic Chicken Wraps.Enjoy your cooking!
Step-by-Step Instructions
Preparation of Chicken and Cheese Mixture
To start, gather your cooked chicken, cream cheese, mozzarella cheese, garlic, and spices. In a large bowl, mix the shredded chicken, cream cheese, and mozzarella cheese. Add the minced garlic, garlic powder, paprika, salt, and pepper. Stir everything until it becomes smooth and creamy. This mixture is the heart of your wraps. It brings rich flavor and a nice texture.
Cooking the Spinach
Next, heat a skillet over medium heat and pour in the olive oil. When it gets hot, add the spinach leaves. Sauté them for about 2 minutes. You want them to wilt but not lose their bright green color. Once done, take the skillet off the heat. Let the spinach cool for a minute, then mix it into your chicken and cheese blend. Don’t forget to add the halved cherry tomatoes. This adds a fresh burst of flavor.
Assembling and Cooking the Wraps
Now, grab a large flour tortilla and lay it flat on a clean surface. Spoon a generous amount of the cheesy chicken mixture into the center. Fold the sides of the tortilla over the filling. Then, roll the bottom up tightly to create your wrap. Repeat this with the rest of the tortillas and filling.
Wipe the skillet clean and return it to medium heat. Place each wrap seam side down in the skillet. Cook for 2 to 3 minutes on each side until they turn golden brown and crispy. Once cooked, take them out and let them cool for a minute before slicing them diagonally. Garnish with fresh parsley for a nice touch.Enjoy your Cheesy Garlic Chicken Wraps!
Tips & Tricks
How to Achieve the Perfect Wrap Texture
To get a great wrap texture, use flour tortillas. They are soft and easy to roll. Warm the tortillas in a pan for a few seconds. This makes them more flexible. Don’t overfill your wrap; this helps it stay closed. Make sure to fold the sides in before rolling. This keeps the filling inside. Cook the wraps seam side down in a hot skillet. This helps seal the edges and gives a nice crisp.
Suggested Dipping Sauces
Dipping sauces make your wraps even better. Try ranch for a cool and creamy taste. Honey mustard adds a sweet kick. You could also use a spicy salsa for some heat. A garlic aioli pairs nicely too. Each sauce adds a fun twist to your meal. Set out a few options for your family or guests to try.
Common Mistakes to Avoid
Avoid overcooking the chicken. It should be just right—tender and juicy. Watch the heat when cooking the wraps. Too high can burn them quickly. Make sure to mix the filling well. If it’s lumpy, the wrap won’t taste as good. Don’t rush the cooling process for spinach. Let it cool before adding it to the filling. This keeps your wrap from getting soggy. Following these tips will help you make the best cheesy garlic chicken wraps.

Variations
Vegetarian Version of Cheesy Garlic Wraps
You can easily make a vegetarian version of these cheesy garlic wraps. Just swap the chicken for hearty vegetables. Use cooked mushrooms, bell peppers, or zucchini. They add great flavor and texture. Mix these veggies with cream cheese and mozzarella. This blend stays creamy and cheesy, just like the original.
Spicy Garlic Chicken Wraps
If you like heat, try spicy garlic chicken wraps. Start with the base recipe. Add chopped jalapeños or crushed red pepper flakes to the chicken and cheese mix. This extra spice gives the wrap a nice kick. You can also drizzle some hot sauce on top before wrapping. It’s a great way to enjoy a bold flavor.
Other Fillings You Can Add
Feel free to get creative with your fillings. You can add diced avocado for creaminess. Fresh herbs like cilantro or basil bring a fresh taste. Try adding roasted corn or black beans for a fun twist. These ingredients can change the taste and texture. Experimenting keeps the wraps exciting and new.
Storage Info
How to Store Leftover Wraps
To keep your cheesy garlic chicken wraps fresh, place them in an airtight container. Make sure to cool the wraps first. Store them in the fridge for up to three days. If you have more wraps, you can also wrap them in plastic wrap and then place them in a container. This method helps keep them moist and tasty.
Reheating Instructions
When you’re ready to enjoy your leftovers, you can reheat them easily. Heat a skillet over medium heat. Place the wrap in the skillet and cook for about 2-3 minutes on each side. This will help make them warm and crispy again. You can also use a microwave. Just cover the wrap with a paper towel and heat it for about 30 seconds. Check to see if it’s warm enough; if not, heat it for a bit longer.
Freezing and Thawing Tips
If you want to save your wraps for later, freezing is a great option. Wrap each one tightly in plastic wrap. Then place them in a freezer bag. They can last up to three months in the freezer. When you’re ready to eat, take them out and let them thaw in the fridge overnight. After that, use the reheating instructions to warm them up. This way, you have a quick meal ready to go!
FAQs
What can I substitute for cream cheese?
You can use Greek yogurt or ricotta cheese. Both options add creaminess without the fat of cream cheese. Greek yogurt brings a tangy flavor. Ricotta cheese offers a lighter texture. You can also use low-fat cream cheese if you want a closer match.
Can I make this recipe ahead of time?
Yes, you can prepare the filling a day ahead. Store it in the fridge to keep it fresh. When you are ready, just assemble and cook the wraps. This saves time during busy days. You can also wrap and store the cooked wraps for a quick meal later.
How can I make Cheesy Garlic Chicken Wraps healthier?
To make these wraps healthier, use whole wheat tortillas. They add more fiber and nutrients. You can also add extra veggies like bell peppers or zucchini for more vitamins. Using lean chicken breast reduces fat. Lastly, reduce cheese or use lower-fat options to cut calories.
You learned about the key ingredients for wraps and tips for fresh choices. I shared step-by-step instructions for making delicious wraps too. We explored variations, storage tips, and FAQs to answer common questions.
In closing, you can customize your wraps to fit your taste. Use fresh ingredients for the best flavor. With these tips, you’ll create tasty wraps every time. Enjoy your cooking!