
Introduction
Sliders have emerged as one of the most beloved snack options for gatherings, parties, and family dinners. Their bite-sized nature makes them perfect for sharing, while their versatility allows for an array of flavors to cater to various palates. Among the numerous slider recipes, the melty baked ham and cheese sliders stand out with their warm, gooey cheese and savory ham nestled between soft, pillowy buns. This particular recipe is not just a snack; it’s a comfort food that brings people together, making it an ideal choice for any occasion.
The appeal of these sliders lies not only in their delightful taste but also in the ease and speed of preparation. Whether you are a novice in the kitchen or a seasoned cook, you’ll find that assembling these sliders is simple and quick. With a handful of ingredients and minimal cooking time, you can whip up a tray of melty baked ham and cheese sliders that will impress your guests and leave them craving more.
Understanding the Ingredients
To create the perfect melty baked ham and cheese sliders, it’s essential to understand the ingredients that contribute to their deliciousness. Each component plays a crucial role in the overall flavor and texture of the dish, ensuring a satisfying eating experience.
Slider Buns
The foundation of any slider is, of course, the bun. For this recipe, you have the option of using either Hawaiian rolls or potato buns. Hawaiian rolls are known for their slightly sweet flavor and soft, fluffy texture, which pairs beautifully with the savory ham and cheese. On the other hand, potato buns offer a denser yet equally tender option, providing a satisfying bite. Whichever type you choose, ensure the buns are fresh to maximize the sliders’ appeal.
Deli Ham
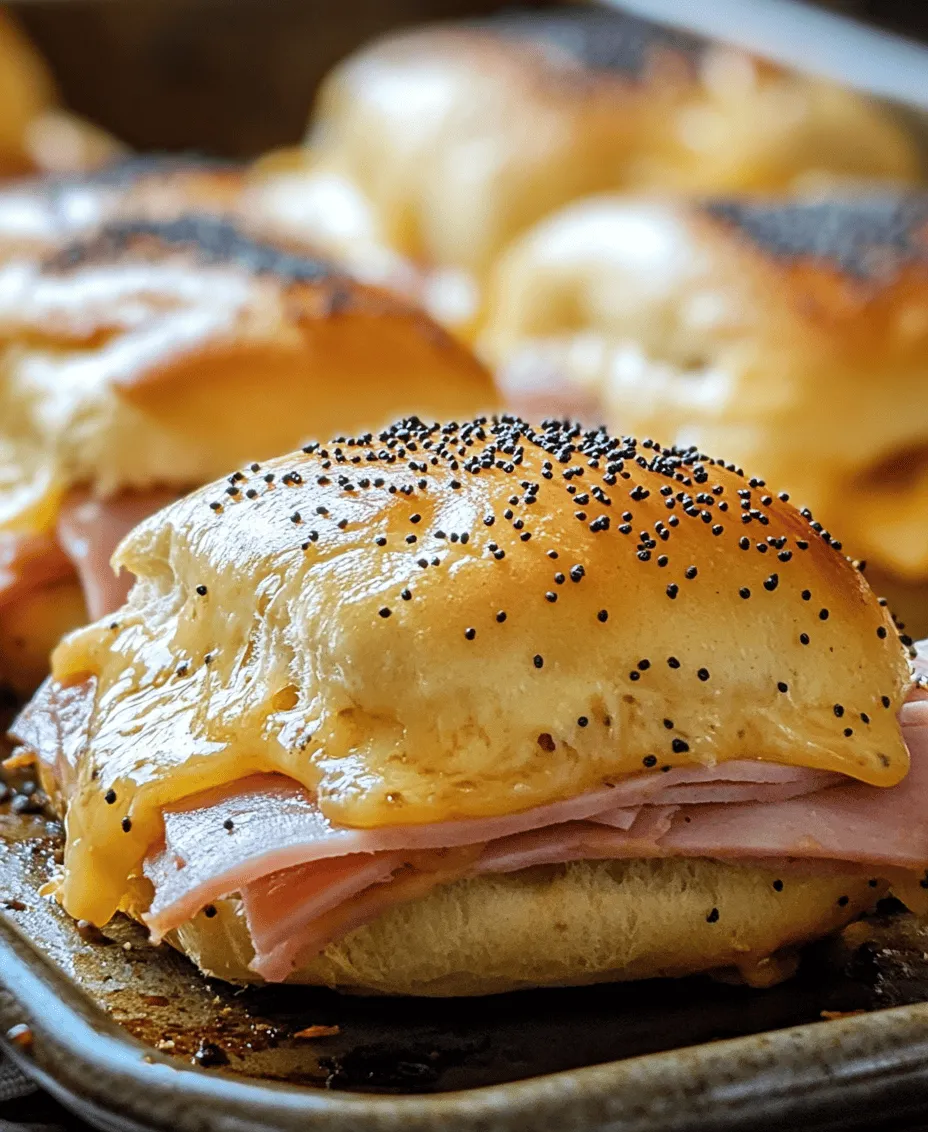
When it comes to the star of the slider, thinly sliced deli ham is essential. Opt for quality ham, as it significantly influences the flavor profile of the sliders. The thin slices allow for optimal layering, ensuring that each bite is packed with flavor. You can experiment with different types of ham, such as honey-baked or smoked, to find the perfect match for your taste preferences.
Swiss Cheese (or Alternatives)
Swiss cheese is the traditional choice for these sliders due to its exceptional melting properties and mild, nutty flavor. As the sliders bake, the cheese becomes gooey and melds seamlessly with the ham, creating a heavenly combination. However, if Swiss cheese is not available or if you prefer a different flavor, feel free to substitute it with provolone, mozzarella, or cheddar cheese. Each cheese will impart its unique taste while still achieving that desirable melt.
Additional Flavor Enhancers
While the ham and cheese are the stars of the sliders, several additional ingredients elevate the dish to new heights.
– Melted Butter: A crucial component for brushing on the sliders before baking, melted butter adds richness and moisture. It creates a golden-brown crust on top of the sliders, enhancing their visual appeal and flavor.
– Dijon Mustard: A hint of Dijon mustard introduces a tangy flavor that beautifully complements the savory ham. Its sharpness balances the richness of the cheese and butter, creating a well-rounded taste experience.
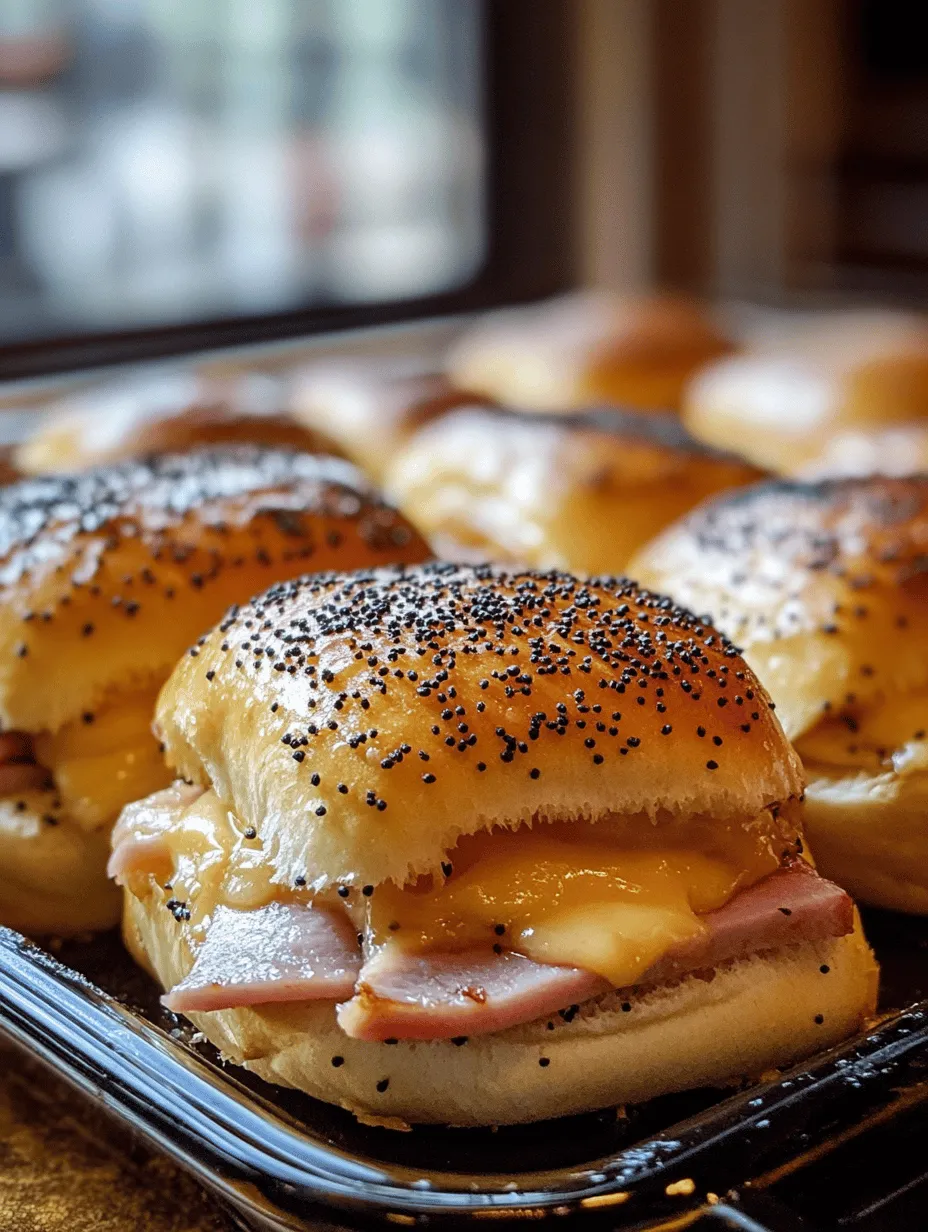
– Poppy Seeds: Sprinkling poppy seeds on top of the sliders not only adds a slight crunch but also visual interest. These tiny seeds contribute a nutty flavor that enhances the overall taste profile.
– Brown Sugar: A small amount of brown sugar is used in the buttery mixture, adding a touch of sweetness that balances the savory elements of the sliders. This ingredient helps to create a harmonious flavor that keeps you coming back for more.
– Garlic and Onion Powder: These spices are essential for enhancing the overall taste. Garlic powder provides a mild, aromatic flavor, while onion powder adds depth, ensuring that every bite is packed with deliciousness.
– Seasoning: A sprinkle of salt and pepper rounds out the flavors, ensuring that the sliders are well-seasoned and delicious.
Step-by-Step Preparation of Melty Baked Ham and Cheese Sliders
Now that we understand the essential ingredients, it’s time to delve into the preparation of these mouthwatering sliders. The following steps will guide you through the process, ensuring that your sliders turn out perfectly every time.
Prepping the Baking Dish and Oven
Before you begin assembling your sliders, preheat your oven to 350°F (175°C). This ensures that your sliders will get that lovely melty texture when they bake. Additionally, prepare a baking dish by greasing it lightly to prevent sticking. A 9×13 inch baking dish is ideal for this recipe, allowing you to fit multiple sliders without overcrowding.
Slicing the Buns
The next step involves slicing the buns. To achieve even cuts while keeping the buns attached, place the entire pack of buns on a cutting board. Using a serrated knife, slice the buns horizontally, being careful to cut through the top without separating the bottom. This technique keeps the buns intact, creating a convenient base for layering your ingredients.
Once sliced, gently open the buns to create a “lid” and place the bottom half into the prepared baking dish. This method not only makes assembly easier but also helps to keep the sliders from falling apart during baking.
Layering the Ingredients
With the buns sliced and placed in the baking dish, it’s time to layer the ingredients. Start by adding a generous layer of deli ham over the bottom half of the buns. Make sure to cover the entire surface, ensuring that every slider is packed with ham.
Next, add slices of Swiss cheese on top of the ham. For an extra cheesy experience, feel free to overlap the cheese slices or add an additional layer. The more cheese, the better!
Once the ham and cheese layers are in place, carefully place the top half of the buns back on. This completes the assembly process and prepares the sliders for their flavor-enhancing topping.
Preparing the Butter Mixture
In a separate bowl, melt the butter. Once melted, stir in the Dijon mustard, brown sugar, garlic powder, onion powder, and a pinch of salt and pepper. Mix until well combined, ensuring that the sugar dissolves in the warm butter. This mixture will be brushed over the top of the sliders, infusing them with rich flavor and creating a beautiful golden crust.
Using a pastry brush, generously coat the tops of the buns with the butter mixture. Be sure to cover every inch, allowing the flavors to penetrate the buns as they bake.
Adding the Finishing Touches
To finish off your sliders, sprinkle poppy seeds over the top. This step not only adds an appealing visual touch but also enhances the flavor. The combination of the melted butter, spices, and poppy seeds will create a tantalizing aroma as the sliders bake, making it difficult to resist their allure.
Baking the Sliders
With the sliders fully assembled and topped, it’s time to bake them in the preheated oven. Place the baking dish in the oven and allow the sliders to bake for about 20 to 25 minutes, or until the tops are golden brown and the cheese is beautifully melted.
During baking, the heat will work its magic, melding the flavors together and creating a perfect bite-sized treat. The aroma wafting through your kitchen will have everyone eagerly awaiting the first taste.
With this detailed preparation outline, you’re well-equipped to create the most delicious melty baked ham and cheese sliders. The combination of flavorful ingredients and straightforward steps ensures a delightful dish that is bound to be a hit at any gathering. As you embark on this culinary adventure, remember that the joy of cooking is not just in the final product but in the shared experience of delicious food and great company.
Layering Ingredients: Tips for Evenly Distributing Ham and Cheese
When preparing your melty baked ham and cheese sliders, the way you layer the ingredients significantly impacts the final flavor and texture. Begin with the bottom half of your slider buns, placing them cut-side up on a baking sheet. For an even distribution, lay down a single layer of ham, ensuring each slider receives an equal portion. Depending on your bun size, two to three slices of ham per slider should suffice.
Next, sprinkle a generous amount of cheese over the ham. Use a mix of cheeses if desired, such as sharp cheddar and Swiss, to create a flavor explosion. For optimal melting and gooeyness, consider using sliced cheese instead of shredded, as it covers the ham more consistently. As you layer, press down gently to compress the ingredients slightly, ensuring they adhere well to the buns. This method not only enhances flavor but also prevents the sliders from becoming too soggy during baking.
Creating the Butter Mixture: Importance of Whisking for a Smooth Blend
The buttery topping is what transforms basic sliders into a flavorful treat. In a medium bowl, combine melted butter with Dijon mustard, garlic powder, and a hint of Worcestershire sauce. Whisking these ingredients together is crucial; it ensures that the mustard and spices are evenly incorporated, creating a smooth and cohesive mixture. If you skip this step, you might end up with pockets of mustard or garlic that overwhelm your sliders.
To elevate the flavor, consider adding a sprinkle of fresh herbs such as parsley or thyme to the butter mixture. This not only enhances the taste but also adds a touch of color to your sliders. Once combined, brush this mixture generously over the top of each slider. This step not only adds flavor but also helps achieve that irresistible golden-brown crust during baking.
Coating the Sliders: How to Ensure Every Slider is Well-Covered
Coating the sliders thoroughly with the butter mixture is essential for maximizing flavor and achieving the perfect texture. Use a pastry brush to apply the butter evenly over the tops of the buns. Make sure to cover every inch, as this will help the sliders develop a crispy exterior while keeping the insides moist and flavorful.
After brushing the butter mixture, consider sprinkling a little extra garlic powder or poppy seeds on top for added texture and flavor. These small additions not only enhance the visual appeal but also provide a delightful crunch with each bite. Ensure that the buns are well-coated; this will prevent them from drying out during baking and contribute to that melty, gooey goodness inside.
Baking Process
Now that your sliders are prepared, it’s time to bake them to perfection. Preheat your oven to 350°F (175°C) and place the assembled sliders in the center of the oven. The initial baking time should be around 15 minutes, covered with aluminum foil. Covering the sliders while they bake helps to steam them slightly, preventing the tops from burning while allowing the cheese to melt to its gooey best.
Importance of Covering with Foil for Initial Baking
Covering your sliders with foil during the first part of the baking process is crucial. This method traps steam, which aids in melting the cheese evenly and keeps the buns moist. If left uncovered, the tops may brown too quickly while the cheese remains unmelted, leading to an unbalanced texture.
Once the initial 15 minutes have passed, carefully remove the foil, and return the sliders to the oven for an additional 10 minutes. This second phase of baking is where the magic happens—watch as the tops crisp up to a perfect golden brown while the insides remain soft and melty.
Techniques for Achieving the Perfect Golden Top While Keeping Sliders Moist
To achieve that perfect golden top while ensuring the sliders remain moist, keep a close eye on the oven during the final minutes of baking. The goal is to allow enough time for the tops to brown without overcooking the sliders. If you notice they are browning too quickly, you can lower the oven temperature slightly or rotate the baking sheet for even cooking.
Another technique is to brush the tops with a little extra melted butter during the last few minutes of baking. This will not only enhance the flavor but also contribute to a shiny, golden finish. Once baked, remove the sliders from the oven, let them rest for a few minutes before slicing, and allow the flavors to meld together for a perfect serving experience.
Serving Suggestions and Pairing Ideas
These melty baked ham and cheese sliders are best served warm and fresh out of the oven. For an enjoyable dining experience, cut the sliders into individual portions and serve them on a platter. Pair them with a variety of sides to create a well-rounded meal.
Suggested Sides: Ideas for Complementary Dishes
– Salads: A fresh garden salad or a classic Caesar salad complements the richness of the sliders. The crisp vegetables and zesty dressings provide a refreshing contrast to the warm, cheesy sliders.
– Chips: Serve with kettle-cooked chips or sweet potato fries for a satisfying crunch. The saltiness of the chips pairs well with the savory sliders.
– Dips: Consider a creamy ranch or a tangy mustard dip for an extra layer of flavor. Guests can dip their sliders, adding a fun twist to the meal.
Drink Pairings: Suggestions for Beverages that Complement the Flavors of the Sliders
For beverages, opt for light, refreshing choices that balance the richness of the sliders. Here are a few suggestions:
– Lemonade or Iced Tea: The citrusy notes of lemonade or the subtle sweetness of iced tea can cleanse the palate between bites.
– Beer: A light lager or a fruity wheat beer pairs particularly well, as their crispness complements the savory ham and cheese.
– Wine: A chilled white wine, such as Sauvignon Blanc, can enhance the flavors without overwhelming the dish.
Variations and Customization Ideas
One of the best aspects of melty baked ham and cheese sliders is their versatility. Here are several ways to customize this recipe to suit various dietary preferences and taste preferences.
Exploring Alternative Ingredients for Dietary Preferences
– Vegetarian Options: For a vegetarian twist, substitute the ham with roasted vegetables or a selection of grilled mushrooms. You could also use a plant-based deli meat that mimics the texture of ham.
– Gluten-Free Options: For those avoiding gluten, simply use gluten-free slider buns. Many grocery stores now offer delicious gluten-free alternatives that hold up well to the fillings.
– Flavor Variations: Get creative with flavors! Adding sliced jalapeños for a spicy kick, using different cheese varieties like pepper jack or gouda, or incorporating fresh herbs like basil or oregano can elevate the dish and cater to different taste preferences.
Nutritional Information
Understanding the nutritional value of your sliders can help with portion control and maintaining a balanced diet. Here’s a breakdown of the estimated nutritional content per slider, based on standard ingredients:
– Calories: Approximately 180-220 calories
– Protein: 8-10 grams
– Fat: 10-12 grams
– Carbohydrates: 20-25 grams
– Fiber: 1-2 grams
These sliders can certainly fit into a balanced diet, especially when paired with lighter sides such as salads or veggie sticks. Remember to enjoy them in moderation, and feel free to opt for healthier ingredient choices to maintain a nutritious meal.
Conclusion
In summary, melty baked ham and cheese sliders are a delightful and convenient dish perfect for gatherings, game days, or a simple weeknight meal. Their gooey, cheesy goodness combined with savory ham makes them a crowd-pleaser among various palates. The ease of preparation and the ability to customize the recipe ensures that this dish can be tailored to your specific tastes and dietary needs.
We encourage you to try making these sliders for your next gathering or meal. Whether served with a side of chips, a fresh salad, or a cooling beverage, they are sure to impress. Sharing food like these sliders creates memorable moments around the table, fostering connections and joyful experiences with family and friends. Embrace the joy of cooking and the delight of sharing delicious meals!