No-Bake Banana Split Cake Easy Delightful Recipe

WANT TO SAVE THIS RECIPE?

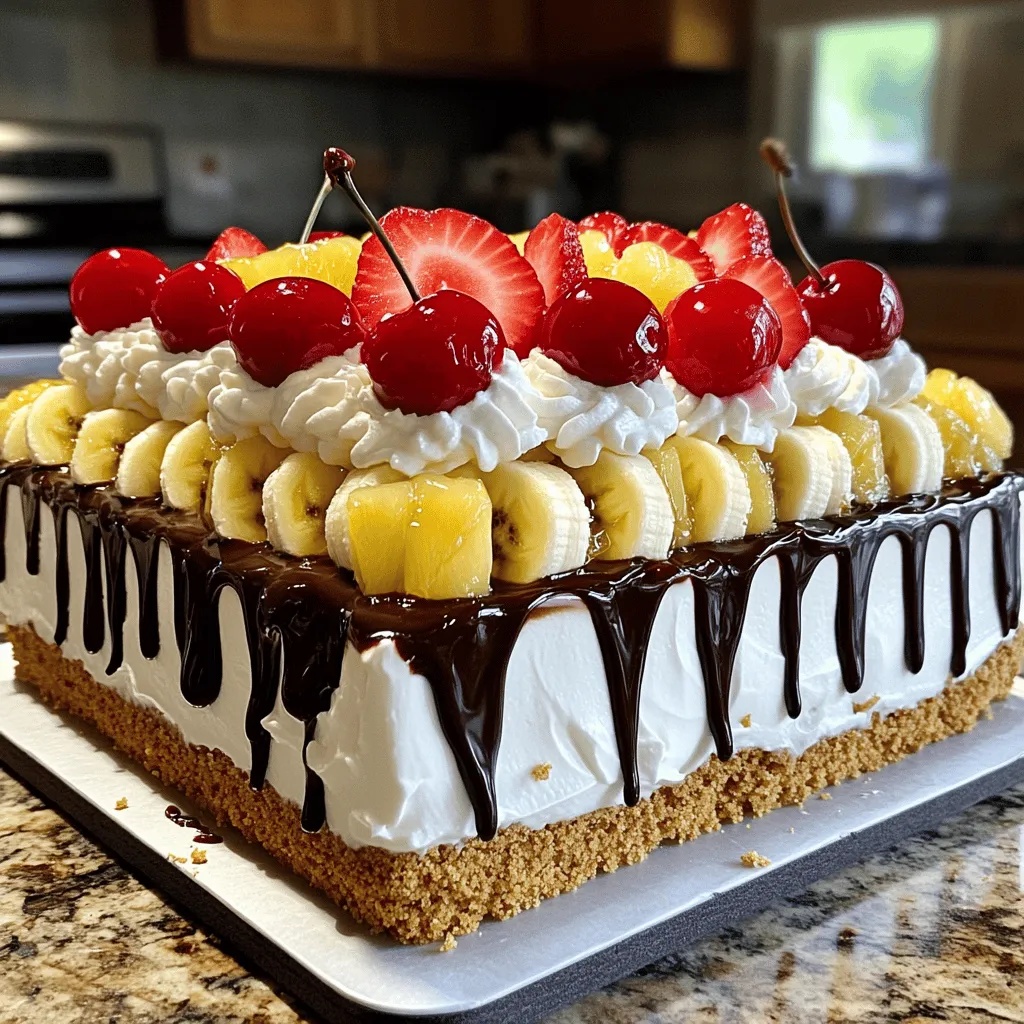
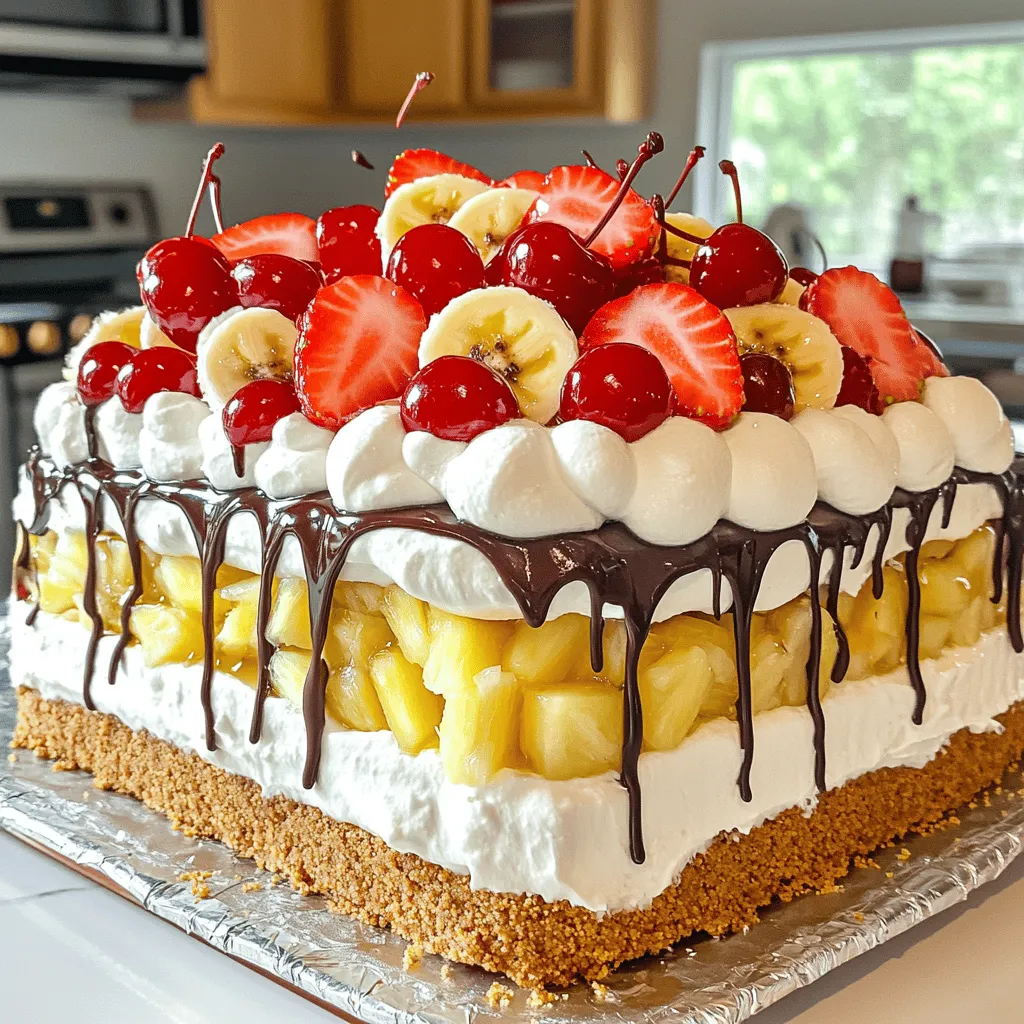
If you’re looking for a fun and easy dessert, this No-Bake Banana Split Cake is just for you! With its creamy layers, fresh fruit, and a delightful graham cracker crust, it’s the perfect treat for any occasion. You won’t need to turn on your oven, and each bite is full of flavor. Get ready to impress your friends and family with a dessert they’ll love! Let’s dive into the easy recipe!

Ingredients

Main Ingredients

To make a No-Bake Banana Split Cake, gather these key items:

– 1 ½ cups of graham cracker crumbs

– ½ cup unsalted butter, melted

– 1 cup powdered sugar

– 8 oz cream cheese, softened

– 1 cup whipped cream (store-bought or homemade)

– 2 ripe bananas, sliced

– 1 cup fresh strawberries, hulled and sliced

– 1 can (20 oz) crushed pineapple, drained

– ½ cup chopped walnuts (optional)

Chocolate syrup for drizzling

– Maraschino cherries for topping

You will need some simple tools for this recipe. Grab a mixing bowl for each step. Use a spatula to mix and spread the ingredients. A 9×13 inch pan works best for setting the cake.

Important Notes

Choosing quality ingredients makes a big difference. Use ripe bananas for the best flavor and texture. Fresh strawberries add sweetness and a nice crunch. Drain the crushed pineapple well. This helps keep the cake from becoming soggy.

If you have allergies or dietary needs, you can make swaps. For a gluten-free option, use gluten-free graham crackers. You can also substitute the cream cheese with a dairy-free option if needed. Enjoy making this cake that fits your needs!

Step-by-Step Instructions

Preparing the Crust

To make the crust, you need graham cracker crumbs and melted butter. Start by mixing 1 ½ cups of graham cracker crumbs with ½ cup of melted butter in a bowl. Stir until the crumbs look like wet sand. This step is key for a strong base. Next, press the mixture firmly into the bottom of a 9×13 inch pan. Make sure it is even. A good crust holds the cake together, so take your time here.

Making the Cream Layer

Now, you will create the cream layer. In a clean bowl, beat 8 oz of softened cream cheese with 1 cup of powdered sugar. Mix until it is smooth and creamy. This step is crucial for flavor. Gently fold in 1 cup of whipped cream. Be careful not to deflate it. Once it is mixed well, spread this cream layer evenly over the crust. This will add richness and help balance the sweetness.

Layering the Fruits

It’s time for the fruit! Start by placing sliced bananas on top of the cream layer. Use 2 ripe bananas for this. Then, add a layer of crushed pineapple, but first, drain it well. You don’t want extra juice ruining your cake. After the pineapple, arrange 1 cup of sliced strawberries on top. This colorful layer makes the cake look great and adds fresh flavor. Each fruit layer adds texture and taste, so enjoy this step!

For the full recipe, check the complete instructions in the recipe section.

Tips & Tricks

Chilling and Serving

Chilling the cake is key. It helps the flavors blend well. I recommend chilling for at least four hours, but overnight is best. This allows the layers to set nicely. When it’s time to serve, use a sharp knife to cut the cake. Clean the knife between cuts for neat slices.

Enhancements for Flavor

You can make this cake even better with fun toppings. Consider adding chopped nuts for crunch. You might also try fresh blueberries or raspberries for a twist. For extra sweetness, drizzle caramel sauce or peanut butter sauce on top. These small changes can elevate the taste.

Troubleshooting Common Issues

If your cake is too watery, check the pineapple. Make sure it’s well-drained before using. For a dry cake, you might need more whipped cream in the cream layer. This adds moisture and creaminess. Aim for a smooth, thick texture in your cream layer for the best results.

Variations

Dietary Variations

You can make this no-bake banana split cake fit different diets. For a vegan option, swap the cream cheese for a dairy-free version. Use coconut whipped cream instead of the regular whipped cream. For a low-sugar cake, try sugar-free pudding or sweeteners like stevia. You can also play with flavors! Use a chocolate crust instead of the regular graham cracker crust. You can mix in other fruits, like blueberries or raspberries, for a twist.

Themed Variations

Make your cake stand out for special occasions! For Halloween, add orange and black sprinkles. For Christmas, use red and green fruits like pomegranate seeds and kiwi. Think about seasonal fruits, too. In spring, you can add fresh peaches or cherries. In fall, consider using spiced apples or pears to change the taste. It’s fun to match the cake to the season!

Creative Serving Ideas

Presentation adds charm to your gatherings. Use a large platter to show off the layers. Add whipped cream in a piping bag for a fancy touch. You can also sprinkle nuts or chocolate chips on top for texture. Pair this cake with ice-cold milk or coffee for a delightful treat. It also goes well with a scoop of vanilla ice cream on the side. You can find even more ideas in the Full Recipe.

Storage Info

Best Practices for Storage

To keep your No-Bake Banana Split Cake fresh, wrap it well. Use plastic wrap or aluminum foil. This will help prevent it from drying out. Store the cake in the fridge for up to four days. If you want it to last longer, consider freezing it.

Freezing Instructions

To freeze the cake, follow these steps. First, make sure the cake is fully chilled. Once chilled, wrap it tightly in plastic wrap. Then, place it in a freezer-safe container. You can freeze it for up to three months. When you’re ready to serve, take it out and let it thaw in the fridge overnight. This way, it will be nice and ready to enjoy!

FAQs

How long does No-Bake Banana Split Cake last in the fridge?

No-Bake Banana Split Cake stays fresh in the fridge for about 3 to 4 days. After that, the fruits may start to get mushy. To keep it fresh, make sure to store it in an airtight container. This helps to prevent the cream layer from absorbing moisture and losing its texture.

Can I make this cake in advance?

Yes, you can make this cake a day before you plan to serve it. Chilling it overnight allows the flavors to blend well. It also helps the cake set properly, making it easier to slice. Just cover it tightly with plastic wrap to keep it fresh.

What other fruits can I use in a Banana Split Cake?

You can get creative with the fruits! Try using blueberries, raspberries, or even peaches. If you want a tropical twist, mangoes work well too. Just make sure to slice them thinly and drain any excess juice. This ensures your cake stays firm and delicious.

Can I use a different type of crust?

Absolutely! While graham cracker crust is classic, you can try different options. Use Oreo cookies for a chocolatey flavor or almond flour for a gluten-free option. Another great choice is a cookie crust made from vanilla wafers. Each crust brings a unique taste to your cake!

The No-Bake Banana Split Cake is fun and easy to make. We covered key ingredients, step-by-step instructions, and smart tips to help you succeed. Remember to choose ripe fruit and chill the cake well. Feel free to try different fruits and crusts for your own twist. With these ideas, you can make a yummy dessert that everyone will love. Enjoy creating and sharing this treat!

To make a No-Bake Banana Split Cake, gather these key items: - 1 ½ cups of graham cracker crumbs - ½ cup unsalted butter, melted - 1 cup powdered sugar - 8 oz cream cheese, softened - 1 cup whipped cream (store-bought or homemade) - 2 ripe bananas, sliced - 1 cup fresh strawberries, hulled and sliced - 1 can (20 oz) crushed pineapple, drained - ½ cup chopped walnuts (optional) - Chocolate syrup for drizzling - Maraschino cherries for topping You will need some simple tools for this recipe. Grab a mixing bowl for each step. Use a spatula to mix and spread the ingredients. A 9x13 inch pan works best for setting the cake. Choosing quality ingredients makes a big difference. Use ripe bananas for the best flavor and texture. Fresh strawberries add sweetness and a nice crunch. Drain the crushed pineapple well. This helps keep the cake from becoming soggy. If you have allergies or dietary needs, you can make swaps. For a gluten-free option, use gluten-free graham crackers. You can also substitute the cream cheese with a dairy-free option if needed. Enjoy making this cake that fits your needs! To make the crust, you need graham cracker crumbs and melted butter. Start by mixing 1 ½ cups of graham cracker crumbs with ½ cup of melted butter in a bowl. Stir until the crumbs look like wet sand. This step is key for a strong base. Next, press the mixture firmly into the bottom of a 9x13 inch pan. Make sure it is even. A good crust holds the cake together, so take your time here. Now, you will create the cream layer. In a clean bowl, beat 8 oz of softened cream cheese with 1 cup of powdered sugar. Mix until it is smooth and creamy. This step is crucial for flavor. Gently fold in 1 cup of whipped cream. Be careful not to deflate it. Once it is mixed well, spread this cream layer evenly over the crust. This will add richness and help balance the sweetness. It’s time for the fruit! Start by placing sliced bananas on top of the cream layer. Use 2 ripe bananas for this. Then, add a layer of crushed pineapple, but first, drain it well. You don’t want extra juice ruining your cake. After the pineapple, arrange 1 cup of sliced strawberries on top. This colorful layer makes the cake look great and adds fresh flavor. Each fruit layer adds texture and taste, so enjoy this step! For the full recipe, check the complete instructions in the recipe section. Chilling the cake is key. It helps the flavors blend well. I recommend chilling for at least four hours, but overnight is best. This allows the layers to set nicely. When it's time to serve, use a sharp knife to cut the cake. Clean the knife between cuts for neat slices. You can make this cake even better with fun toppings. Consider adding chopped nuts for crunch. You might also try fresh blueberries or raspberries for a twist. For extra sweetness, drizzle caramel sauce or peanut butter sauce on top. These small changes can elevate the taste. If your cake is too watery, check the pineapple. Make sure it’s well-drained before using. For a dry cake, you might need more whipped cream in the cream layer. This adds moisture and creaminess. Aim for a smooth, thick texture in your cream layer for the best results. {{image_2}} You can make this no-bake banana split cake fit different diets. For a vegan option, swap the cream cheese for a dairy-free version. Use coconut whipped cream instead of the regular whipped cream. For a low-sugar cake, try sugar-free pudding or sweeteners like stevia. You can also play with flavors! Use a chocolate crust instead of the regular graham cracker crust. You can mix in other fruits, like blueberries or raspberries, for a twist. Make your cake stand out for special occasions! For Halloween, add orange and black sprinkles. For Christmas, use red and green fruits like pomegranate seeds and kiwi. Think about seasonal fruits, too. In spring, you can add fresh peaches or cherries. In fall, consider using spiced apples or pears to change the taste. It’s fun to match the cake to the season! Presentation adds charm to your gatherings. Use a large platter to show off the layers. Add whipped cream in a piping bag for a fancy touch. You can also sprinkle nuts or chocolate chips on top for texture. Pair this cake with ice-cold milk or coffee for a delightful treat. It also goes well with a scoop of vanilla ice cream on the side. You can find even more ideas in the Full Recipe. To keep your No-Bake Banana Split Cake fresh, wrap it well. Use plastic wrap or aluminum foil. This will help prevent it from drying out. Store the cake in the fridge for up to four days. If you want it to last longer, consider freezing it. To freeze the cake, follow these steps. First, make sure the cake is fully chilled. Once chilled, wrap it tightly in plastic wrap. Then, place it in a freezer-safe container. You can freeze it for up to three months. When you're ready to serve, take it out and let it thaw in the fridge overnight. This way, it will be nice and ready to enjoy! No-Bake Banana Split Cake stays fresh in the fridge for about 3 to 4 days. After that, the fruits may start to get mushy. To keep it fresh, make sure to store it in an airtight container. This helps to prevent the cream layer from absorbing moisture and losing its texture. Yes, you can make this cake a day before you plan to serve it. Chilling it overnight allows the flavors to blend well. It also helps the cake set properly, making it easier to slice. Just cover it tightly with plastic wrap to keep it fresh. You can get creative with the fruits! Try using blueberries, raspberries, or even peaches. If you want a tropical twist, mangoes work well too. Just make sure to slice them thinly and drain any excess juice. This ensures your cake stays firm and delicious. Absolutely! While graham cracker crust is classic, you can try different options. Use Oreo cookies for a chocolatey flavor or almond flour for a gluten-free option. Another great choice is a cookie crust made from vanilla wafers. Each crust brings a unique taste to your cake! The No-Bake Banana Split Cake is fun and easy to make. We covered key ingredients, step-by-step instructions, and smart tips to help you succeed. Remember to choose ripe fruit and chill the cake well. Feel free to try different fruits and crusts for your own twist. With these ideas, you can make a yummy dessert that everyone will love. Enjoy creating and sharing this treat!

No-Bake Banana Split Cake

Indulge in a delightful No-Bake Banana Split Cake that's perfect for any occasion! With layers of creamy goodness, fresh fruits, and a crunchy graham cracker crust, this dessert will become a family favorite. It's easy to prepare, needing just 20 minutes of your time and a little chill to set! Dive into the sweet layers and bring joy to your gatherings. Click to explore this delicious recipe and treat yourself today!

Ingredients
  

1 ½ cups of graham cracker crumbs

½ cup unsalted butter, melted

1 cup powdered sugar

8 oz cream cheese, softened

1 cup whipped cream (store-bought or homemade)

2 ripe bananas, sliced

1 cup fresh strawberries, hulled and sliced

1 can (20 oz) crushed pineapple, drained

½ cup chopped walnuts (optional)

Chocolate syrup for drizzling

Maraschino cherries for topping

Instructions
 

Prepare the crust: In a mixing bowl, combine the graham cracker crumbs with the melted butter. Stir until the crumbs are well coated and resemble wet sand. Press this mixture firmly into the bottom of a 9x13 inch pan to form a crust layer.

    Make the cream layer: In another bowl, beat the softened cream cheese and powdered sugar together until smooth. Gently fold in the whipped cream until fully combined. Spread this cream cheese mixture over the graham cracker crust, smoothing it out evenly.

      Layer the fruits: Arrange the sliced bananas over the cream cheese layer, followed by a layer of crushed pineapple. Ensure the pineapple is well-drained to prevent excess moisture in the cake.

        Add strawberries and walnuts: Top the pineapple layer with sliced strawberries and sprinkle chopped walnuts over them if using.

          Finish with toppings: Drizzle chocolate syrup generously over the top of the cake, and finish with a few Maraschino cherries for decoration.

            Chill: Cover the cake with plastic wrap or foil and refrigerate for at least 4 hours, or preferably overnight, to allow the flavors to meld and the cake to set properly.

              Serve: Before serving, you may drizzle additional chocolate syrup and add more whipped cream on top if desired. Cut into squares and enjoy!

                Prep Time, Total Time, Servings: 20 mins | 4 hours (chill time) | 12 servings

                  WANT TO SAVE THIS RECIPE?

                  Leave a Comment

                  Recipe Rating