Irresistible White Chocolate Raspberry Cheesecake Balls: A Delightful Dessert Recipe

WANT TO SAVE THIS RECIPE?

Introduction

Cheesecake has long been a beloved dessert around the world, celebrated for its rich, creamy texture and versatility. From classic New York-style cheesecake to innovative variations featuring seasonal fruits, this dessert has captured the hearts (and taste buds) of many. Among the myriad of cheesecake-inspired treats, the Irresistible White Chocolate Raspberry Cheesecake Balls stand out as a delightful twist that combines the indulgent flavor of cheesecake with the fresh tartness of raspberries, all enveloped in a luscious white chocolate coating.

The unique combination of sweet white chocolate and vibrant raspberries not only brings a burst of flavor but also provides a visual appeal that makes this dessert a favorite for various occasions. Whether you’re hosting a birthday party, celebrating the holidays, or simply enjoying a casual gathering with friends and family, these cheesecake balls are sure to impress. They are easy to make, bite-sized, and offer a perfect balance of sweetness and tartness, making them a hit among cheesecake lovers and raspberry aficionados alike.

Understanding the Ingredients

To create the perfect batch of Irresistible White Chocolate Raspberry Cheesecake Balls, it’s essential to understand the role of each ingredient in this delectable recipe. Here’s a closer look at the key components:

Cream Cheese

At the heart of any cheesecake is cream cheese, and for this recipe, using softened cream cheese is crucial to achieving a smooth and creamy texture. Softened cream cheese allows for easy mixing, preventing lumps and ensuring a velvety consistency that is characteristic of a high-quality cheesecake. It’s best to leave the cream cheese at room temperature for at least an hour before using it, or you can microwave it in short intervals (15-20 seconds) until softened.

Powdered Sugar

Powdered sugar, also known as confectioners’ sugar, is used in this recipe to sweeten the cheesecake filling. Its fine texture allows it to dissolve quickly in the cream cheese, contributing to a smooth mixture without any graininess. The amount of sugar can be adjusted according to personal taste preferences, but it’s essential to find a balance that complements the tanginess of the cream cheese and the tartness of the raspberries.

Vanilla Extract

Vanilla extract enhances the overall flavor profile of the cheesecake balls, adding a warm and inviting aroma. The depth of flavor it provides elevates the sweetness and complements the richness of the cream cheese and white chocolate. For the best results, opt for pure vanilla extract rather than imitation vanilla, as it delivers a more authentic and robust flavor.

Graham Crackers

Graham crackers provide a crunchy base and contribute to the classic cheesecake flavor. In this recipe, crushed graham crackers are mixed into the cheesecake filling, adding texture and a hint of sweetness. This element not only balances the creaminess of the filling but also helps to bind the ingredients together. For a different twist, consider using flavored graham crackers, such as honey or cinnamon, to add an extra layer of flavor.

Fresh Raspberries

Fresh raspberries are the star of this dessert, providing a burst of tartness that beautifully contrasts the sweetness of the white chocolate and cream cheese. It’s important to use fresh raspberries for their vibrant flavor and natural juices. When incorporating them into the mixture, be gentle to preserve their integrity and prevent them from breaking down too much, which could lead to a mushy consistency.
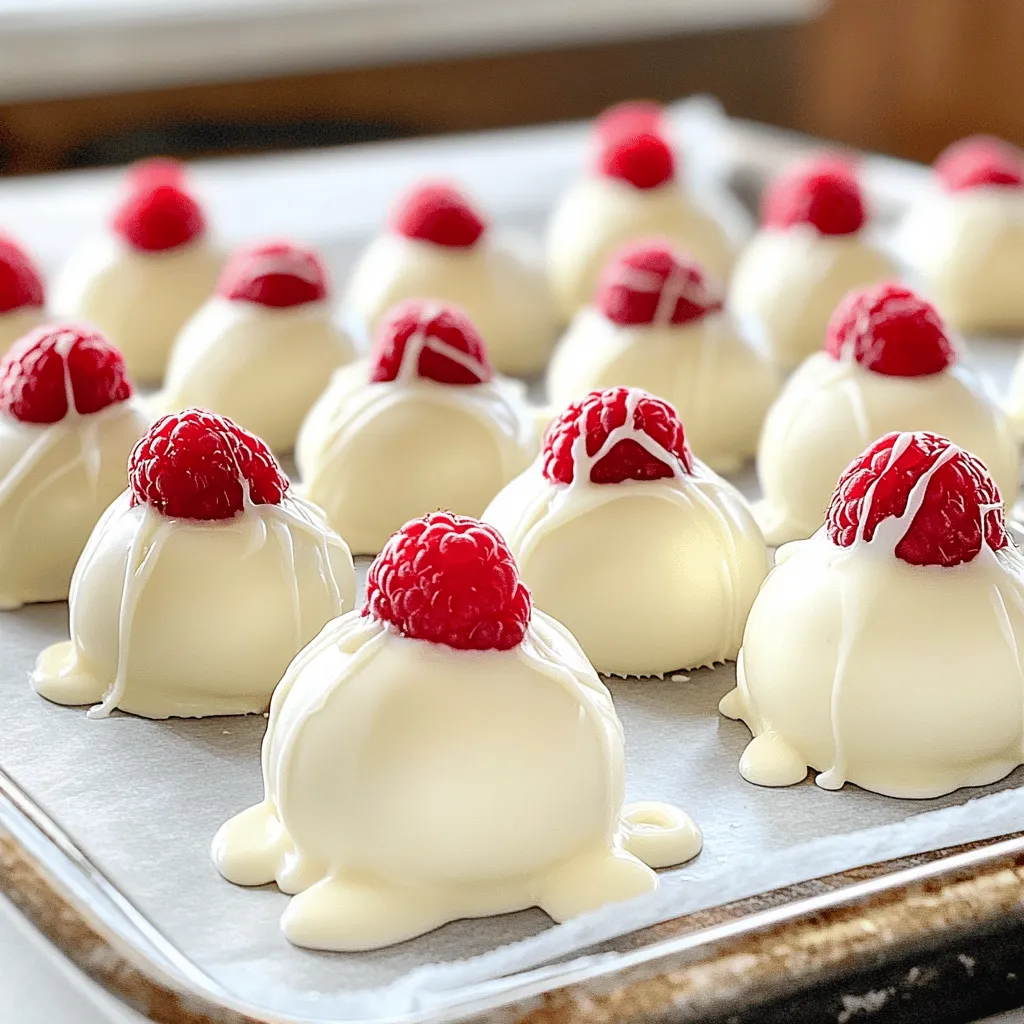
White Chocolate

The white chocolate coating is what makes these cheesecake balls irresistible. Not only does it add a creamy sweetness, but it also creates a beautiful glossy finish that enhances their visual appeal. When selecting white chocolate, choose high-quality chocolate with cocoa butter as the primary fat for the best flavor and melting properties. Avoid using white chocolate chips, as they may not melt as smoothly due to stabilizers.

Coconut Oil

Coconut oil plays a dual role in this recipe. It aids in melting the white chocolate smoothly and contributes to a shiny finish once the cheesecake balls are coated. Additionally, the subtle coconut flavor can complement the other ingredients, enhancing the overall taste. If you prefer, you can substitute coconut oil with vegetable oil, but the result may differ slightly in flavor and sheen.

Pinch of Salt

A pinch of salt is a simple yet effective addition that enhances the overall flavor of the cheesecake balls. Salt helps to balance sweetness and brings out the richness of the cream cheese and white chocolate. It’s a small but crucial component that should not be overlooked.

Preparation Steps for White Chocolate Raspberry Cheesecake Balls

Creating Irresistible White Chocolate Raspberry Cheesecake Balls involves several straightforward steps. Here’s a detailed breakdown of the process to ensure you achieve the best results:

Mixing the Base

To start, gather all your ingredients and make sure your cream cheese is softened. In a large mixing bowl, combine the softened cream cheese, powdered sugar, and vanilla extract. Using an electric mixer or a whisk, blend the ingredients together until smooth and creamy. This step is essential for achieving a rich cheesecake filling without any lumps. Take your time to mix thoroughly, scraping down the sides of the bowl as needed to ensure even incorporation.

Incorporating Graham Crackers

Once the cream cheese mixture is smooth, it’s time to incorporate the graham cracker crumbs. Gradually add the crushed graham crackers to the mixture, folding them in gently with a spatula or wooden spoon. The goal is to evenly distribute the crumbs throughout the filling without over-mixing, which could lead to a denser texture. The graham crackers will add a delightful crunch and flavor that is reminiscent of traditional cheesecake crusts.

Folding in Raspberries

Next, prepare your fresh raspberries by washing them gently under cold water and patting them dry with a paper towel. Carefully fold the raspberries into the cheesecake mixture, being cautious not to break them apart too much. The goal is to maintain some whole raspberries in the filling for pops of flavor in the final product. This step is crucial, as the freshness of the raspberries adds a bright contrast to the creamy cheesecake base.

Forming the Balls

Once the filling is ready, it’s time to form the cheesecake balls. Using a small cookie scoop or your hands, take a spoonful of the mixture and roll it into a ball, about 1 inch in diameter. To ensure uniformity, you may want to use a kitchen scale to measure out each ball, aiming for a consistent size. Place the formed balls on a parchment-lined baking sheet, leaving some space between each one to allow for easy handling during the coating process.

Refrigeration

The next crucial step is to refrigerate the cheesecake balls. Cover the baking sheet with plastic wrap and place it in the refrigerator for at least 1-2 hours, or until the balls are firm. Chilling the balls helps them hold their shape during the chocolate coating process and ensures a pleasant texture when biting into them. Keep in mind that the longer they chill, the easier they will be to coat, so consider making them a day in advance for best results.

Melting the White Chocolate Coating

Once the cheesecake balls have chilled and firmed up, it’s time to prepare the white chocolate coating. Melting white chocolate requires a gentle approach to ensure it remains smooth and does not seize up. Here’s a step-by-step guide on how to melt white chocolate safely:

1. Chop the Chocolate: If you’re using a white chocolate bar, chop it into small, even pieces to promote uniform melting. If using white chocolate chips, you can skip this step.

2. Double Boiler Method: Set up a double boiler by placing a heatproof bowl over a pot of simmering water. Make sure the bottom of the bowl does not touch the water. This method provides gentle heat and helps to prevent the chocolate from burning.

3. Add Coconut Oil: To the melted chocolate, add a small amount of coconut oil. This will not only help the chocolate melt smoothly but also give it a beautiful sheen once coated.

4. Stir Frequently: As the chocolate begins to melt, stir it frequently with a spatula or wooden spoon until completely smooth. Remove it from the heat as soon as it’s melted to prevent overheating.

5. Coating the Cheesecake Balls: Once the chocolate is melted, carefully dip each cheesecake ball into the white chocolate, using a fork to lift it out and allowing any excess chocolate to drip off. Place the coated balls back onto the parchment-lined baking sheet.

6. Chill Again: After coating all the balls, return them to the refrigerator for a brief period to allow the chocolate to set.

Following these steps will ensure that your Irresistible White Chocolate Raspberry Cheesecake Balls are not only delicious but also visually stunning. The combination of creamy cheesecake, tart raspberries, and smooth white chocolate creates a dessert that is sure to be a crowd-pleaser, perfect for any occasion.

Cheesecake has long been a beloved dessert around the world, celebrated for its rich, creamy texture and versatility. From classic New York-style cheesecake to innovative variations featuring seasonal fruits, this dessert has captured the hearts (and taste buds) of many. Among the myriad of cheesecake-inspired treats, the <strong>Irresistible White Chocolate Raspberry Cheesecake Balls</strong> stand out as a delightful twist that combines the indulgent flavor of cheesecake with the fresh tartness of raspberries, all enveloped in a luscious white chocolate coating.” /></p>
</p>
<h2>Using a Microwave: Best Practices for Avoiding Overheating</h2>
</p>
<p>When melting chocolate for your Irresistible White Chocolate Raspberry Cheesecake Balls, using a microwave can be a quick and convenient option. However, chocolate can easily overheat and seize if not monitored closely. To avoid this common pitfall, follow these best practices:</p>
</p>
<p>1. <strong>Use Short Intervals</strong>: Heat the chocolate in 20-30 second intervals. This allows you to check the chocolate frequently, preventing it from getting too hot too quickly. Stir after each interval to help distribute the heat evenly.</p>
</p>
<p>2. <strong>Choose the Right Bowl</strong>: Opt for a microwave-safe bowl that is dry and free from any moisture. Glass or ceramic bowls work best as they retain heat evenly.</p>
</p>
<p>3. <strong>Temperature Awareness</strong>: Aim for a gentle melting process. The chocolate should be melted just enough to stir smoothly; it will continue melting from residual heat once removed from the microwave.</p>
</p>
<p>4. <strong>Avoid Water</strong>: Ensure that no water or steam comes into contact with the chocolate, as this can cause it to seize.</p>
</p>
<p>By following these practices, you’ll ensure a smooth melting process that will enhance the coating of your cheesecake balls.</p>
</p>
<h2>Alternative Methods: Stovetop Double Boiler Option</h2>
</p>
<p>If you prefer a stovetop method, the double boiler technique is highly effective for melting chocolate gently. Here’s how to do it:</p>
</p>
<p>1. <strong>Set Up the Double Boiler</strong>: Fill a saucepan with a couple of inches of water and bring it to a simmer. Place a heatproof bowl on top, ensuring that the bottom of the bowl does not touch the water.</p>
</p>
<p>2. <strong>Add Chocolate</strong>: Chop your white chocolate into small, uniform pieces and place them into the bowl. This increases the melting efficiency.</p>
</p>
<p>3. <strong>Stir Constantly</strong>: As the chocolate begins to melt, stir it continuously. This will help prevent hot spots and ensure an even melt.</p>
</p>
<p>4. <strong>Remove from Heat</strong>: Once the chocolate is glossy and smooth, take the bowl off the heat. Be careful of the steam when removing the bowl.</p>
</p>
<p>Using a double boiler provides more control over the melting process and can help prevent overheating while yielding a smooth chocolate consistency.</p>
</p>
<h2>Importance of Coconut Oil in Chocolate Coating</h2>
</p>
<p>Incorporating coconut oil into your melted white chocolate for coating serves multiple purposes. It not only gives the chocolate a beautiful sheen but also enhances the texture, making it easier to work with. Here’s why coconut oil is a must:</p>
</p>
<p>– <strong>Smooth Consistency</strong>: Coconut oil helps the chocolate maintain a smoother consistency, which is essential for achieving an even coating on the cheesecake balls.</p>
</p>
<p>– <strong>Improved Flow</strong>: Adding a small amount of coconut oil (about 1 tablespoon per cup of chocolate) allows the chocolate to flow better, making it easier to dip and coat the cheesecake balls.</p>
</p>
<p>– <strong>Flavor Enhancement</strong>: The subtle coconut flavor can complement the raspberry filling, enhancing the overall taste profile of your dessert.</p>
</p>
<p>– <strong>Stability</strong>: Coconut oil also helps the chocolate harden more efficiently once cooled, ensuring that your cheesecake balls have a firm and attractive finish.</p>
</p>
<h2>Coating the Cheesecake Balls</h2>
</p>
<h3>Techniques for Achieving an Even Chocolate Coating</h3>
</p>
<p>Coating the cheesecake balls requires patience and a steady hand. To achieve an even chocolate coating, consider these techniques:</p>
</p>
<p>1. <strong>Chill the Cheesecake Balls</strong>: Before coating, place the cheesecake balls in the freezer for about 30 minutes. This helps them firm up and makes them easier to dip.</p>
</p>
<p>2. <strong>Use a Dipping Method</strong>: When ready to coat, use a fork or a toothpick to dip the cheesecake ball into the melted chocolate. Allow any excess chocolate to drip off before placing it on a cooling rack or parchment paper.</p>
</p>
<p>3. <strong>Rotate for Even Coating</strong>: If using a fork, gently rotate the cheesecake ball as you dip it into the chocolate. This ensures all sides are evenly coated.</p>
</p>
<h3>Using a Fork vs. Toothpick: Pros and Cons of Each Method</h3>
</p>
<p>Choosing between a fork and a toothpick for dipping can impact your coating experience:</p>
</p>
<p>– <strong>Fork</strong>:</p>
<p>– <strong>Pros</strong>: Provides a more stable grip and allows for easier rotation when coating.</p>
<p>– <strong>Cons</strong>: May leave marks on the surface of the chocolate if not careful.</p>
</p>
<p>– <strong>Toothpick</strong>:</p>
<p>– <strong>Pros</strong>: Allows for precise dipping and less chocolate wastage, as it’s easier to control the amount of chocolate.</p>
<p>– <strong>Cons</strong>: Can be less stable, especially for larger cheesecake balls, increasing the risk of dropping them.</p>
</p>
<p>Ultimately, the choice between using a fork or a toothpick depends on personal preference and how comfortable you are with each tool.</p>
</p>
<h3>Tips for Setting the Chocolate Properly</h3>
</p>
<p>Once coated, allowing the chocolate to set correctly is crucial for achieving the perfect finish. Here are some tips:</p>
</p>
<p>1. <strong>Use a Cooling Rack</strong>: Place the coated cheesecake balls on a cooling rack. This prevents them from sticking to the surface as the chocolate hardens.</p>
</p>
<p>2. <strong>Chill in the Refrigerator</strong>: After coating, chill the cheesecake balls in the refrigerator for about 15-30 minutes, allowing the chocolate to firm up properly.</p>
</p>
<p>3. <strong>Avoid Humidity</strong>: Try to coat and chill in a low-humidity environment, as moisture can cause the chocolate to become dull or sticky.</p>
</p>
<h3>Creative Presentation Ideas: How to Make Them Visually Appealing</h3>
</p>
<p>Presentation is key when it comes to desserts. To make your cheesecake balls visually appealing:</p>
</p>
<p>1. <strong>Use Colorful Sprinkles</strong>: After coating, roll the cheesecake balls in colorful sprinkles or crushed nuts for an added pop of color.</p>
</p>
<p>2. <strong>Chocolate Drizzle</strong>: Melt some additional white chocolate and drizzle it over the coated balls for a decorative touch. Use a piping bag or a fork for precision.</p>
</p>
<p>3. <strong>Fresh Berries</strong>: Garnish the serving platter with fresh raspberries or mint leaves to create a colorful, inviting display.</p>
</p>
<p>4. <strong>Serve in Mini Cups</strong>: Place each cheesecake ball in a cupcake liner or mini dessert cup for an elegant presentation.</p>
</p>
<p>By incorporating these creative ideas, your cheesecake balls will not only taste amazing but will look irresistible on any dessert table.</p>
</p>
<h2>Garnishing Your Cheesecake Balls</h2>
</p>
<h3>Importance of Presentation in Dessert Serving</h3>
</p>
<p>The way you present your desserts can elevate the entire dining experience. A beautiful presentation enhances the anticipation and enjoyment of the dish. For your cheesecake balls, consider these aspects of garnishing:</p>
</p>
<p>1. <strong>Visual Appeal</strong>: A well-garnished dessert draws the eye and makes it more enticing. The colors and textures create a feast for the senses.</p>
</p>
<p>2. <strong>Flavor Highlights</strong>: Garnishes can enhance or complement the flavors of the dessert, providing a hint of what to expect.</p>
</p>
<p>3. <strong>Personal Touch</strong>: Customizing your garnishing techniques allows you to express creativity and make the dessert uniquely yours.</p>
</p>
<h3>Step-by-Step Guide for Drizzling White Chocolate and Adding Raspberries</h3>
</p>
<p>1. <strong>Melt Additional White Chocolate</strong>: Use the same melting methods as before to prepare more melted white chocolate for drizzling.</p>
</p>
<p>2. <strong>Prepare a Piping Bag</strong>: Fill a small piping bag or a zip-top bag with the melted white chocolate. If using a zip-top bag, snip a small corner for controlled drizzling.</p>
</p>
<p>3. <strong>Drizzle Over Cheesecake Balls</strong>: Hold the piping bag above the cheesecake balls and gently squeeze to create a drizzle pattern. Move your hand back and forth for a decorative effect.</p>
</p>
<p>4. <strong>Add Fresh Raspberries</strong>: While the drizzle is still warm, strategically place fresh raspberries on top of the cheesecake balls. This adds a burst of color and flavor.</p>
</p>
<p>5. <strong>Chill Again</strong>: Place the garnished balls back in the refrigerator for a few minutes to set the drizzle before serving.</p>
</p>
<h3>Other Garnishing Options for Customization</h3>
</p>
<p>Feel free to get creative with your garnishing! Here are some additional ideas:</p>
</p>
<p>– <strong>Nuts</strong>: Crushed almonds or hazelnuts can add a crunchy texture.</p>
<p>– <strong>Cocoa Powder</strong>: Dust with cocoa powder for a sophisticated look.</p>
<p>– <strong>Edible Flowers</strong>: Garnish with edible flowers for a touch of elegance.</p>
<p>– <strong>Caramel Sauce</strong>: A drizzle of caramel can provide a sweet contrast to the tart raspberry flavor.</p>
</p>
<p>The possibilities are endless, allowing you to personalize your cheesecake balls for any occasion.</p>
</p>
<h2>Nutritional Information</h2>
</p>
<h3>Overview of the Nutritional Profile of Cheesecake Balls</h3>
</p>
<p>Understanding the nutritional profile of your dessert can help you make informed choices. Here’s a general overview of the nutritional content per cheesecake ball (based on a recipe yielding 20 balls):</p>
</p>
<p>– <strong>Calories</strong>: Approximately 120-150 calories</p>
<p>– <strong>Fat</strong>: 8-10 grams (depends on the cream cheese and chocolate used)</p>
<p>– <strong>Carbohydrates</strong>: 10-12 grams</p>
<p>– <strong>Protein</strong>: 2 grams</p>
<p>– <strong>Sugar</strong>: 8-10 grams</p>
</p>
<h3>Discussion on Portion Control and Serving Sizes</h3>
</p>
<p>While these cheesecake balls are a delightful treat, portion control is essential, especially if you’re mindful of sugar intake. Consider serving them in small quantities—one or two per person is usually sufficient to satisfy sweet cravings without overindulging.</p>
</p>
<h3>Suggestions for Healthier Alternatives</h3>
</p>
<p>If you’re looking to cut down on calories or fat, consider these healthier alternatives:</p>
</p>
<p>– <strong>Low-Fat Cream Cheese</strong>: Substitute regular cream cheese with a low-fat version to reduce calories.</p>
<p>– <strong>Greek Yogurt</strong>: For a tangy twist and lower fat content, replace some of the cream cheese with Greek yogurt.</p>
<p>– <strong>Sugar Substitutes</strong>: Use natural sweeteners like stevia or monk fruit to lower sugar content without sacrificing sweetness.</p>
</p>
<p>By making these adjustments, you can enjoy a guilt-free version of your favorite dessert!</p>
</p>
<h2>Serving Suggestions</h2>
</p>
<h3>Best Practices for Serving and Storing</h3>
</p>
<p>To serve your cheesecake balls at their best:</p>
</p>
<p>– <strong>Serve Chilled</strong>: Keep them refrigerated until just before serving for optimal texture and flavor.</p>
<p>– <strong>Use a Platter</strong>: Arrange them on a decorative platter for presentation, and include a small scoop or tongs for easy serving.</p>
</p>
<p>For storage, place the cheesecake balls in an airtight container in the refrigerator, where they can last for up to one week.</p>
</p>
<h3>Pairing Ideas: Recommended Beverages and Other Desserts</h3>
</p>
<p>Enhance your cheesecake balls experience with complementary pairings:</p>
</p>
<p>– <strong>Beverages</strong>: Serve with dessert wines like Moscato or a refreshing raspberry lemonade. Coffee or espresso can also create a delightful contrast to the sweetness.</p>
<p>– <strong>Other Desserts</strong>: Pair with fresh fruit tarts or chocolate mousse for a dessert spread that caters to various tastes.</p>
</p>
<h3>Seasonal Serving Suggestions: How to Adapt for Different Occasions</h3>
</p>
<p>These cheesecake balls are versatile and can be tailored for different occasions:</p>
</p>
<p>– <strong>Summer</strong>: Serve chilled alongside a berry salad for a refreshing treat.</p>
<p>– <strong>Holidays</strong>: Decorate with festive sprinkles or edible glitter for a holiday dessert table.</p>
<p>– <strong>Parties</strong>: Create a dessert platter with various flavors—try incorporating different fruits or chocolate coatings to surprise your guests.</p>
</p>
<h2>Conclusion</h2>
</p>
<p>The Irresistible White Chocolate Raspberry Cheesecake Balls are a delightful fusion of creamy cheesecake and tart raspberry, all enveloped in a smooth white chocolate coating. With their elegant presentation and delectable flavors, they are sure to impress at any gathering or special occasion.</p>
</p>
<p>We encourage you to try this recipe and experience the joy of creating your own homemade desserts. Sharing these treats with loved ones not only brings joy but also creates cherished memories around the dining table. So gather your ingredients, unleash your creativity, and enjoy the rewarding experience of baking these cheesecake balls. Whether for a festive celebration or a cozy family gathering, these cheesecake balls are bound to become a favorite treat that everyone will love.</p>
</div>

Cheesecake has long been a beloved dessert around the world, celebrated for its rich, creamy texture and versatility. From classic New York-style cheesecake to innovative variations featuring seasonal fruits, this dessert has captured the hearts (and taste buds) of many. Among the myriad of cheesecake-inspired treats, the Irresistible White Chocolate Raspberry Cheesecake Balls stand out as a delightful twist that combines the indulgent flavor of cheesecake with the fresh tartness of raspberries, all enveloped in a luscious white chocolate coating.

Irresistible White Chocolate Raspberry Cheesecake Balls

Indulge in the delightful taste of Irresistible White Chocolate Raspberry Cheesecake Balls! These bite-sized treats combine creamy cheesecake with fresh raspberries, all enveloped in a luscious white chocolate coating. Perfect for any occasion, they're easy to make, visually stunning, and sure to impress your guests. Discover the recipe and elevate your dessert game! #CheesecakeBalls #DessertRecipes #ChocolateLovers #RaspberryDelight #BakingAtHome #SweetTreats #PartyDesserts

Ingredients
  

8 oz cream cheese, softened

1 cup powdered sugar

1 teaspoon vanilla extract

1 cup crushed graham crackers

1 cup fresh raspberries (plus extra for garnish)

1 cup white chocolate chips

2 tablespoons coconut oil (or shortening)

A pinch of salt

Instructions
 

In a mixing bowl, combine the softened cream cheese, powdered sugar, vanilla extract, and a pinch of salt. Beat until the mixture is smooth and creamy.

    Gently fold in the crushed graham crackers until well incorporated.

      Add the fresh raspberries to the mixture. Be careful not to break them too much; you want to maintain some whole pieces for bursts of flavor.

        Using your hands, form the mixture into small balls, about 1 inch in diameter, and place them on a parchment-lined baking sheet. Once done, refrigerate for at least 30 minutes to firm up.

          Meanwhile, in a microwave-safe bowl, combine white chocolate chips and coconut oil. Microwave in 30-second intervals, stirring in between, until melted and smooth.

            Remove the cheesecake balls from the fridge. Using a fork, dip each ball into the melted white chocolate, ensuring they are fully coated.

              Return the coated balls to the parchment-lined baking sheet. You can use a toothpick to help with dipping if needed.

                Once all the balls are coated, place the baking sheet in the refrigerator for another 15-20 minutes to set the chocolate.

                  For garnish, melt a small amount of white chocolate and drizzle it over the set balls. Top with a whole raspberry for an elegant finish.

                    Serve chilled and enjoy the delightful combination of creamy cheesecake, tart raspberries, and sweet white chocolate!

                      Prep Time: 20 minutes | Total Time: 1 hour | Servings: 12 balls

                        WANT TO SAVE THIS RECIPE?

                        Leave a Comment

                        Recipe Rating