Introduction
As the warm summer months roll in, the vibrant colors and delightful flavors of fresh vegetables come into full swing. Among the many seasonal favorites, corn on the cob stands out as a beloved treat that evokes nostalgia and joy. Grilled, boiled, or roasted, corn is a versatile ingredient that can be enjoyed in various ways. However, one preparation method that has gained immense popularity is the crispy fried corn on the cob. This delightful version not only enhances the natural sweetness of the corn but also adds a crunchy texture that makes it irresistible.
Crispy fried corn on the cob is the perfect dish for summer gatherings, barbecues, or simply as a satisfying snack. Imagine biting into a perfectly fried ear of corn, the crispy exterior giving way to tender, juicy kernels bursting with flavor. The simplicity of this recipe, combined with the use of fresh, high-quality ingredients, elevates this dish to a new level, making it a standout favorite among family and friends. Whether you’re hosting a backyard cookout or craving a delicious dish to enjoy with loved ones, crispy fried corn on the cob is sure to delight.
The Allure of Fried Corn on the Cob
Corn on the cob has a rich cultural significance across various cuisines worldwide. From street vendors in Mexico serving elote topped with cheese and chili powder to summer cookouts in the United States, corn on the cob is more than just a food item; it’s a symbol of community, celebration, and tradition. The aroma of corn cooking over an open flame can transport you back to fond memories of family gatherings, fairs, and summer picnics.
The appeal of crispy fried corn on the cob lies not only in its flavor but also in its texture. The contrast between the crunchy coating and the succulent, sweet corn creates a delightful experience for the palate. Each bite offers a satisfying crunch, followed by a burst of juicy flavor, making it a truly irresistible snack. Personal experiences of enjoying fried corn at summer fairs or family cookouts often evoke feelings of nostalgia and warmth, reminding us of shared moments and laughter around the table.
This dish is not just about enjoying corn; it’s about savoring the experience of cooking and sharing it with others. The process of preparing crispy fried corn on the cob is straightforward, allowing both novice cooks and seasoned chefs to create a dish that brings people together.
Ingredients Overview
To make the perfect crispy fried corn on the cob, it’s essential to choose the right ingredients. Here’s a detailed breakdown of what you will need for this recipe:
Fresh Corn
The star of the dish is, of course, fresh corn. Selecting the right corn is crucial for achieving the best flavor and sweetness. Look for ears of corn that are plump, bright yellow or golden in color, and have tightly packed kernels. The husk should be green and moist, while the silk should be slightly sticky and fresh. Sweet corn varieties, like Silver Queen or Peaches and Cream, are excellent choices for frying due to their natural sweetness and tender texture.
Buttermilk
Buttermilk plays a vital role in this recipe, acting as a marinade that tenderizes the corn while infusing it with flavor. The acidity in buttermilk helps to break down the corn’s fibers, making it more tender and enhancing its natural sweetness. Marinating the corn in buttermilk for a few hours allows the flavors to permeate deeply, ensuring each bite is juicy and flavorful.
Flour and Cornmeal
The combination of flour and cornmeal creates the crispy coating that makes this dish so delicious. The flour provides a light, even coverage, while the cornmeal adds a delightful crunch that enhances the texture. Using a mix of both ensures that the coating adheres well to the corn and fries up perfectly golden brown.
Spices
To elevate the flavor profile of the fried corn on the cob, a blend of spices is essential. The recipe typically includes paprika, garlic powder, onion powder, and cayenne pepper. Paprika adds a subtle smokiness, while garlic and onion powders provide depth and richness. A pinch of cayenne pepper introduces a hint of heat, balancing the sweetness of the corn. Adjust the spice levels to your personal preference for a customized flavor experience.
Garnishes
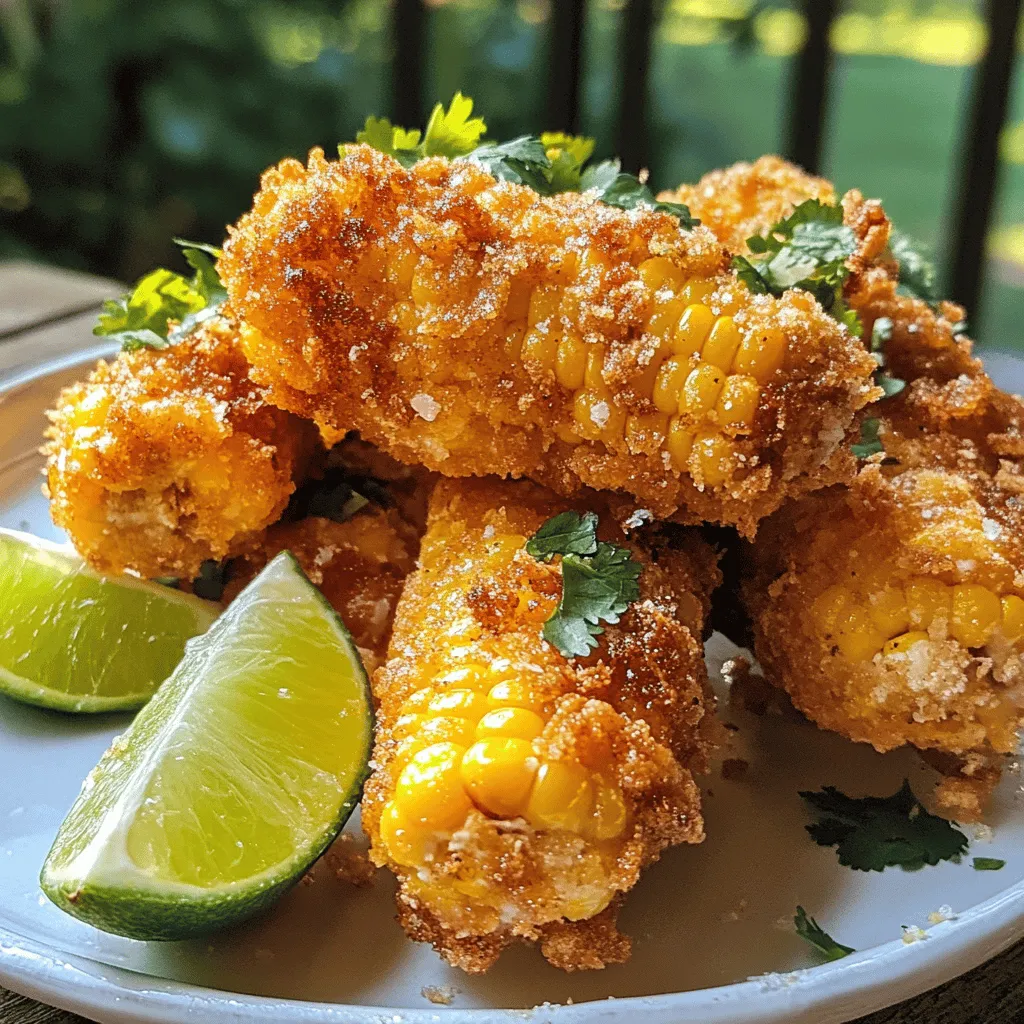
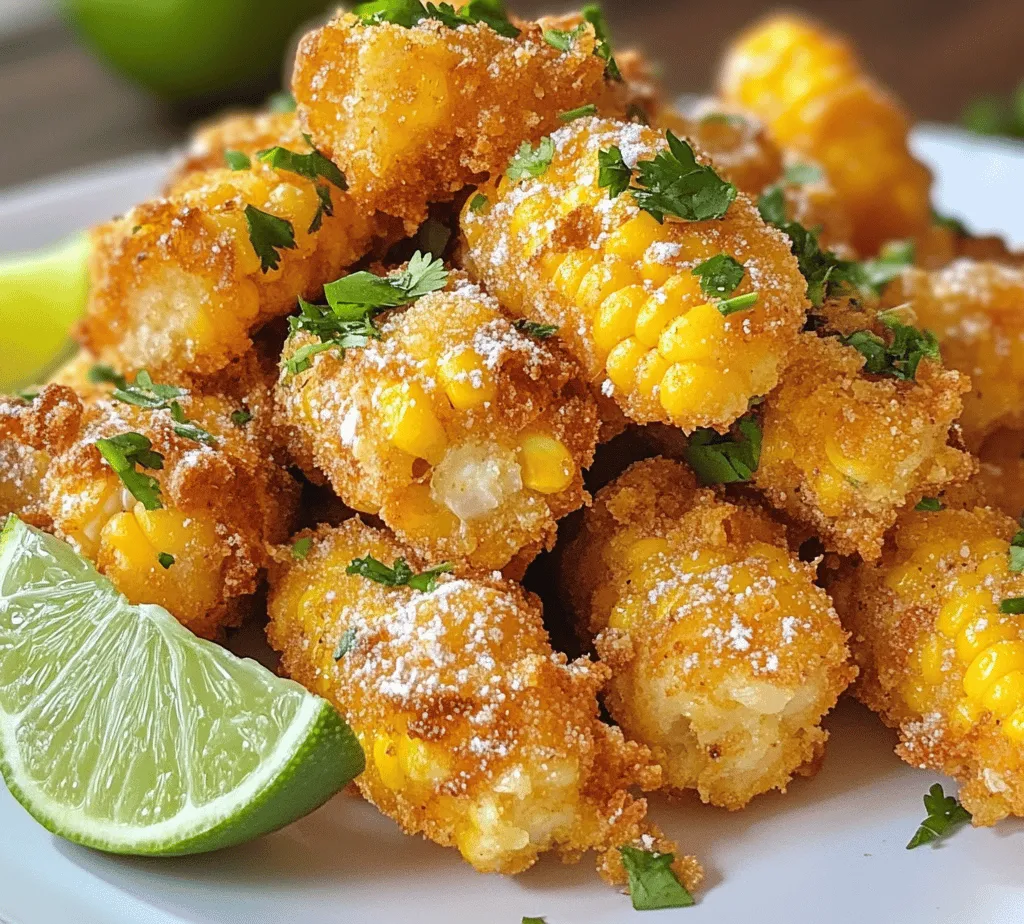
To finish off the dish, garnishes play a significant role in enhancing its appeal. Fresh herbs, such as cilantro or parsley, add a burst of color and freshness, while lime wedges provide a zesty contrast that brightens the overall flavor. Squeezing a bit of lime juice over the fried corn just before serving can elevate the taste, making it even more enjoyable.
Step-by-Step Instructions for Crispy Fried Corn on the Cob
Now that we’ve covered the ingredients, let’s dive into the step-by-step instructions for preparing crispy fried corn on the cob. Follow these detailed steps to achieve the perfect dish that will impress your guests.
Preparing the Corn
The first step in making crispy fried corn on the cob is properly preparing the corn itself. Begin by husking the corn, which involves removing the outer green husk and silks. Hold the ear of corn firmly and pull down the husk towards the base, stripping it away completely. Be sure to remove all the silk strands, as they can be unpleasant to eat.
Tip: For easier handling and serving, consider breaking the corn in half. This is especially helpful for larger ears of corn and can make it easier for guests to enjoy. Simply use a sharp knife to cut the corn in half, ensuring the pieces are of even length.
Marinating Process
Once the corn is prepared, the next step is marinating it in buttermilk. This marinating process is crucial as it enhances the flavor and contributes to the crispiness of the final product. Place the husked corn in a large bowl or resealable plastic bag, then pour in enough buttermilk to fully submerge the corn.
Allow the corn to marinate for at least 30 minutes, but for the best results, aim for a few hours or even overnight in the refrigerator. This extended marination period will allow the flavors to seep into the corn, resulting in a more flavorful and tender bite.
Mixing the Dry Ingredients
While the corn is marinating, it’s time to prepare the dry ingredients for the crispy coating. In a large mixing bowl, combine flour, cornmeal, and the various spices mentioned earlier. Whisk the dry ingredients together until they are evenly mixed.
Importance of Properly Combining: Ensuring that the flour and spices are thoroughly mixed is vital for achieving an even coating on the corn. If the spices are not evenly distributed, some bites may taste bland while others are overly seasoned. A well-mixed dry ingredient blend will ensure that each kernel of corn is perfectly coated with flavor.
—
This introduction and detailed breakdown of the ingredients and initial steps of the Crispy Delight Fried Corn on the Cob recipe sets the stage for an engaging cooking experience. The upcoming sections will further guide readers through the frying process and tips for achieving the perfect dish.
Tips on Adjusting Spice Levels Based on Personal Preference
When it comes to frying corn on the cob, adjusting the spice levels allows you to tailor the dish to your taste. For those who prefer milder flavors, consider reducing the amount of cayenne pepper or omitting it altogether. Instead, you can enhance the flavor with a pinch of smoked paprika for a subtle smokiness without the heat.
On the other hand, if you enjoy a good kick, feel free to increase the cayenne pepper or add some diced jalapeños to the coating mixture. Another great option is to mix in spicy seasonings such as chili powder or hot sauce into the buttermilk prior to coating. Remember, the key is to taste as you go and make adjustments that suit your palate.
Heating the Oil
Properly heating the oil is crucial for achieving that crispy exterior while keeping the inside tender and juicy. Start by selecting a deep, heavy-bottomed pot or a deep fryer to ensure even heat distribution. Fill the pot with at least 2-3 inches of oil, allowing enough space for the corn to be submerged without causing the oil to overflow.
Recommended Method for Heating Oil
Begin by placing the pot on the stove over medium heat. As the oil heats, use a thermometer to monitor the temperature, aiming for around 350°F to 375°F. This temperature range is ideal for frying corn on the cob, ensuring a crispy texture without overcooking the corn.
How to Test Oil Temperature for Optimal Frying Results
A quick method to test if the oil is ready is to drop in a small piece of bread; if it sizzles and turns golden brown within 30 seconds, the oil is at the right temperature. Alternatively, you can sprinkle a pinch of flour into the oil. If it bubbles vigorously, you’re good to go. Always be cautious and avoid overheating the oil, as it can become dangerous and lead to a fire hazard.
Coating the Corn
Coating the corn properly is essential for achieving that signature crunch.
Step-by-Step Guide on Dredging the Corn in the Coating Mixture
1. Start by removing the corn from the buttermilk and letting any excess drip off.
2. In a shallow dish, combine the flour, cornmeal, and your chosen spices.
3. Take each corn cob and roll it in the flour mixture, ensuring it is fully covered.
4. After the first coat, return the corn to the buttermilk briefly and then dredge it again in the flour mixture for a thicker coating.
Tips on Achieving a Thick and Even Coating Without Excess Flour
To prevent excess flour from clumping, shake the corn gently after dredging to remove any loose flour. Additionally, working in batches can help maintain even coating and prevent overcrowding, which can lead to a soggy texture.
Frying the Corn
Now it’s time to fry the corn and create that perfect crispy delight.
Detailed Frying Instructions
1. Once the oil is heated, carefully place the coated corn cobs into the hot oil. Avoid dropping them in, as this can splatter hot oil.
2. Fry the corn in batches, depending on the size of your pot. Fry for about 3-4 minutes on each side, or until golden brown.
3. Turn the corn occasionally using tongs to ensure even cooking on all sides.
Visual Cues for Determining When the Corn is Perfectly Fried
Keep an eye on the color of the coating; it should turn a beautiful golden brown. Additionally, you’ll hear a satisfying sizzle as the corn fries. If you notice any excessive bubbling or splattering, it may indicate the temperature is too high, so adjust the heat as needed.
Draining and Serving
After frying, it’s crucial to drain the corn properly to maintain its crispy texture.
Best Practices for Draining Excess Oil
Once the corn is golden and cooked, use tongs to carefully remove it from the oil. Place the fried corn on a plate lined with paper towels to absorb any excess oil. This step is vital to keep the coating crisp and prevent it from becoming soggy.
Presentation Tips for Serving the Dish Attractively
To serve, arrange the crispy corn on a large platter. Consider garnishing with freshly chopped herbs, a sprinkle of chili powder, or grated cheese for added flavor and visual appeal. For an extra touch, serve with a selection of dipping sauces, such as ranch dressing, garlic aioli, or a spicy salsa.
Nutritional Information
Corn on the cob is not just delicious; it’s also packed with nutritional benefits.
Overview of the Nutritional Benefits of Corn on the Cob
Corn is an excellent source of fiber, which aids in digestion and promotes gut health. It’s rich in vitamins such as B vitamins, which are essential for energy production, and antioxidants that help combat free radicals in the body.
Analysis of the Ingredients and Their Contribution to a Balanced Diet
The buttermilk in this recipe adds calcium and probiotics, supporting bone health and digestion. When combined with whole grain flour and cornmeal, this dish offers a satisfying balance of carbohydrates, protein, and healthy fats, making it a well-rounded choice for a snack or side dish.
Considerations for Dietary Restrictions
For those with gluten sensitivities, consider substituting traditional flour with a gluten-free flour blend or almond flour to enjoy this crispy delight without concerns. Additionally, using plant-based milk alternatives can make this recipe suitable for those on a dairy-free diet.
Variations and Customizations
There are countless ways to customize this recipe to suit your taste preferences.
Explore Different Seasoning Variations
– Spicy: Add extra cayenne pepper or a dash of hot sauce to the coating for a fiery kick.
– Cheesy: Incorporate grated Parmesan cheese into the flour mixture for a cheesy crust.
– Herb-Infused: Mix dried herbs such as oregano or thyme into the coating for a fragrant twist.
Suggestions for Alternative Frying Methods
If you prefer healthier cooking methods, consider oven-baking or air-frying the corn. For oven-baking, preheat your oven to 425°F, place the coated corn on a baking sheet lined with parchment paper, and bake for 25-30 minutes, flipping halfway through. In an air fryer, cook at 375°F for about 15-20 minutes until crispy.
Ideas for Additional Toppings
Elevate your corn on the cob by adding toppings such as melted butter, a sprinkle of chili powder, or fresh lime juice for a refreshing twist. Crumbled feta cheese or diced avocados can also add a delicious creamy element to the dish.
Conclusion
In conclusion, making crispy fried corn on the cob is not only a fun culinary adventure but also a delightful way to celebrate the flavors of summer. This recipe is simple yet versatile, allowing for personal touches and variations that cater to different tastes and dietary preferences.
Whether you’re preparing a festive barbecue, a cozy family dinner, or just a snack for yourself, this crispy delight is sure to impress. So gather your ingredients, heat that oil, and enjoy the satisfying crunch of perfectly fried corn on the cob. You’ll find that this dish not only brings joy to your taste buds but also creates memorable moments to share with family and friends. Don’t hesitate to give this recipe a try and indulge in the delightful flavors it brings!


