Skip to content
  • Disclaimer
  • Terms Of Use
  • GDPR Policy
  • Cookie Policy
themomdish.com
themomdish.com
  • Home
  • Drinks
  • Appetizer
  • Dinner
  • Desserts
  • Breakfast
  • About
  • Contact
  • Privacy Policy
  • Home
  • Drinks
  • Appetizer
  • Dinner
  • Desserts
  • Breakfast
  • About
  • Contact
  • Privacy Policy

Appetizer

- 1 pound boneless, skinless chicken breasts, cooked and shredded - 1 cup cream cheese, softened - 1 cup shredded mozzarella cheese - 4 cloves garlic, minced - 1 tablespoon fresh parsley, chopped - 1 teaspoon garlic powder - Salt and pepper to taste - 1 package (1 lb) puff pastry sheets, thawed - 1 egg, beaten (for egg wash) Choosing the right chicken Use boneless, skinless chicken breasts for the best texture. Cook them until tender, then shred them. This will help keep your filling moist and flavorful. Best types of cheese for flavor and texture Cream cheese adds a nice creaminess. The mozzarella gives a stretchy, gooey texture when baked. Together, they create a perfect balance that complements the garlic flavor. Variations in seasonings Feel free to adjust the seasonings. You can add herbs like thyme or dill for more depth. A pinch of red pepper flakes can add a nice kick, too. The goal is to create a filling that you love. Check out the Full Recipe for detailed instructions on how to put this all together! First, you need to preheat your oven to 400°F (200°C). This ensures the puffs cook evenly and get nice and crispy. Next, grab a baking sheet and line it with parchment paper. This will keep the puffs from sticking and make cleanup a breeze. In a large bowl, combine the shredded chicken and cream cheese. Mix them until they blend well. Then, stir in the minced garlic, parsley, garlic powder, salt, and pepper. This filling is the heart of your garlic chicken puffs. The flavors mix together to create a tasty treat. Now it’s time to roll out the puff pastry sheets on a lightly floured surface. Cut the pastry into 3-inch squares. Place a heaping tablespoon of the chicken filling in the center of each square. Fold the corners over the filling to create a small pouch. Make sure to pinch the edges tightly to seal them well. This step is key to keep the filling inside while baking. Before you bake, brush the tops of the puffs with the beaten egg. This will give them a beautiful golden color. Place the puffs on the prepared baking sheet and bake for 15-20 minutes. Keep an eye on them; they should be puffed and golden brown when done. Let the puffs cool slightly before serving. Enjoy these crispy and flavorful treats! For the full recipe, check the details above. To make the best garlic chicken puffs, you must avoid soggy pastry. Here are some tips: - Use cold puff pastry: Keep it chilled until you're ready to use it. - Do not overfill: A tablespoon of filling is enough. Too much can make the pastry soggy. - Bake immediately: Once you seal the puffs, place them in the oven right away. Even cooking is vital for perfect puffs. Follow these tips: - Space them out: Leave space between the puffs on the baking sheet. This helps hot air circulate. - Rotate the baking sheet: Halfway through baking, turn the sheet for even heat. Garlic chicken puffs pair well with many sides. Here are some great options: - Marinara sauce: A classic dipping sauce for added flavor. - Fresh salad: A light salad balances the richness of the puffs. For garnishing ideas, consider using fresh herbs. They add color and flavor: - Chopped parsley: Sprinkle on top for a fresh touch. - Basil leaves: Add whole leaves for an aromatic hint. When making garlic chicken puffs, avoid these common mistakes: - Overfilling the pastry: Filling should be just enough to close the edges. - Not sealing edges correctly: Pinch the edges tightly to prevent leaks during baking. Following these tips will help you create garlic chicken puffs that are crispy and flavorful. If you're looking for the full recipe, check out the Full Recipe section! {{image_2}} You can change the filling to make it fit your taste. For a vegetarian option, try using spinach and cheese. Simply mix cooked spinach with ricotta or feta cheese. This creates a creamy and flavorful filling. If you want meat, consider other proteins like beef or shrimp. Cook and season the meat before mixing it with cream cheese and garlic. This adds new flavors and keeps it fun. You can spice up your garlic chicken puffs by adding red pepper flakes. This adds heat and a nice kick to each bite. If you prefer herbs, try thyme or basil. These herbs add freshness and depth to the filling. Feel free to experiment with different spices. Each option gives a unique twist to the classic garlic chicken puffs. For a healthier option, consider air frying the puffs. This method gives the same crispy texture but with less oil. Just set your air fryer to the right temperature and check often. You can also freeze the puffs for later. After assembling, place them on a baking sheet and freeze until firm. Then, transfer them to a freezer bag. This makes it easy to bake them fresh whenever you want. For the full recipe, check the earlier section. To keep your garlic chicken puffs fresh, store them correctly. First, let them cool down to room temperature. Then, place them in an airtight container. This can help prevent them from getting soggy. In the fridge, these puffs can last about three days. If you want to save them for longer, freezing is a great option. Wrap each puff in plastic wrap. Then, place them in a freezer-safe bag. This way, you can enjoy them for up to two months. Just remember to label the bag with the date. When you're ready to enjoy your garlic chicken puffs again, reheating them properly is key to keeping them crispy. The best method is to use an oven. Preheat your oven to 375°F (190°C). Place the puffs on a baking sheet and bake for about 10 minutes. This will help restore their crispy texture. If you're in a hurry, you can use a microwave but be careful. Microwaving can make the puffs soggy. If you must use a microwave, heat them in short bursts of 15 seconds. Check them often to avoid overcooking. Aim for a warm center, but try to keep the outer layer crisp. To make garlic chicken puffs from scratch, follow these easy steps: 1. Preheat your oven to 400°F (200°C). Line a baking sheet with parchment paper. 2. In a large bowl, mix shredded chicken, cream cheese, mozzarella, minced garlic, parsley, garlic powder, salt, and pepper. 3. Roll out puff pastry on a floured surface. Cut it into 3-inch squares. 4. Place a tablespoon of filling in each square's center. 5. Fold the corners over the filling and pinch the edges to seal. 6. Brush the tops with beaten egg for a golden look. 7. Bake for 15-20 minutes until golden brown. 8. Let them cool slightly before serving. This recipe makes about 12 puffs and takes around 40 minutes, including prep time. Check out the Full Recipe for more details. Yes, you can use store-bought chicken. It saves time and is convenient. However, it may lack the fresh flavor of homemade. I recommend rotisserie chicken for a good balance of ease and taste. It adds a nice richness to your puffs. Absolutely! You can prepare garlic chicken puffs ahead of time. Assemble them and freeze before baking. Place them on a baking sheet and freeze until firm. After, transfer to a freezer-safe bag. They can stay frozen for up to a month. Bake from frozen, adding a few extra minutes to the cooking time. Garlic chicken puffs pair well with many sides. Here are some great options: - Fresh salad with a light vinaigrette - Marinara sauce for dipping - Garlic aioli for a creamy touch - A side of pickled vegetables for crunch These sides enhance the flavors and add variety to your meal. Garlic chicken puffs last about 3-4 days in the fridge. Store them in an airtight container to keep them fresh. Always check for signs of spoilage before eating. If they look or smell off, it's best to throw them away. Enjoy them warm for the best taste! These garlic chicken puffs are a delightful treat. You learned about the key ingredients, preparation, and assembly. I shared tips to help you avoid common mistakes. You can customize the filling and explore healthier cooking methods. These puffs can impress at any gathering. Follow the storage advice to keep leftovers fresh. Enjoy your cooking and the delicious results!

Garlic Chicken Puffs Crispy and Flavorful Treat

May 1, 2025 by Emma

Are you ready to impress your family and friends with a delicious snack? My Garlic …

Learn more

Categories Appetizer
- 1 lb ground beef - 1 lb ground sausage - 1 can (15 oz) black beans, drained and rinsed - 1 can (15 oz) pinto beans, drained and rinsed - 1 cup corn kernels (canned or frozen) - 1 (8 oz) package cream cheese, softened - 1 cup sour cream - 1 cup shredded cheddar cheese - 1 cup shredded Monterey Jack cheese - 1 packet ranch dressing mix - 1 tablespoon taco seasoning - Sliced jalapeños (for garnish) - Tortilla chips (for serving) You need a mix of hearty meats and creamy goodness for Meaty Texas Trash Dip. The blend of beef and sausage gives it deep flavor. The beans add protein and texture. Cream cheese and sour cream make it rich and smooth. Corn adds a nice sweetness, while the cheese brings it all together. The ranch dressing mix and taco seasoning add a kick. You can top this dip with jalapeños for a spicy finish. Serve it warm with crispy tortilla chips for a great snack or party treat. - Prep Time: 15 minutes - Cook Time: 25 minutes - Total Time: 40 minutes This dip takes just 40 minutes from start to finish. You can enjoy it with friends or family in no time. It's perfect for game day or any fun gathering. - Servings: 8-10 This recipe serves 8 to 10 people. It’s great for sharing, so make sure to have enough chips on hand! If you have leftovers, they can be enjoyed the next day. Just reheat and dive back in! You can find the full recipe in the original post. First, you need to brown the ground beef and sausage together. Heat a large skillet over medium heat. Add both meats to the skillet. Use a spatula to break them apart as they cook. Stir until they are fully cooked and browned, which takes about 8 to 10 minutes. Be sure to drain any excess fat before moving on. Next, lower the heat and mix in the cream cheese and sour cream. Add the softened cream cheese first, then the sour cream. Stir these into the meat mixture until everything is melted and well combined. This step takes about 2 to 3 minutes. The mixture should be creamy and smooth. Now, it’s time to add more flavor! Sprinkle in the ranch dressing mix and taco seasoning. Mix them well into the meat and cream cheese blend. After that, add the black beans, pinto beans, and corn. Toss in half of the shredded cheddar cheese and Monterey Jack cheese as well. Stir everything together until it's well mixed and heated through, which takes about 5 minutes. Finally, transfer the mixture into a greased baking dish. Spread it evenly across the dish. Top it with the remaining shredded cheeses. Bake in a preheated oven set to 350°F (175°C) for about 20 to 25 minutes. You’ll know it’s done when the dip is hot, bubbly, and the cheese is melted and slightly golden. Let it cool for a few minutes before serving. Enjoy with tortilla chips! For the full recipe, check out the details above. To get the best creamy texture, start with softened cream cheese. This helps it mix well. When you add sour cream, make sure to stir it in fully. This keeps your dip smooth and rich. If you want more creaminess, add extra sour cream or cheese. You can also blend the dip after baking for a silkier finish. Add some extra kick to your dip with spices. A dash of garlic powder or onion powder works well. You can even try a teaspoon of smoked paprika for a smoky taste. If you like it spicy, add more jalapeños or even a splash of hot sauce. Fresh herbs like cilantro can brighten the flavor too. Serve your dip hot from the oven for the best taste. Use sturdy tortilla chips for dipping. If you want more sides, fresh veggies like carrots and celery are great. A side of salsa or guacamole adds more flavor. You can also serve it with a cold drink for a fun snack time. For the full recipe, check out the detailed instructions above. {{image_2}} To make a meatless version of Meaty Texas Trash Dip, swap out the meats. You can use a mix of black beans and pinto beans for protein. Add in some cooked lentils or chopped mushrooms for a hearty texture. For extra flavor, toss in diced bell peppers or zucchini. These veggies add great taste and color. You can also replace the cream cheese with a plant-based alternative. This keeps the dip creamy while fitting vegetarian needs. If you love heat, there are many ways to spice things up! Start by adding diced jalapeños or serrano peppers. You can mix in a little hot sauce for a kick. For a smoky flavor, consider using chipotle in adobo sauce. Another option is to add pepper jack cheese instead of regular cheese. This will give your dip a nice zing. Adjust the spice level to fit your taste buds. Changing the cheese can bring new flavors to the dip. While cheddar and Monterey Jack are great, feel free to experiment. Try using gouda for a rich, smoky flavor. For a creamier texture, swap in some cream cheese or goat cheese. You can even mix in a bit of feta for a tangy twist. Each cheese will give your dip a unique taste. So, don’t hesitate to play with your cheese choices. For the full recipe, check out the details above! To keep your Meaty Texas Trash Dip fresh, follow these steps: - Let the dip cool to room temperature. - Transfer it to an airtight container. - Store it in the fridge for up to three days. This method keeps the dip safe and tasty for later. Reheating the dip can be easy. Here’s how: - Preheat your oven to 350°F (175°C). - Place the dip in an oven-safe dish. - Cover it with foil to prevent drying. - Heat for about 15-20 minutes until warm. You can also use a microwave. Heat in short bursts, stirring in between. Yes, you can freeze Meaty Texas Trash Dip! Here’s how: - Cool the dip completely first. - Pack it in a freezer-safe container. - Label it with the date and contents. - Freeze for up to three months. To enjoy, thaw it in the fridge overnight and reheat as described above. Yes, you can make this dip ahead. Cook the meat and mix it with other ingredients. Once done, put the dip in a pan. Cover and store it in the fridge for up to two days. When you are ready to serve, bake it as normal. This saves time and keeps it fresh for your guests. You can serve the dip with a variety of items. Here are some great choices: - Tortilla chips - Fresh veggies like carrots and bell peppers - Sliced baguette or toasted bread - Salsa or guacamole for extra flavor Serve the dip hot from the oven. It looks great in a colorful dish. You can also add jalapeños on top for a nice touch. The heat level can vary. This dip has a mild spice from the taco seasoning and jalapeños. If you like it spicier, you can: - Add more jalapeños or use spicy ones - Mix in hot sauce before baking - Use spicy sausage instead of regular You can adjust the heat to match your taste. Make it your own! This blog post covers how to make a creamy and tasty Meaty Texas Trash Dip. We explored the ingredients, shared clear steps, and offered tips to enhance flavor. You can easily adapt this dish to your taste, whether adding spice or making it meatless. In the end, this dip is perfect for gatherings. It’s easy to prepare and fun to serve. Enjoy every bite of your delicious creation!

Meaty Texas Trash Dip Hearty and Flavorful Treat

May 1, 2025 by Emma

Craving a hearty snack that packs flavor? Meet the Meaty Texas Trash Dip! This creamy, …

Learn more

Categories Appetizer
- 1 lb salmon fillet, skin off and cut into bite-sized cubes - 1 cup panko breadcrumbs - 1/2 cup all-purpose flour - 1 teaspoon paprika - 1 teaspoon garlic powder - 1/2 teaspoon salt - 1/4 teaspoon black pepper - Vegetable oil, for frying - 1/3 cup mayonnaise - 3 tablespoons sweet chili sauce - 1 tablespoon Sriracha - 2 green onions, sliced for garnish To make Crispy Bang Bang Salmon Bites, you need fresh ingredients. Start with the salmon fillet, cut into small cubes. Using fresh fish makes a big difference in taste. You will also need panko breadcrumbs for that perfect crunch. They are lighter than regular breadcrumbs and give a nice texture. The all-purpose flour helps the batter stick. For flavor, we add paprika and garlic powder. Paprika gives a mild sweetness and a nice color. Garlic powder adds a bit of zing, making it hard to resist these bites. Sprinkle in salt and black pepper for basic seasoning. When frying, use vegetable oil. It has a high smoke point, which is great for frying. For the sauce, mix mayonnaise, sweet chili sauce, and Sriracha. This combination is creamy, sweet, and spicy. Finally, slice some green onions for garnish. They add a nice touch and fresh flavor to the dish. For the full recipe, check the complete guide. Start by patting the salmon cubes dry. This helps them crisp up when you fry them. Use a clean paper towel to remove any moisture. Next, cut the salmon into bite-sized pieces. Aim for about one-inch cubes. This size helps the salmon cook evenly and makes them easy to eat. Now, let’s set up the breading station. You will need three bowls: one for flour, another for beaten eggs, and the last for panko breadcrumbs. In the panko bowl, mix in paprika, garlic powder, salt, and black pepper. This gives the bites great flavor. Coat each salmon cube in flour first. Make sure it gets a nice, even layer. Then, dip it into the beaten eggs. Finally, roll it in the panko mixture. Press gently to help the crumbs stick well. Repeat this for all the salmon pieces. Heat vegetable oil in a large frying pan. You want about a quarter-inch deep of oil. Warm it over medium-high heat. Wait for it to get hot but not smoking. Carefully add the coated salmon bites to the hot oil. Fry them in small batches. Don't crowd the pan; this keeps them crispy. Cook for about 2-3 minutes on each side. You want them golden brown and crunchy. Use a slotted spoon to remove them. Place the salmon bites on a paper towel-lined plate to drain any excess oil. This helps keep them crispy. Now you are ready to enjoy your crispy bang bang salmon bites! For the full recipe, check out the earlier section. To achieve that perfect crunch, drying the salmon cubes is key. Moisture can make your bites soggy instead of crispy. Use paper towels to pat them dry before breading. Frying temperature is also important. Heat your oil to medium-high. If it’s too low, the salmon will absorb oil and become greasy. If it's too high, the outside will burn before the inside cooks. You can customize the Bang Bang sauce to fit your taste. Start with the basic mix of mayonnaise, sweet chili sauce, and Sriracha. Adjust the heat by adding less or more Sriracha. Want to mix it up? Try adding lime juice for zing or garlic powder for extra flavor. You can even swap mayonnaise for Greek yogurt for a lighter option. Serving your crispy salmon bites on a bright plate makes them pop. Arrange them in a circle or stack them for a fun look. For garnishing, add sliced green onions on top. This not only adds color but also fresh flavor. You can also serve with a side of cucumber salad. This adds a nice crunch and balances the meal. {{image_2}} You can cook crispy Bang Bang salmon bites in different ways. Baking is a great option if you want less oil. Preheat your oven to 400°F (200°C). Place the coated salmon bites on a baking sheet lined with parchment paper. Bake for 12-15 minutes until they turn golden and crispy. You might prefer the air fryer for a healthier choice. Set your air fryer to 375°F (190°C). Arrange the salmon bites in a single layer. Cook for about 10-12 minutes until they are crispy and cooked through. Both methods give you tasty results, just with less oil. Feel free to swap out the salmon for other fish. Cod or tilapia works well. Both have a mild flavor and cook nicely. If you want a different twist, use shrimp instead. The cooking time may vary, so keep an eye on them. If you need gluten-free options, use gluten-free breadcrumbs. They work just as well as panko. You can also replace all-purpose flour with almond flour. This keeps the bite crispy and adds a nutty flavor. You can add spices or herbs to the coating for more flavor. Try cayenne for heat or Italian herbs for a fresh taste. Simply mix them into the panko before coating the fish. Dipping sauces are a fun way to enhance your bites. While the Bang Bang sauce is delicious, you can try a sweet and sour sauce or a spicy aioli. Experiment with different flavors to find your favorite. For the full recipe, check out the Crispy Bang Bang Salmon Bites section. To keep your salmon bites fresh, store them in an airtight container. Place parchment paper between layers to prevent sticking. This method helps maintain their crunch. In the fridge, they stay good for up to three days. However, they taste best when eaten fresh. When you want to enjoy leftovers, reheating is key. Use an oven or an air fryer for the best results. Preheat your oven to 375°F (190°C). Place the salmon bites on a baking sheet. Heat for about 10 minutes, or until crispy again. Avoid microwaving, as it can make them soggy. You can freeze salmon bites before or after cooking. If you freeze before cooking, coat the salmon and then freeze them on a baking sheet. Once frozen, transfer to a bag. If you choose to freeze after cooking, wait until they cool down. Thaw them in the fridge overnight before reheating. For best results, avoid refreezing after thawing. To cut salmon into uniform pieces, use a sharp knife. Start with a whole fillet. Remove the skin if it’s still on. Cut the fillet into strips, about one inch wide. Then, slice those strips into cubes. Aim for bite-sized pieces so they cook evenly. If the pieces are the same size, they all cook at the same time. Yes, you can prepare some steps in advance. You can cut the salmon and coat it in the breading. Then, place the salmon bites on a tray and cover them. Store them in the fridge for up to an hour before frying. This makes cooking faster when you are ready to eat. To change the spice level, simply adjust the amount of Sriracha. If you want it milder, use less Sriracha. You can also add a bit of honey or sugar to balance the heat. For more spice, add extra Sriracha or even some red pepper flakes. Taste as you go to reach your perfect level. These salmon bites pair well with many sides. Try a fresh cucumber salad for a cool crunch. You can also serve them with rice or quinoa for a filling meal. A side of steamed broccoli or green beans adds a healthy touch. Serve with the Bang Bang sauce for dipping to enhance flavor. For the full recipe, check out the section above. Making crispy bang bang salmon bites is easy and fun. We covered key ingredients, the right way to prepare, and cooking tips. You can customize the bang bang sauce to fit your taste and even try different dips. Storing leftovers and reheating them is simple, too. Remember, practice makes perfect, so don’t worry if your first batch isn’t flawless. Enjoy experimenting with this recipe, and soon you’ll be serving up delicious bites that everyone loves.

Crispy Bang Bang Salmon Bites Tasty and Simple Recipe

April 30, 2025 by Emma

Looking for a quick and tasty way to enjoy salmon? These Crispy Bang Bang Salmon …

Learn more

Categories Appetizer
- 1 pound salmon fillet, skinless and boneless - 1 cup panko breadcrumbs - 1/2 cup all-purpose flour - 2 large eggs - 1 teaspoon garlic powder - 1 teaspoon paprika - Salt and pepper to taste - 1/4 cup mayonnaise - 2 tablespoons sweet chili sauce - 1 tablespoon sriracha (adjust for spice preference) - 2 green onions, finely chopped - Sesame seeds for garnish To make Crispy Bang Bang Salmon Bites, you need fresh, high-quality ingredients. The salmon fillet should be skinless and boneless. This makes it easy to cut into bite-sized pieces. Panko breadcrumbs give a great crunch. All-purpose flour helps the coating stick. Eggs bind everything together, making each bite crispy and delicious. For seasoning, garlic powder and paprika add flavor. Salt and pepper are key for taste. The sauce is a mix of mayonnaise, sweet chili sauce, and sriracha. This combo creates a creamy, spicy dip that pairs well with the salmon. Garnish with green onions and sesame seeds for extra flair. They add a nice touch and a bit of color. You can find the full recipe in the link above. Enjoy your cooking! - Cut the salmon fillet into bite-sized cubes. - Set aside the prepared salmon. To start, take your skinless, boneless salmon fillet and slice it into 1-inch cubes. This size ensures even cooking and a perfect bite. Once cut, place them aside while you prepare the coating. - Prepare three bowls for flour, egg mixture, and panko breadcrumbs. - Bread the salmon cubes following the coating process. In a smooth flow, get three bowls. In the first bowl, place all-purpose flour. In the second bowl, whisk together two large eggs, garlic powder, paprika, salt, and pepper. The last bowl should hold panko breadcrumbs, which give that nice crunch. Now, take each salmon cube. First, dip it in flour, shaking off any extra. Next, coat it in the egg mixture, then roll it in panko breadcrumbs. Press gently to help the crumbs stick. Repeat this until all your salmon pieces are coated and ready for frying. - Heat oil in a skillet. - Fry the salmon bites until golden brown. - Drain excess oil on paper towels. Grab a large skillet and pour in about 1/4 inch of oil. Heat it over medium heat until it shimmers. Carefully add the breaded salmon bites in a single layer. Do not overcrowd the pan; this helps them cook evenly. Fry them for about 3-4 minutes on each side, or until they turn golden brown and crispy. Once done, remove the bites and let them drain on paper towels. This step will help keep them crispy. Enjoy the process and the delightful scent filling your kitchen! For the full recipe, check out the complete instructions above. - Ensure oil is hot enough before frying. This step is key for crispy bites. - Do not overcrowd the skillet while frying. This keeps the temperature right, leading to even cooking. - Experiment with additional spices in the egg mixture. Adding some cayenne can ramp up the flavor. - Adjust sriracha for desired heat level. Start with a little, then add more if you want a kick. - Serve with dipping sauce on the side. This makes each bite more fun and flavorful. - Use fresh herbs for garnish. Chopped green onions or cilantro add a nice touch and color. I always love to present my Crispy Bang Bang Salmon Bites with a splash of color. For the full recipe, check out the detailed instructions above. {{image_2}} You can swap salmon for chicken or tofu. Both options work well. Chicken gives a classic taste. Tofu offers a nice plant-based choice. Cut them into bite-sized pieces, just like the salmon. Then follow the same coating and frying steps. You will have a tasty snack either way! For gluten-free bites, use gluten-free breadcrumbs. They still give that crispy texture you want. If you need a vegan option, try using flax eggs instead of regular eggs. Mix one tablespoon of ground flaxseed with three tablespoons of water. Let it sit for a few minutes until it thickens. This mix acts like an egg and helps the coating stick. To change up the taste, experiment with different sauces. Buffalo sauce adds a spicy kick. Teriyaki sauce brings a sweet and savory flavor. You can also add citrus zest, like lemon or lime, to brighten the taste. Just sprinkle some zest into your coating mixture for a fresh twist. You will be amazed at how a simple change can elevate these bites! For the full recipe, check out the earlier section. To keep your crispy salmon bites fresh, store them in an airtight container. Place parchment paper between layers to avoid sticking. Refrigerate them for up to three days. This keeps the bites from losing their crunch. To reheat your salmon bites, use an oven or an air fryer. Preheat the oven to 350°F (175°C). Place the bites on a baking sheet and heat for about 10 minutes. For an air fryer, set it to 350°F and cook for around 5-7 minutes. This method keeps them crispy. You can freeze the salmon bites for later. Allow them to cool completely first. Arrange them in a single layer on a baking sheet and freeze until firm. Then, transfer them to a freezer bag. They can last up to two months. When you want to enjoy them again, thaw them in the fridge overnight. Reheat using the oven or air fryer for the best results. Enjoy your bites fresh and crispy! For the full recipe, check out the earlier sections. You can find the full recipe above. It includes all the steps to create these tasty bites. Trust me, you will love making them! Yes, you can bake the salmon bites. Preheat your oven to 400°F (200°C). Arrange the breaded salmon on a baking sheet lined with parchment paper. Lightly spray them with oil to help them crisp up. Bake for about 15-20 minutes, flipping halfway through. They won't be as crispy as fried ones but still taste great! The best sauces for these bites are sweet chili sauce and soy sauce. You could also try a spicy mayo or a tangy tartar sauce. Each adds a nice kick to the salmon! In this article, we explored how to make crispy Bang Bang salmon bites. We discussed the key ingredients, preparation, cooking steps, and tips for great flavor. You can even make variations with different proteins and sauces. Remember to store leftovers properly and reheat for the best taste. My final thought: enjoy your cooking journey and don't hesitate to experiment with flavors and techniques. Happy cooking!

Crispy Bang Bang Salmon Bites Tasty and Easy Snack

April 30, 2025 by Emma

Are you ready to elevate snack time with a flavorful twist? Crispy Bang Bang Salmon …

Learn more

Categories Appetizer
- 8 ounces cream cheese - 1 cup ranch dressing - 1 cup cooked bacon, crumbled These main ingredients give the roll-ups their creamy and savory flavor. Cream cheese adds a rich texture. Ranch dressing brings a tangy taste, while the crumbled bacon provides a salty crunch. Together, they create a yummy base for your snack. - 4 large flour tortillas - 1 cup shredded cheese (cheddar or mozzarella) - Optional add-ins (e.g., green onions, diced tomatoes) Flour tortillas hold everything together and make these roll-ups easy to eat. Shredded cheese adds more flavor and gooeyness. You can also add green onions for a fresh bite or tomatoes for a touch of sweetness. These extras make the dish even better. For the full recipe, check the link to get all the details you need! To start, take 8 ounces of cream cheese out of the fridge. Let it sit until it softens. This makes it easy to mix. Next, add 1 cup of ranch dressing to the cream cheese. Stir them together until smooth. You want a creamy mixture that is well-blended. Once mixed, grab 4 large flour tortillas. Take a tortilla and spread a generous layer of the cream cheese mixture onto it. Make sure to cover the whole tortilla. This adds flavor to every bite. Now it’s time to build your roll-ups. Sprinkle 1 cup of crumbled bacon over the cream cheese mixture. You can also add 1 cup of shredded cheese, like cheddar or mozzarella. For extra flavor, consider adding optional ingredients like green onions or diced tomatoes. Carefully roll up the tortilla from one end to the other. Press gently to keep the filling inside. After rolling, use a sharp knife to cut the roll-up into bite-sized pieces. This makes them perfect for snacking. You can serve these tasty treats right away. If you want, you can also refrigerate them for later. They keep well and taste great cold. For a warm option, heat them in the oven for a few minutes. This melts the cheese and makes the roll-ups even more delicious. Check out the full recipe for more tips and ideas! To get the right creaminess in your Creamy Bacon Ranch Roll-Ups, use softened cream cheese. Let it sit at room temperature for about 30 minutes. This makes mixing easy. Blend it with ranch dressing until it's smooth. You want a nice, creamy texture that spreads well. When rolling your tortillas, lay them flat on a clean surface. Spread the cream cheese mix evenly. Leave a small space at the edges. This helps when you roll. Start at one end and roll tightly. Use a gentle hand to keep the filling inside. If you roll too loosely, the filling might spill out later. Want to spice things up? You can add some garlic powder or a pinch of cayenne pepper. This gives your roll-ups a nice kick. If you prefer milder flavors, stick with just the ranch. To make your meal more complete, pair the roll-ups with a simple salad. Fresh veggies or a light dip like salsa work well too. You can also serve them with crunchy chips for a fun texture contrast. These sides enhance the overall taste and make your snack even better. {{image_2}} You can easily switch things up with ingredient substitutes. If you prefer turkey or chicken, use them instead of bacon. This change makes the roll-ups lighter. You still get great flavor, and it’s a fun twist on the classic. For those who want a vegan option, there are alternatives for cream cheese and ranch dressing. You can try cashew cream or tofu-based cream cheese. Look for plant-based ranch dressings at your store. These options keep the taste without using animal products. Let’s get creative with regional twists! If you enjoy some heat, add jalapeños to the mix. This spicy version adds a kick that many love. Just chop the jalapeños finely and mix them in with the bacon and cheese for a zesty flavor. Another fun idea is to make Mediterranean-inspired roll-ups. Use feta cheese and olives to give your roll-ups a fresh taste. You can add chopped tomatoes and cucumbers, too. This twist makes the roll-ups bright and unique, perfect for a summer snack or party platter. For the full recipe, check out the earlier sections. To keep your creamy bacon ranch roll-ups fresh, follow these tips: - Refrigeration: Place roll-ups in an airtight container. This keeps them fresh for longer. Store in the fridge if you plan to eat them in a few days. - Freezing: You can freeze roll-ups for up to three months. Wrap each roll tightly in plastic wrap. Then, place them in a freezer bag. This helps avoid freezer burn. Now, let's discuss how long your roll-ups will stay fresh. - In the fridge: These tasty snacks last about 3 to 5 days. Always check for freshness if you keep them longer. - In the freezer: Roll-ups can last up to three months. They remain good as long as they are wrapped well. Look for these signs to know when roll-ups are no longer good: - A sour smell is a sure sign they have gone bad. - If the texture feels slimy or sticky, it’s best to toss them. - If you see any mold, do not eat them. By following these tips, you can enjoy your creamy bacon ranch roll-ups at their best! For the full recipe, check the earlier section. How can I make Creamy Bacon Ranch Roll-Ups in advance? You can prepare these roll-ups a day ahead. Simply follow the recipe, then wrap them in plastic. Store them in the fridge until you are ready to serve. This keeps them fresh and tasty. When it’s time to eat, just slice and enjoy. Making them early saves you time during busy gatherings. Can I use low-fat cream cheese for this recipe? Yes, you can use low-fat cream cheese. It will work well in this recipe. The texture may be a bit different, but the flavor will still shine. Using low-fat cream cheese can help reduce calories. It’s a great option for those watching their diet. What are the best beverages to pair with roll-ups? Creamy Bacon Ranch Roll-Ups go well with many drinks. I recommend soda, iced tea, or lemonade. If you prefer something stronger, try a light beer or white wine. These drinks balance the rich flavors of the roll-ups. You can mix and match to find your favorite. Are they suitable for large gatherings or parties? Absolutely! These roll-ups are perfect for parties. They are easy to make and serve. You can cut them into small pieces for bite-sized snacks. Guests will love the creamy and savory flavors. Plus, they are fun to eat while mingling. This blog post covered how to make Creamy Bacon Ranch Roll-Ups. We looked at the key ingredients, like cream cheese and bacon, and the simple preparation steps. I shared tips to enhance flavor and variations to suit your tastes. Lastly, I offered essential storage advice to keep your roll-ups fresh. These tasty treats are easy to make and fun to enjoy. Experiment with flavors or serve them at your next party. You'll impress everyone with these delicious snacks!

Creamy Bacon Ranch Roll-Ups Tasty and Easy Snack

April 30, 2025 by Emma

Are you ready to try a snack that’s both creamy and packed with flavor? Creamy …

Learn more

Categories Appetizer
To make a great bologna salad, you need some key items. Here’s what you will need: - 1 pound bologna, diced - 1 cup sweet pickle relish - 1/2 cup mayonnaise - 1/4 cup mustard - 2 celery stalks, finely chopped - 1/2 cup red onion, finely chopped - 1/4 cup green bell pepper, finely chopped - 1 hard-boiled egg, finely chopped - Salt and pepper to taste - Lettuce leaves for serving These ingredients create a mix of flavors and textures that everyone loves. The bologna gives it a hearty base, while the relish adds a nice sweet touch. You can make your bologna salad even better with some fun extras. Here are some ideas: - Chopped pickles for more crunch - Shredded cheese for creaminess - Chopped herbs like dill or parsley for freshness - A dash of hot sauce for a kick Feel free to experiment. Everyone has their favorite twist on this classic dish. Bologna salad pairs well with different sides and snacks. Here are a few good options: - Crackers for a crunchy bite - Toasted bread for a warm touch - Potato chips for extra crunch These sides add to the meal and make it more fun. You can easily mix and match to find your favorite combo. For the full recipe, check out the complete instructions to get started on this tasty tradition. First, gather your ingredients. You will need: - 1 pound bologna, diced - 1 cup sweet pickle relish - 1/2 cup mayonnaise - 1/4 cup mustard - 2 celery stalks, finely chopped - 1/2 cup red onion, finely chopped - 1/4 cup green bell pepper, finely chopped - 1 hard-boiled egg, finely chopped - Salt and pepper to taste - Lettuce leaves for serving Wash and chop all your veggies. Dice the bologna into small pieces. This makes it easy to mix. In a large mixing bowl, combine the diced bologna, sweet pickle relish, mayonnaise, and mustard. Stir until it is smooth. Then, add the celery, red onion, green bell pepper, and hard-boiled egg. Mix all the items well. Make sure each piece is coated in the dressing. Now, season the salad with salt and pepper. Taste it to see if you like the flavor. You can add more salt or pepper if you want. Cover the bowl with plastic wrap. Put it in the fridge for at least 30 minutes. This helps the flavors blend better. When you are ready to serve, take the salad out. Spoon it onto a plate with lettuce leaves. For a fun touch, sprinkle paprika or add slices of hard-boiled egg on top. Enjoy your bologna salad with crackers or toasted bread. This dish is simple but full of flavor. Try this full recipe for a tasty tradition! When making bologna salad, avoid over-mixing. This can make your salad mushy. Don't skip chilling the salad. Chilling helps the flavors blend well. If you don’t add enough seasoning, the taste can be flat. Always taste before serving to make sure it’s just right. You can make this salad your own! Try adding diced apples for a sweet crunch. If you like heat, add chopped jalapeños. Swap out the bologna for turkey or chicken for a lighter dish. You can also use Greek yogurt instead of mayonnaise for a tangy twist. To get the best flavor, let your salad sit in the fridge. This helps the ingredients meld together. Use fresh ingredients for the best taste. Fresh veggies add crunch and flavor. Lastly, garnish your salad with paprika for color and a hint of spice. For a full recipe, check out the Bologna Bliss Salad. {{image_2}} In this twist, I add Italian herbs and cheeses. Use fresh basil, oregano, and parsley. These herbs bring a burst of flavor. Also, try adding diced mozzarella or provolone cheese for creaminess. The tang of Italian dressing pairs nicely with bologna. This version feels like a picnic in Italy. If you like heat, this version is for you. Add diced jalapeños to the mix. The heat complements the bologna's richness. You can also use spicy mustard instead of regular mustard. This salad becomes a fun party dish. Serve it with tortilla chips for a crunchy bite. For a meat-free option, replace bologna with tofu or chickpeas. Tofu absorbs flavors well and adds protein. Chickpeas give a nice texture and nutty taste. You can use vegan mayo to keep it plant-based. This version keeps the spirit of bologna salad alive while catering to vegetarians. Explore the [Full Recipe] for more details on making the classic bologna salad! To store leftover bologna salad, place it in a bowl. Cover the bowl tightly with plastic wrap or a lid. This keeps the salad fresh and tasty. Use glass or plastic containers with tight seals. They help keep the flavors locked in. If you don’t have those, a clean jar can work too. Just make sure it is sealed well. Leftover bologna salad stays fresh in the fridge for about three days. After that, the taste and texture may change. If you notice any strange smells or colors, toss it out. For best enjoyment, eat it within this time! Bologna salad has roots in American cooking. It became popular during the mid-20th century. Families often made it for potlucks and picnics. The dish is simple and uses easy-to-find ingredients. Many people remember it from childhood. It holds a special place in many homes. The salad reflects a time when meals were made with love and care. Yes, you can use turkey or chicken bologna. These options lower the fat in the dish. They also add a different taste. Just make sure to chop them into small pieces. This helps the flavors mix well. The rest of the recipe stays the same. Your salad will still be tasty and fun! Bologna salad can be both tasty and healthy. It depends on how you make it. You can add more veggies for extra nutrients. Using less mayonnaise can cut calories too. The bologna provides protein, but it can be high in sodium. Enjoy this salad in moderation. It’s a great dish, especially for gatherings. For the full recipe, check out the Bologna Bliss Salad. Bologna salad combines tasty ingredients, simple steps, and fun variations. I shared how to make it, from preparation to serving tips. Remember to customize your salad and avoid common mistakes for the best flavor. Also, store leftovers correctly to enjoy later. This dish isn't just easy; it offers options for everyone. You can try Italian-style, spicy, or even vegetarian versions. Enjoy your bologna salad and make it your own!

Bologna Salad Old Recipe for a Tasty Tradition

April 30, 2025 by Emma

Are you ready to dive into a dish that’s both nostalgic and delicious? This Bologna …

Learn more

Categories Appetizer
- 1 lb fresh salmon fillet, skinless, cut into bite-sized pieces - 1 cup panko breadcrumbs - 1/2 cup all-purpose flour - 2 large eggs, beaten - 1 teaspoon garlic powder - 1 teaspoon paprika - Salt and pepper, to taste - 1/4 cup mayonnaise - 2 tablespoons sweet chili sauce - 1 tablespoon sriracha (adjust to taste) - 1 teaspoon lime juice - 1 green onion, finely sliced (for garnish) These ingredients form the base of my Crispy Bang Bang Salmon Bites. Each one plays a key role in creating a delicious flavor. The salmon gives a rich taste. The panko breadcrumbs add crunch. The flour helps the coating stick. Eggs hold it all together. For the seasonings, garlic powder and paprika add depth. Salt and pepper balance the flavors. The Bang Bang Sauce brings heat and sweetness. Mayonnaise creates creaminess. Sweet chili sauce adds a sweet kick. Sriracha gives it a spicy finish. Lime juice brightens the sauce. Green onions are perfect for garnish. I keep these ingredients on hand for quick meals. The recipe is simple but packed with flavor. Follow the [Full Recipe] to create this dish at home! First, I dry the salmon pieces with a paper towel. This step is key. It helps the coating stick better. Next, I prepare the coatings. In a shallow bowl, I mix the flour, garlic powder, paprika, salt, and pepper. This blend adds great flavor. I then place the beaten eggs in another bowl. Finally, I pour the panko breadcrumbs into a third bowl. This setup makes coating easy. Now, I take each piece of salmon. I coat it lightly in the flour mixture first. Then, I dip it into the beaten egg. Finally, I roll it in the panko breadcrumbs until it’s fully covered. This three-step process ensures a crispy outer layer. I heat about one inch of vegetable oil in a deep skillet over medium-high heat. To test the oil, I drop a small piece of bread into it. If it sizzles, the oil is ready. Next, I carefully place the salmon bites in the hot oil. I fry them in batches to avoid overcrowding. I cook them for about three to four minutes on each side. I watch for them to turn golden brown and crispy. Once cooked, I transfer the bites to a paper towel-lined plate. This drains any excess oil. Now, the salmon bites are ready to enjoy! For a tasty dip, I serve them warm with the Bang Bang Sauce on the side. Check out the Full Recipe for all the details! To get your salmon bites nice and crispy, pay close attention to oil temperature. Heat your oil to about 350°F. You can test it by dropping in a small piece of bread. If it sizzles, you’re ready to fry! Avoid overcrowding the pan. This keeps the temperature steady and helps the bites crisp up. If you add too many at once, the oil cools down, making soggy bites. You can adjust the spice levels in your Bang Bang Sauce. If you like it hot, add more sriracha. For a milder sauce, use less. Pair these bites with fresh veggies or a simple salad. They balance the richness of the salmon and add crunch. A side of rice or quinoa works great too! To wow your guests, arrange the salmon bites on a big platter. Use green onions as a garnish for a pop of color. Add lime wedges for a zesty touch. This not only looks nice but also adds flavor. Serve your bites warm for the best taste! Enjoy these crispy treats straight from the pan or with the Bang Bang Sauce drizzled on top. If you want to follow the complete process, you can check the Full Recipe. {{image_2}} If you want to switch things up, use different proteins. Chicken and shrimp work great. For chicken, cut it into bite-sized pieces like the salmon. Coat it the same way. For shrimp, use peeled and deveined shrimp. Both will taste amazing with the Bang Bang sauce. For a vegan option, you can try tofu or tempeh. Press the tofu to remove extra moisture. Cut it into cubes and coat it just like the salmon. This gives you a crispy treat that everyone can enjoy. You can change up the flavor with different seasonings. Try adding lemon pepper or cayenne for a kick. You can also use herbs like dill or parsley for a fresh twist. Dip the bites in alternative sauces too. Instead of Bang Bang sauce, try a spicy mayo or a sweet teriyaki sauce. Each option gives a new taste to the crispy bites. If you need gluten-free bites, use gluten-free flour and breadcrumbs. They work just as well and keep the crunch. For a low-calorie version, bake the bites instead of frying. Spray them lightly with cooking oil before baking. This gives you a healthier option without losing flavor. To keep your crispy Bang Bang salmon bites fresh, store them in an airtight container. This helps the bites stay tasty and prevents them from drying out. They should go in the fridge as soon as they cool down. When stored this way, they last about 2 to 3 days. If you want to enjoy them later, follow the freezing steps below. To enjoy your salmon bites again, reheating them properly is key. For the best results, use an oven. Preheat it to 375°F (190°C). Place the bites on a baking sheet lined with parchment paper. Bake them for about 10 to 15 minutes. This method keeps them crispy. If you choose to use a microwave, be aware that it may make them soggy. To help with this, place a paper towel under the bites. Yes, you can freeze salmon bites! This is a great way to save leftovers. To freeze them, first let the bites cool completely. Next, arrange them in a single layer on a baking sheet. Place the sheet in the freezer for a few hours until they are firm. Once frozen, transfer the bites to a freezer-safe bag or container. This way, they can last for up to 2 months. When you are ready to eat, just reheat directly from the freezer. Bang Bang sauce is creamy and spicy. It combines simple ingredients for big flavor. Here’s what you need: - 1/4 cup mayonnaise - 2 tablespoons sweet chili sauce - 1 tablespoon sriracha (adjust for spice) - 1 teaspoon lime juice - 1 green onion, finely sliced (for garnish) This sauce has a creamy base with a kick from the sriracha. The sweet chili sauce adds a nice balance. Together, they make the perfect dip for your crispy salmon bites. You want your salmon bites to be golden brown and crispy. Look for these signs: - A golden color on both sides - A crispy texture when you bite into them - Cooked salmon should flake easily with a fork Typically, they take about 3-4 minutes per side in hot oil. If you see those signs, your salmon bites are ready to enjoy! Yes, you can! Here are some tips: - Prepare the salmon bites and coat them. - You can freeze them before frying. This makes them easy to cook later. - When ready, just fry straight from the freezer. This is great for busy days or when you have guests. You can have a tasty treat ready in no time! You can find pre-packaged options at many grocery stores. Look in the frozen aisle or the seafood section. Here are some brands to check out: - SeaPak - Gorton’s - Trader Joe's They offer tasty choices that save time. Just remember to check the cooking instructions. Yes, this recipe can be very kid-friendly! Here’s how to make it work for your family: - Reduce the sriracha in the sauce for a milder flavor. - Serve the sauce on the side for dipping. - Make the bites smaller for easier eating. Kids love crispy foods! These salmon bites can be a hit at dinner or parties. For full details, check the Full Recipe. This blog post covers everything you need to make Crispy Bang Bang Salmon Bites. We looked at the key ingredients, from fresh salmon to panko breadcrumbs and the tasty Bang Bang sauce. You learned step-by-step instructions for prepping, coating, and frying your salmon bites. Tips for perfect crispiness and variations keep the dish fun and flexible. Enjoy making these bites in your kitchen. With practice, you’ll impress everyone with your culinary skills.

Crispy Bang Bang Salmon Bites Easy and Flavorful Treat

April 29, 2025 by Emma

Looking for a tasty snack that packs a punch? You’ll love these Crispy Bang Bang …

Learn more

Categories Appetizer
- 2 cups cooked chicken, shredded - 1/2 cup buffalo sauce - 1/2 cup cream cheese, softened - 1/2 cup shredded cheddar cheese - 1/4 cup green onions, chopped - 4 large flour tortillas - 1 cup lettuce, shredded - 1/4 cup ranch dressing (optional for dipping) Gathering the right ingredients is key for great Buffalo Chicken Tortilla Roll-Ups. Start with cooked chicken. This adds protein and flavor. You can use rotisserie chicken or boil your chicken at home. Shred it finely for easy rolling. Next, grab buffalo sauce. This is where the heat comes from. Adjust the amount based on your spice level. Cream cheese adds a rich, smooth texture. It balances the heat from the sauce. Shredded cheddar cheese gives a nice bite. It melts well and adds creaminess. Green onions add a fresh crunch and bright flavor. Use large flour tortillas to wrap everything easily. Don’t forget the lettuce! It adds a crisp texture. Lastly, ranch dressing is optional but great for dipping. This mix of ingredients makes the roll-ups flavorful and fun. For the full recipe, follow the steps to create these tasty snacks. Start by shredding your cooked chicken into small pieces. This step helps the chicken soak up the flavors. In a medium bowl, mix the shredded chicken with the buffalo sauce. Stir well until every piece is coated. This spicy mix gives your roll-ups a kick. Next, grab another bowl and add the softened cream cheese. Blend it with the shredded cheddar cheese. Use a fork or mixer to make it smooth. This creamy spread will balance the heat from the buffalo sauce. It adds richness to each bite. Now, lay out a flour tortilla on a clean surface. Spread a generous layer of the cream cheese mixture on it. Leave about an inch of space around the edges. This space helps keep the filling inside. Place a handful of shredded lettuce in the center. Then, add a portion of the buffalo chicken mixture on top. Sprinkle with chopped green onions for extra taste. Carefully roll the tortilla, starting from the filling side. Tuck in the edges as you go to keep it neat. Repeat this with the rest of the tortillas and filling. Once done, place the roll-ups seam-side down on a cutting board. If you want them firmer, chill in the fridge for 15-30 minutes. When ready to serve, slice each roll into 1-inch pieces. Arrange on a platter and enjoy with ranch dressing on the side for dipping. For the full recipe, refer to the previous section. To roll tortillas well, start with soft ones. Warm them slightly in the microwave for ten seconds. This makes them easier to bend without breaking. Spread the filling evenly across the tortilla. Leave about an inch around the edges. This helps to seal the roll. As you roll, tuck in the sides gently. This keeps the filling secure while you finish rolling. These roll-ups shine at parties or game days. Serve them cold or at room temperature. Slice each roll into bite-sized pieces. This makes them easy to grab and eat. Arrange them on a colorful platter to catch the eye. Add a bowl of ranch dressing for dipping. You can also serve them with celery sticks for a crunchy side. You can add your favorite ingredients to make these roll-ups your own. Try adding diced bell peppers for crunch. You can also use different cheeses, like pepper jack for some heat. Swap the chicken for turkey or even beans for a vegetarian twist. Experiment with different sauces too, like barbecue or honey mustard. The options are endless! Check out the Full Recipe for more ideas. {{image_2}} You can easily change Buffalo Chicken Tortilla Roll-Ups to suit your taste. Here are some fun ideas. Try a vegetarian twist! Use roasted cauliflower instead of chicken. Toss the cauliflower with buffalo sauce for that spicy kick. Combine it with the cream cheese and cheddar mix. Add lettuce and green onions just like the original. You will enjoy a zesty, meat-free option. Want more heat? Use spicy buffalo sauce. You can also add sliced jalapeños to the chicken mix for extra spice. If you love heat, try pepper jack cheese instead of cheddar. These spicy roll-ups are perfect for those who crave a fiery flavor. For a gluten-free version, swap out regular tortillas for gluten-free tortillas. Most grocery stores offer good brands. Check the ingredients to ensure they're safe for you. The rest of the recipe stays the same. You can still enjoy the great taste without gluten. These variations let you enjoy Buffalo Chicken Tortilla Roll-Ups in new ways. They make a fun snack for everyone! For the full recipe, don't forget to check the full recipe section. To keep your leftover Buffalo Chicken Tortilla Roll-Ups fresh, wrap them tightly in plastic wrap or foil. Place them in an airtight container to avoid moisture loss. Store them in the fridge for up to three days. This way, you maintain their flavor and texture. When you’re ready to enjoy your roll-ups again, take them from the fridge. You can reheat them in the microwave for about 30 seconds. Check to see if they are warm. If not, heat for an additional 10 seconds. You could also warm them in a skillet over medium heat for a few minutes. This method keeps them crispy on the outside. If you want to freeze your roll-ups, wrap each one in plastic wrap first. Then, place them in a freezer-safe bag or container. They can last for up to two months in the freezer. To eat, thaw them in the fridge overnight, then follow the reheating instructions to warm them up. This way, you always have a tasty snack ready! The best way to cook chicken for Buffalo Chicken Tortilla Roll-Ups is to use cooked, shredded chicken. You can boil, bake, or grill the chicken breast. If you boil it, cook it for about 15-20 minutes in salted water until it's fully cooked. Once it's cool, shred it with two forks. If you bake it, season the chicken with salt and pepper and bake at 375°F for about 25-30 minutes. The key is to ensure the chicken is tender and easy to shred. This method provides a great base for the buffalo sauce. Yes, you can make Buffalo Chicken Tortilla Roll-Ups ahead of time. After you roll them up, wrap them in plastic wrap or foil. Store the roll-ups in the fridge for up to 24 hours before serving. This allows the flavors to meld together. Just remember to slice them right before serving to keep them fresh and appealing. If you want to prepare them even earlier, you can also make the filling and store it separately. To make the Buffalo Chicken Tortilla Roll-Ups less spicy, you can adjust the buffalo sauce. Use a milder buffalo sauce or mix it with more cream cheese. This will tone down the heat while still keeping that great flavor. You can also use less buffalo sauce and add more shredded chicken to balance the spice. Additionally, try adding more shredded lettuce and cheese, which helps to cool down the flavor. These adjustments make the roll-ups delicious for everyone! This blog post covers a tasty Buffalo Chicken Tortilla Roll-Up recipe. We discussed the key ingredients needed, like chicken, buffalo sauce, and cream cheese. I guided you through simple steps for preparing and assembling the roll-ups. You also got tips for rolling, serving, and customizing your dish. Lastly, we explored variations and storage options. Buffalo Chicken Roll-Ups are easy to make and full of flavor. Enjoy making these fun bites for your next meal or snack!

Buffalo Chicken Tortilla Roll-Ups Tasty and Easy Snack

April 29, 2025 by Emma

Looking for a snack that’s both tasty and easy? Try these Buffalo Chicken Tortilla Roll-Ups! …

Learn more

Categories Appetizer
To make a creamy cucumber salad, you need fresh ingredients that pack flavor. Here’s what you’ll need: - 2 large cucumbers, thinly sliced - 1 cup Greek yogurt - 1 tablespoon mayonnaise - 1 tablespoon apple cider vinegar - 1 teaspoon garlic powder - 1 teaspoon fresh dill, chopped (or ½ teaspoon dried dill) - ½ teaspoon salt (adjust to taste) - ¼ teaspoon black pepper - ¼ cup red onion, finely chopped - 1 tablespoon honey (optional for a hint of sweetness) Each ingredient plays a role in creating that perfect creamy texture and refreshing taste. The cucumbers offer crunch and hydration. Greek yogurt gives a rich base with tang. Mayonnaise adds creaminess, while vinegar brings a slight zing. Garlic powder and dill provide great flavor. You can adjust salt and pepper to fit your taste. The red onion adds a nice bite, and honey can sweeten it up if you want. This list ensures you make a salad that is both fresh and tasty. Ready to dive into the full recipe? Let’s get cooking! Start by washing the cucumbers well under cool water. This step removes any dirt or wax. Next, slice the cucumbers thinly. A sharp knife or a mandoline slicer works best. Thin slices make the salad crisp and easy to eat. Now, let’s make the creamy dressing. In a mixing bowl, combine one cup of Greek yogurt, one tablespoon of mayonnaise, and one tablespoon of apple cider vinegar. Add one teaspoon of garlic powder, one teaspoon of fresh dill (or half a teaspoon of dried dill), half a teaspoon of salt, and a quarter teaspoon of black pepper. Whisk this mixture until it is smooth and well-blended. If you want a hint of sweetness, stir in one tablespoon of honey. In a large salad bowl, combine the sliced cucumbers and a quarter cup of finely chopped red onion. Pour the creamy dressing over the cucumber and onion. Gently toss everything together until the cucumbers are well-coated in dressing. Chilling the salad is very important. It helps the flavors blend and taste better. I recommend letting it chill in the fridge for at least 30 minutes. This time allows the cucumbers to soak in the creamy goodness. For the best visual appeal, serve the salad in a chilled bowl. You can garnish it with extra dill on top. Adding a lemon wedge on the side gives a splash of color and freshness. This salad is not only tasty but also looks great on the table. You can find the Full Recipe for this delightful dish to guide you through each step. For a salad, I recommend using English cucumbers or Persian cucumbers. These types are thinner and have fewer seeds. They stay crisp and taste fresh. When selecting cucumbers, look for ones that are firm and smooth. Avoid any that have soft spots or wrinkles. Fresh cucumbers should feel heavy for their size. Taste is key in any dish. Start with the basic seasoning in the recipe, then adjust to your liking. If you like more zing, add a splash of lemon juice or more vinegar. For extra flavor, consider adding cherry tomatoes or bell peppers. You can even toss in some feta cheese for a salty kick. To keep your creamy cucumber salad fresh longer, store it in an airtight container. Place a paper towel inside to absorb any excess moisture. This helps prevent sogginess. When serving at gatherings, use chilled bowls to keep the salad cool. Garnish with fresh dill or mint for a pop of color and flavor. {{image_2}} You can make your creamy cucumber salad even better by adding more veggies. Try adding bell peppers, cherry tomatoes, or radishes. These veggies bring great colors and crunch. To customize the recipe, chop your chosen veggies into small pieces. Mix them in with the cucumbers and red onion. This way, you get a tasty mix with each bite. If you want to change the flavor, try different dressings. Ranch, tahini, or even a simple vinaigrette can work well. Each dressing offers a unique taste that enhances your salad. To balance flavors, add a bit of lemon juice or hot sauce. This can lift the salad and add excitement. For a vegan or dairy-free dressing, use cashew cream or avocado. They create a creamy texture without dairy. You can also replace Greek yogurt with silken tofu for a similar feel. If you need gluten-free options, make sure your dressing is gluten-free. Most condiments are safe, but check the labels. Enjoy your creamy cucumber salad without worries! For the full recipe, refer back to the ingredients listed above. To keep your creamy cucumber salad fresh, store it in an airtight container. This helps keep moisture out. You can use glass or plastic containers. Glass containers are great because they don’t stain and are easy to clean. Make sure to seal the lid tightly to keep the flavors intact. In the fridge, your creamy cucumber salad lasts about 3 to 5 days. After a few days, check for signs that it has gone bad. If the cucumbers become mushy or you see water pooling, it's time to toss it. A sour smell also means the salad is no longer good. You should avoid freezing creamy cucumber salad. The texture of the cucumbers changes when frozen. If you freeze it, they will become mushy when you thaw them. If you must freeze it, use a freezer-safe container. Thaw it in the fridge overnight before using, but keep in mind that the fresh taste may not be the same. For the best flavor, enjoy it fresh! For the complete recipe, check out the Full Recipe. Yes, you can make creamy cucumber salad ahead of time. This salad tastes even better after resting. I suggest making it a few hours before serving. Chilling allows the flavors to blend well. Store it in an airtight container in the fridge. Just remember to stir gently before serving. If you don’t have Greek yogurt, try sour cream. It gives a creamy texture too. You can also use plain yogurt or even cottage cheese. For a dairy-free option, use coconut yogurt or a cashew cream. Each substitute will change the taste slightly, but they all work well. Adjusting the seasoning is easy! Start by adding more salt or pepper to your taste. You can also add a squeeze of fresh lemon juice for brightness. If you like it sweet, add a bit more honey. Experiment with fresh herbs like basil or parsley for new flavors. This creamy cucumber salad is simple to make and full of flavor. We explored the key ingredients and step-by-step instructions, ensuring you get it right every time. You learned tips for selecting fresh cucumbers, optimizing flavor, and variations to keep things exciting. With proper storage, this salad can last longer and still taste fresh. Remember, customizing your salad can make it uniquely yours. Enjoy this delightful dish at any meal or gathering!

Creamy Cucumber Salad Fresh and Flavorful Delight

April 29, 2025 by Emma

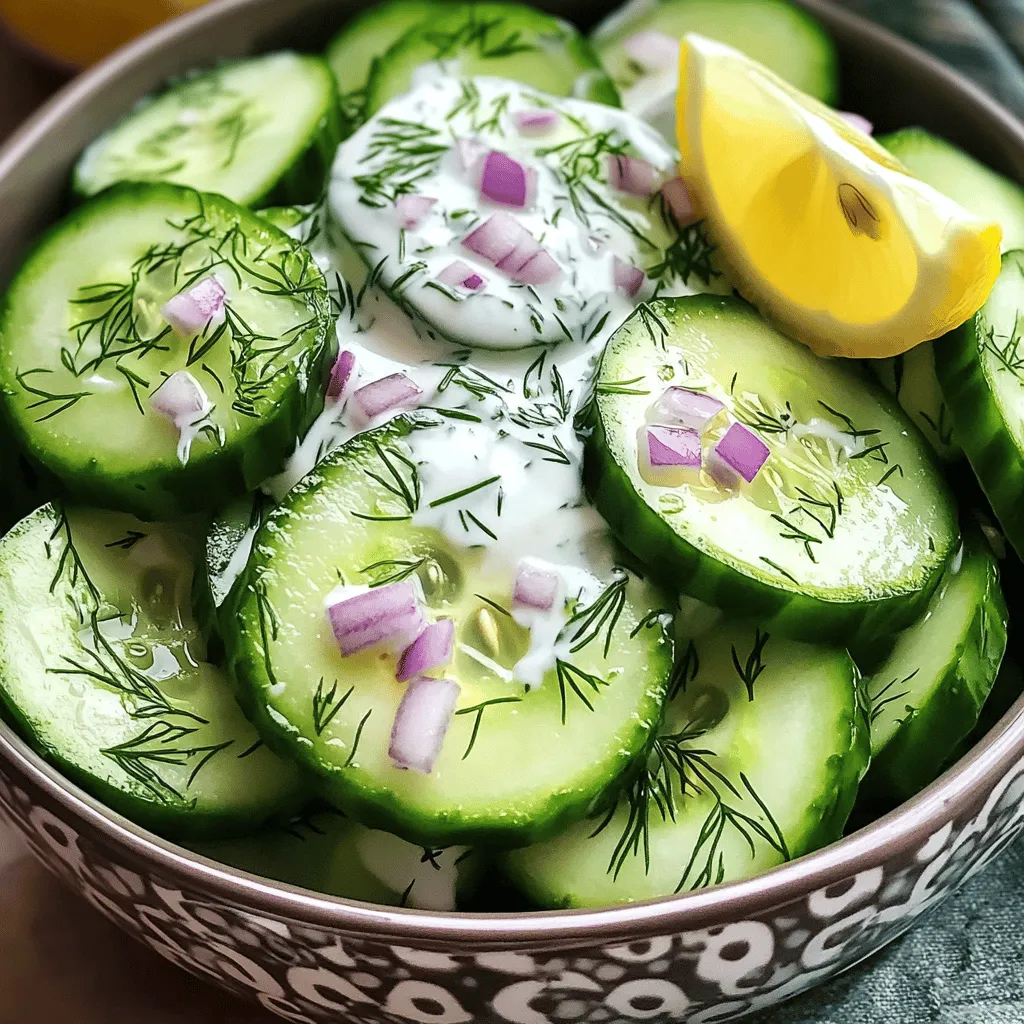
If you’re looking for a light and refreshing dish, you’re in the right place! My …

Learn more

Categories Appetizer
- 4 large russet potatoes - 3 tablespoons olive oil - 1 teaspoon sea salt - ½ teaspoon black pepper - 1 teaspoon garlic powder - 1 teaspoon smoked paprika - ½ teaspoon dried oregano To make crispy oven-baked French fries, you need a few simple ingredients. The main star is the russet potato. They are starchy and create the best texture. Olive oil helps achieve that golden crunch. Seasoning is key. I like to use sea salt, black pepper, garlic powder, smoked paprika, and dried oregano for a tasty kick. - Fresh parsley for garnish - Alternative oil options You can add fresh parsley as a fun garnish. It adds color and flavor to your fries. If you want to switch things up, try a different oil like avocado or canola. They can add unique tastes to your fries. For the full recipe and more details, check out the Full Recipe link. First, preheat your oven to 425°F (220°C). This high heat helps make the fries crispy. Next, wash your potatoes well. I like to peel them, but you can leave the skin on if you prefer. Cut the potatoes into sticks about ¼ inch thick. This size helps them cook evenly. Soaking the potatoes is very important. It removes extra starch, which helps the fries turn out crispy. I recommend soaking them for at least 30 minutes. If you have time, soaking longer can make a big difference. After soaking, drain the potatoes and dry them with a towel. This step is key. If they are wet, they won’t crisp up. Toss the dried fries with olive oil and your seasonings in a bowl. Next, spread them out on a baking sheet. Make sure not to crowd the fries. If you have too many, use two sheets. Bake the fries for about 30-35 minutes. Flip them halfway through to help them cook evenly. For extra crispiness, you can broil them for the last 2-3 minutes. Just keep an eye on them to avoid burning. When they are golden brown and crispy, take them out and add a little sea salt. Now they are ready to serve! Check out the Full Recipe for all the details. To get the perfect crispy fries, start by drying the potatoes thoroughly. After soaking, drain them well. Use a clean kitchen towel to pat them dry. This step removes moisture, which helps achieve that crunch you crave. Next, line your baking sheet with parchment paper. This prevents sticking and helps the fries crisp evenly. Parchment paper also makes for easy clean-up, which I always appreciate. Experimenting with spices can take your fries to the next level. Try adding cayenne pepper for some heat. Or mix in Italian herbs like basil and thyme for a different flavor. Flavored oils can add a unique twist too. Use garlic-infused olive oil for a rich taste. Just keep in mind that the right seasoning can elevate your fries from ordinary to extraordinary! For extra crispiness, broil your fries at the end of baking. After the fries are golden brown, switch to broil for 2-3 minutes. Keep a close eye to avoid burning. You can also try alternative baking techniques. Some cooks prefer to flip the fries more often. This ensures all sides cook evenly. Adjusting the cooking time based on your oven can also help achieve that perfect crunch. These tips will help you make the best crispy oven baked French fries. For the full method, check out the [Full Recipe]. {{image_2}} You can make your fries even tastier by adding toppings. Here are some ideas. For a classic touch, top with melted cheese and crispy bacon. For a vegetarian option, try cheese, green onions, and sour cream. You can also add chili, jalapeños, or guacamole for a fun twist. To make sweet potato fries, use sweet potatoes instead of russet potatoes. The cooking method is similar, but you may need to adjust the time. Sweet potatoes often take about 25-30 minutes to roast. Keep an eye on them to avoid burning. Want to spice things up? You can add international flavors to your fries. Mix cumin and chili powder for a Mexican flair. For an Italian vibe, try oregano and rosemary. You can also use seasoning blends like curry powder or za'atar for a unique taste. Get creative with your spices! To store your leftover fries, first let them cool completely. Place them in an airtight container. This keeps them fresh and prevents them from getting too soggy. You can store the fries in the fridge for up to three days. After this time, they may lose their crispness and flavor. To reheat fries while keeping them crispy, the oven is your best friend. Preheat the oven to 400°F (200°C). Spread the fries out on a baking sheet. Bake for about 10-15 minutes. Check them often to avoid burning. Another option is to use an air fryer. This method works well and keeps fries crisp. Heat them in the air fryer at 375°F (190°C) for about 5-7 minutes. Avoid microwaving fries. This method makes them soggy and chewy. If you want to enjoy your fries again, stick to the oven or air fryer for the best results. For the full recipe, check out the details above! To get crispy fries, follow these key steps: - Soak the cut potatoes in cold water for at least 30 minutes. - Dry the potatoes completely after soaking. - Use a high oven temperature of 425°F (220°C). - Toss the fries in oil and seasonings before baking. - Space them evenly on the baking sheet. These steps help remove extra starch and allow the fries to crisp up nicely. Yes, you can use different types of potatoes. Here are some pros and cons: - Russet Potatoes: They are ideal for fries. They have a high starch content, making them crispy. - Yukon Gold: These have a creamy texture. They can be crisp but might not be as crunchy as russets. - Red Potatoes: They are waxy and hold their shape well. However, they may not get as crispy. Using the right potato can impact the final texture and taste of your fries. Many dips pair well with oven-baked fries. Here are some popular choices: - Ketchup: A classic choice for fries. - Garlic Aioli: Adds a rich, creamy flavor. - Spicy Mayo: Offers a kick for those who like heat. - Ranch Dressing: A cool and tangy option. Feel free to try different combinations to find your favorite! This article shared key steps to make perfect oven-baked fries. You learned about essential ingredients, preparation, soaking, and baking. We explored tips for crispiness and variations like loaded fries and sweet potato fries. Remember, dry your potatoes well and experiment with spices for great flavor. Store any leftovers properly for the best taste later. With these tips, you’ll enjoy delicious, crispy fries anytime. Happy cooking!

Crispy Oven Baked French Fries Easy and Flavorful Recipe

April 27, 2025 by Emma

If you’re craving crispy oven-baked French fries, you’ve come to the right place! I’m sharing …

Learn more

Categories Appetizer
Older posts
Newer posts
← Previous Page1 Page2 Page3 Page4 … Page35 Next →

I’m Emma, and I love sharing a diverse range of both sweet and savory recipes, each inspired by my love for cooking and exploring new flavors.

Learn more

  • To make Florida Shrimp Pie, you need a few tasty ingredients. Here’s the list: - 1 pound fresh shrimp, peeled and deveined - 1 pre-made pie crust (9-inch) - 2 tablespoons butter - 1 medium onion, finely chopped - 2 cloves garlic, minced - 1 red bell pepper, diced - 1 cup corn (fresh or frozen) - 1 cup heavy cream - 2 large eggs - 1 cup shredded cheddar cheese - 1 teaspoon Old Bay seasoning - Salt and pepper to taste - Fresh parsley, chopped (for garnish) Each ingredient plays a role in giving the pie its rich flavor. The shrimp brings a sweet taste, while the cream adds a nice creaminess. The Old Bay seasoning gives it that classic seafood kick. You can use fresh corn for a burst of sweetness or frozen corn for convenience. When you choose your shrimp, look for fresh ones. They should smell like the sea, not fishy. The pie crust saves time, but you can also make your own if you prefer. This list will help you create a dish that is both tasty and filling. For the full recipe, check out the detailed cooking steps. - Preheat your oven to 375°F (190°C). This helps the pie cook evenly. - In a skillet, melt 2 tablespoons of butter over medium heat. Add 1 medium onion, chopped finely, and sauté until it turns clear. This usually takes about 3-4 minutes. - Next, stir in 2 cloves of minced garlic and 1 diced red bell pepper. Cook for another 2-3 minutes until they are soft. - Then, add 1 pound of peeled and deveined shrimp and 1 cup of corn to the skillet. Cook for about 5 minutes. The shrimp should turn pink and be cooked through. Once done, remove from heat and let it cool a bit. - In a mixing bowl, whisk together 1 cup of heavy cream, 2 large eggs, 1 teaspoon of Old Bay seasoning, and some salt and pepper to taste. This mixture gives the pie its rich flavor. - Now, take your pre-made pie crust and place it in a pie dish. Pour the shrimp and veggie mix evenly into the crust. - Finally, pour the cream mixture over the shrimp. Don’t forget to sprinkle 1 cup of shredded cheddar cheese on top for that gooey goodness. - Place the pie in the preheated oven and bake for 30-35 minutes. Look for a golden and bubbling top. That means it's ready! - Once it’s out of the oven, let it cool for about 10 minutes. This helps the pie set. - Before serving, garnish with fresh chopped parsley for a pop of color and flavor. This is the full recipe for Florida Shrimp Pie! Enjoy the delicious blend of flavors! To ensure your shrimp are perfectly cooked, pay attention to color. Raw shrimp is gray. When they turn pink, they are done. Overcooked shrimp can become rubbery. Cook them just until they change color, about 5 minutes in the skillet. Choosing the right pie crust is key. A pre-made pie crust saves time and effort. Look for one that is sturdy enough to hold the filling. A flaky crust adds texture and flavor. If you’re feeling adventurous, you can make your own crust from scratch. Pair your Florida Shrimp Pie with fresh sides. A simple green salad complements the rich pie well. You can also serve it with garlic bread or coleslaw. For dips, try a zesty cocktail sauce or a tangy remoulade for a fun twist. Best drinks to serve with Florida Shrimp Pie include chilled white wine or a light beer. A refreshing lemonade can also balance the flavors. For a non-alcoholic option, iced tea with lemon works wonderfully. Garnishing techniques can elevate your dish. Use fresh parsley to sprinkle on top. This adds color and freshness. You can also add slices of lemon on the side for a pop of brightness. For plating ideas, use a wide plate to show off your pie. Slice it into wedges for a clean look. Add a small salad next to the pie for a touch of green. This makes your meal look special, perfect for hosting friends or family. For the full recipe, check out the [Full Recipe]. {{image_2}} You can easily change the main protein in this dish. Crab or lobster work well. They add rich flavors and a different texture. If you want a vegetarian option, try using mushrooms or tofu. Both can soak up the seasonings and give a nice bite. To spice things up, consider using cayenne or paprika. These spices add a nice kick. You can also add a touch of lemon zest for brightness. Fresh herbs like dill or cilantro can enhance the taste. They bring a fresh note that pairs well with seafood. If you want to mix things up, make a seafood casserole instead. Just layer the cooked shrimp and veggies in a baking dish with cheese on top. You can also grill the pie instead of baking it. Grilling adds a smoky flavor that is truly unique. For more details on making this delicious dish, check out the Full Recipe. To store leftovers, let the pie cool first. Cover it tightly with plastic wrap or foil. You can also use an airtight container. This keeps the pie fresh and tasty. Leftovers stay good in the fridge for up to three days. After that, the quality may drop. Always check for any off smells or signs of spoilage before eating. If you want to freeze Florida Shrimp Pie, let it cool completely. Wrap it tightly in plastic wrap, then place it in a freezer bag. You can store it for up to three months. To reheat, thaw the pie in the fridge overnight. Preheat your oven to 350°F (175°C). Bake the pie for about 25-30 minutes, until hot. This way, it keeps its flavor and texture. Enjoy your delicious pie even later! You can use crab or scallops as a great swap. If you want a plant-based option, try chickpeas or jackfruit. Both will add a nice texture and flavor to your pie. Yes, you can make this pie in advance. Prepare it, then cover it well and store it in the fridge. You can bake it the next day. This saves time and makes meal planning easy. Leftovers will stay fresh for about three days. Keep the pie in an airtight container. If it smells off or looks strange, it’s best to throw it away. I love serving this pie with a fresh salad or steamed veggies. Garlic bread also makes a nice side. For something light, try a fruit salad. Each goes well with the rich flavors of the pie. This blog post covered everything you need for Florida Shrimp Pie. We discussed the main ingredients, easy instructions, and helpful tips. Variations let you customize this dish, while storage info keeps it fresh. I encourage you to experiment with flavors and ingredients. Cooking should be fun! Now, gather your shrimp and get started on this tasty recipe. Enjoy your culinary adventure and impress your family and friends with your skills!
    Florida Shrimp Pie Flavorful and Easy to Make
  • - 1 pound ground beef - 1 cup shredded cheddar cheese - 1/2 cup grated Parmesan cheese - 1 tablespoon minced garlic - 1 teaspoon onion powder - 1 teaspoon dried oregano - Salt and pepper to taste The main stars of this recipe are ground beef and cheese. The beef gives a rich flavor, while cheddar and Parmesan add creaminess and a nice bite. Garlic and onion powder bring out the essence of the beef. Dried oregano adds a touch of earthiness, making each bite a delight. Adjusting salt and pepper helps customize the flavor to your taste. - 1 package refrigerated biscuit dough (8 biscuits) I use refrigerated biscuit dough for ease and speed. This dough is soft and puffs up nicely during baking. You can use Southern-style biscuits if you want a flakier texture. For a homemade option, try making your own biscuit dough with flour, baking powder, and butter. - Fresh parsley, chopped (for garnish) Fresh parsley adds a pop of color and freshness. You can also use other herbs like chives or basil for a different taste. These herbs balance the richness of the cheeseburger bombs. A little sprinkle on top makes them look even more tasty. For a complete recipe, check out the Full Recipe. Prepping the oven and baking sheet First, you need to preheat your oven to 375°F (190°C). This heat ensures your cheeseburger bombs cook evenly. While the oven warms up, line a baking sheet with parchment paper. This step helps prevent sticking and makes cleanup easier. Preparing the filling In a large mixing bowl, combine the ground beef, shredded cheddar cheese, grated Parmesan cheese, minced garlic, onion powder, dried oregano, salt, and pepper. Mix these ingredients well with your hands or a spoon. You want a uniform mixture for great flavor in every bite. How to flatten biscuit dough Open the package of refrigerated biscuit dough. Take out each biscuit and place it on a clean surface. Use your hands or a rolling pin to flatten each biscuit to about 4 inches in diameter. Make sure they are even for the best results. Filling and sealing techniques Spoon about 2 tablespoons of the cheeseburger mixture into the center of each flattened biscuit. Carefully fold the edges over the filling. Pinch the seams tightly to seal them completely. This helps the filling stay inside while baking. Optimal baking time and temperature Place the stuffed biscuits seam-side down on the prepared baking sheet. Brush the tops with melted butter and sprinkle extra Parmesan cheese on top. Bake the bombs in your preheated oven for about 15 to 20 minutes. Signs of doneness Look for a golden brown color on the tops of the bombs. You can also check if they are cooked through by cutting one open. The filling should be hot and bubbly. When done, remove them from the oven and let cool slightly before serving. For the full recipe, check out the detailed instructions above. Enjoy your delicious Garlic Parmesan Cheeseburger Bombs! To make your garlic Parmesan cheeseburger bombs shine, adjust the seasonings to your taste. If you love heat, add a dash of cayenne pepper. For a zestier flavor, mix in a teaspoon of Worcestershire sauce. You can also try adding diced jalapeños for a spicy kick. Another great option is to include finely chopped green onions for extra crunch and flavor. Feel free to get creative with additional ingredients. For instance, you can add cooked bacon bits to the beef mixture for a smoky flavor. You could also swap out cheeses. Try using mozzarella for a gooey texture or pepper jack for some spice. Each change can make your bombs unique. These cheeseburger bombs pair well with a variety of dipping sauces. Classic ketchup and mustard are always a hit. You might also enjoy ranch dressing for a creamy touch. For something bolder, try a spicy aioli or barbecue sauce. When it comes to side dishes, keep it simple. A fresh salad with tangy vinaigrette complements the rich flavors of the bombs. You can also serve them with crispy sweet potato fries for a fun twist. These options balance the meal and keep it light. If you want to save time, cook in batches. You can make a large batch of these bombs and freeze them before baking. Just place the unbaked bombs on a baking sheet and freeze for about an hour. Once frozen, transfer them to a freezer bag. This way, you can bake them whenever you want a quick snack. When you're ready to eat, you can reheat them straight from the freezer. Just add a few extra minutes to your baking time. This makes meal prep easy and allows you to enjoy delicious snacks anytime. {{image_2}} You can switch up the meat in this recipe. Ground turkey or chicken works well. Each gives the bombs a lighter taste. If you want to try something different, use pork or lamb. For a vegetarian option, use plant-based ground meat. You can also use black beans or lentils. They add a hearty texture and flavor. Just mix with the cheeses and seasonings as you would with meat. Want some heat? Add diced jalapeños or red pepper flakes to the filling. These spicy additions bring a kick to each bite. You can also try sriracha or hot sauce for an extra zing. Mixing cheeses can take your bombs to the next level. Instead of cheddar, use pepper jack for a spicy twist. Or try mozzarella for a gooey texture. You can even blend cheeses for a tasty surprise. These cheeseburger bombs can shine as an appetizer or a main course. Serve them hot with dipping sauces like ranch or ketchup. They are also great at parties or game days. If you want smaller bites, make sliders. Use the same filling but cut the dough into smaller pieces. Full-sized bombs are great for a meal. Choose what fits your occasion best. For the full recipe, check out the ingredients and steps above. To keep your leftover garlic Parmesan cheeseburger bombs fresh, wrap them tightly. Use plastic wrap or aluminum foil for the best results. You can also place them in an airtight container. This method protects them from air and moisture. Refrigerator vs. Freezer In the refrigerator, these bombs last about 3 days. If you freeze them, they can last up to 3 months. Just make sure to label the container with the date. This way, you know when you made them. When you're ready to enjoy your leftovers, the oven is the best choice. Preheat it to 350°F (175°C). Place the bombs on a baking sheet and heat for about 10-15 minutes. This keeps them crispy. Microwave Option You can use the microwave, but they might get soggy. If you do, heat them for about 30 seconds. Check if they are warm enough and heat more if needed. Re-crisping Techniques If they lose their crunch, try broiling them for a minute or two after microwaving. This adds back some crispiness. These garlic Parmesan cheeseburger bombs stay fresh for about 3 days in the fridge. If frozen, they can last for about 3 months. Signs of Spoilage Watch for changes in color or texture. If they smell off or look dry, it’s best to throw them away. Always trust your senses when checking for freshness. For the full recipe, please refer to the [Full Recipe]. Can I use frozen ground beef? Yes, you can use frozen ground beef. Just thaw it first. You can do this overnight in the fridge. If you’re in a hurry, use the microwave. Make sure it is fully thawed before mixing it with the cheese and spices. What can I use instead of biscuit dough? If you want, you can use pizza dough or puff pastry. Both will give a nice texture. You can also try crescent roll dough for a different taste. Just make sure to adjust baking time if needed. Can I prepare these ahead of time? Yes, you can make them ahead. Prepare the cheeseburger bombs and seal them. Store them in the fridge for up to one day. When ready, bake them as directed. This saves time on busy days. What is the best temperature for baking? The best temperature for baking these bombs is 375°F (190°C). This heat cooks them evenly and gives a golden color. Always preheat your oven to ensure the best results. How to adjust for dietary restrictions? To adjust for dietary needs, use ground turkey or chicken instead of beef. You can also replace cheese with dairy-free options. Always check labels for hidden allergens. Tips for making them gluten-free? For a gluten-free option, use gluten-free biscuit dough. Many stores sell this now. You can also make your own using gluten-free flour. Just follow a trusted recipe to ensure they turn out well. In this blog post, we explored how to make delicious biscuit bombs from start to finish. We discussed key ingredients like ground beef, tasty cheeses, and seasonings. We covered biscuit dough choices, garnishes, and essential tips to enhance flavor. You learned how to assemble and bake these treats, plus options for variations and storage. Now, go ahead and make your own biscuit bombs. Enjoy them as a snack, meal, or share them with friends. Happy cooking!
    Irresistible Garlic Parmesan Cheeseburger Bombs Recipe
  • Huli Huli Chicken hails from Hawaii. It first appeared in the 1950s. The name "Huli" means "turn" in Hawaiian. This dish gets its name from the grilling method. You turn the chicken on the grill for even cooking. Locals often serve Huli Huli Chicken at luaus and gatherings. Its sweet and savory flavor makes it a favorite among many. People love Huli Huli Chicken for its unique taste. The mix of pineapple juice and soy sauce gives it a great balance. The dish is simple to make and full of flavor. It appeals to both kids and adults, making it perfect for family meals. Plus, grilling adds a smoky touch that enhances the dish. You can serve it at barbecues, parties, or just for a nice dinner at home. The key ingredients bring Huli Huli Chicken to life. Here’s what you need: - 4 chicken thighs, bone-in and skin-on - 1 cup pineapple juice - 1/4 cup soy sauce - 1/4 cup brown sugar - 2 tablespoons sesame oil - 2 garlic cloves, minced - 1 tablespoon fresh ginger, grated - 1 teaspoon red pepper flakes - 1 green onion, chopped (for garnish) - 1/4 cup fresh cilantro, chopped (for garnish) These ingredients create a delicious marinade. They work together to tenderize the chicken and add layers of flavor. You can find the full recipe [here]. To make Huli Huli chicken, gather these simple items: - 4 chicken thighs, bone-in and skin-on - 1 cup pineapple juice - 1/4 cup soy sauce - 1/4 cup brown sugar - 2 tablespoons sesame oil - 2 garlic cloves, minced - 1 tablespoon fresh ginger, grated - 1 teaspoon red pepper flakes - 1 green onion, chopped (for garnish) - 1/4 cup fresh cilantro, chopped (for garnish) Using fresh ingredients makes a big difference. Fresh chicken enhances the taste and texture. Fresh garlic and ginger also add vibrant flavors. Pineapple juice can be fresh or canned. I prefer fresh for a brighter flavor. Pre-packaged sauces can save time but may contain preservatives. If you use them, check the label for quality. Each serving provides a burst of flavor along with key nutrients. Here’s what you get per serving: - Calories: 300 - Protein: 24g - Carbohydrates: 25g - Fat: 15g - Fiber: 1g - Sugars: 10g This dish gives you a balanced meal with protein and some natural sugars. When you use the Full Recipe, you can enjoy a tasty meal that's both healthy and satisfying. To start, gather your ingredients. You need chicken thighs, pineapple juice, soy sauce, brown sugar, sesame oil, garlic, ginger, and red pepper flakes. In a mixing bowl, combine the pineapple juice, soy sauce, brown sugar, sesame oil, minced garlic, grated ginger, and red pepper flakes. Whisk it all together until well mixed. This marinade gives the chicken a sweet and tangy flavor. Place the chicken thighs in a large zip-top bag or a shallow dish. Pour the marinade over the chicken. Seal the bag or cover the dish. Refrigerate for at least 2 hours, or better yet, overnight. This step is key for the best taste. When you are ready to grill, preheat your grill to medium-high heat. This is important to get perfect grill marks and a nice sear on the chicken. Make sure your grill grates are clean. You can oil the grates lightly to prevent sticking. This small step can save you from a messy cooking experience later. Now, it’s time to grill! Remove the chicken from the marinade and let any excess drip off. Keep the leftover marinade for basting later. Place the chicken skin-side down on the grill. Grill for about 7-8 minutes until the skin is crispy and golden. Flip the chicken carefully, then baste it with the reserved marinade. Grill for another 7-8 minutes. You want the internal temperature to reach 165°F (75°C) for safe eating. Once done, remove the chicken from the grill and let it rest for 5 minutes. This will help keep it juicy. Before serving, garnish with chopped green onions and fresh cilantro. Enjoy your flavorful Huli Huli chicken! For the full recipe, check out the previous section. {{image_2}} Marinating chicken is key to great flavor. I recommend marinating for at least two hours. For the best taste, leave it overnight. The longer you marinate, the more delicious the chicken becomes. The pineapple juice tenderizes the meat and adds a sweet taste. Grill marks make your dish look amazing. To get those perfect lines, set your grill to medium-high heat. Place the chicken skin-side down on the grill. Don't move it for about 7-8 minutes. Once you see nice grill marks, flip the chicken carefully. This helps keep the juices inside. Using the right tools makes cooking easier. A good grill is essential for Huli Huli chicken. I also suggest using tongs to flip the chicken. A meat thermometer is important too. It ensures your chicken reaches 165°F (75°C) for safety. Lastly, have a basting brush ready for the marinade. This will keep the chicken juicy and full of flavor. For the full recipe and detailed steps, check out the [Full Recipe]. You can cook Huli Huli chicken in two main ways: grilling or baking. Grilling gives a smoky flavor and crispy skin. The heat from the grill adds nice char marks. For fun, try using a charcoal grill for extra flavor. Bake it for a more hands-off method. Just set your oven to 375°F (190°C). Place the chicken in a baking dish and pour the marinade over it. Bake for about 45 minutes. Check that the chicken reaches 165°F (75°C) for safety. Huli Huli chicken is great in bowls. Start with a base of rice or quinoa. Add grilled veggies like bell peppers and zucchini. Slice the chicken and place it on top. Drizzle with extra marinade or teriyaki sauce for added flavor. You can also sprinkle chopped green onions and cilantro for a fresh touch. Add slices of avocado or mango for a tropical twist. This makes for a colorful and tasty meal. You can easily adapt this recipe for different diets. For gluten-free options, use tamari instead of soy sauce. If you want a lower-sugar version, try using a sugar substitute like stevia. For a vegan option, swap the chicken for tofu or tempeh. Marinate it in the same sauce. Cooking times will vary, so check for doneness. These swaps keep the dish flavorful while meeting your dietary needs. For the full recipe, check out the details above! Yes, you can use different cuts. Huli Huli chicken works great with chicken breasts or drumsticks. Each cut offers a unique taste and texture. Keep in mind that cooking times may change. Breasts may cook faster than thighs. Always check the internal temperature to ensure it reaches 165°F (75°C). To store leftovers, let the chicken cool first. Place it in an airtight container. It will keep well in the fridge for up to four days. You can also freeze it for up to three months. When reheating, make sure the chicken is hot all the way through. You can find great Huli Huli chicken at Hawaiian restaurants. Look for local spots that specialize in island cuisine. Some food trucks also serve this dish. Check reviews online to find the best places. If you can't find a restaurant nearby, try making it at home using the Full Recipe. Huli Huli chicken is a tasty dish with rich history. We explored its origins, key ingredients, and why people love it. You learned how to marinate, grill, and serve this dish perfectly. I shared helpful tips and tasty variations to try. Enjoy making Huli Huli chicken in your kitchen. Each bite brings a taste of Hawaii to your home. Whether grilling or baking, have fun and get creative with flavors!
    Huli Huli Chicken Flavorful Recipe to Try Today
  • To make a tasty strawberry cheesecake, you need the following items: - 1 ½ cups graham cracker crumbs - ⅓ cup granulated sugar - ½ cup unsalted butter, melted - 16 oz cream cheese, softened - 1 cup powdered sugar - 1 teaspoon vanilla extract - 2 cups heavy cream - 1 cup fresh strawberries, pureed - 1 tablespoon lemon juice - Fresh strawberries for topping You can swap some ingredients if needed. Here are a few ideas: - Instead of graham cracker crumbs, use crushed cookies or nuts. - For granulated sugar, you can use brown sugar for a deeper flavor. - Use coconut oil in place of unsalted butter for a dairy-free option. - If you want a lighter version, use low-fat cream cheese. - You can substitute fresh strawberries with frozen ones, but fresh is best for flavor. Choosing ripe strawberries is key for great flavor. Here’s how: - Look for bright red berries. They should feel firm and plump. - Check for green, leafy tops; this shows they are fresh. - Avoid berries with soft spots or mold. This means they are past their prime. - If possible, buy local strawberries for the best taste. To start, preheat your oven to 325°F (163°C). Take a mixing bowl and add the graham cracker crumbs, granulated sugar, and melted butter. Mix these together until all crumbs feel wet. This step is key for a tasty crust. Next, press this mixture into the bottom of a 9-inch springform pan. Make sure it is even. Bake it in the oven for about 10 minutes. Once done, take it out and let it cool completely. Now, let’s make the filling. In a large bowl, beat the softened cream cheese with an electric mixer. You want it to be smooth and creamy. Slowly add the powdered sugar and vanilla extract. Keep mixing until everything is blended well. This process gives the cheesecake its rich taste. Next, take another bowl and whip the heavy cream. You want to whip it until soft peaks form. This adds lightness to your cheesecake. Carefully fold the whipped cream into the cream cheese mixture. Do this gently, so it stays fluffy. Time to add some flavor! Fold in the pureed strawberries and lemon juice. Mix until the color is uniformly pink. This will make your cheesecake taste fresh and fruity. Now, pour this strawberry cheesecake filling over the cooled crust in the springform pan. Smooth the top with a spatula to make it nice and neat. Cover it with plastic wrap and place it in the fridge. For the best flavor, chill it for at least 4 hours, or even overnight. Follow these steps, and you’ll have an amazing strawberry cheesecake. For exact measurements and more details, check the Full Recipe. To make your cheesecake creamy, use softened cream cheese. Cold cream cheese can cause lumps. Beat it well until smooth before adding any sugar. Mixing in the powdered sugar slowly helps keep the creaminess. Always fold in the whipped cream gently. This keeps the mixture light and fluffy. One common mistake is overmixing the filling. Overmixing can add too much air and cause cracks. Make sure to mix just until combined. Another mistake is not chilling long enough. Chilling for at least four hours helps set the cheesecake. Don’t skip the fresh strawberry topping. It adds flavor and looks great! To whip cream perfectly, start with cold heavy cream. Use a clean bowl and beaters for best results. Beat on medium speed until soft peaks form. This takes only a few minutes. Don’t overwhip, or it may turn into butter. Fold it into your cheesecake mixture gently to keep the light texture. You can find the full recipe for this delightful dessert to guide you in making the best strawberry cheesecake! {{image_2}} A no-bake version is simple and quick. You skip the oven and save time. Start with the same crust made from graham cracker crumbs. Mix the cream cheese, powdered sugar, and vanilla like in the original recipe. Instead of baking, spread the filling over the crust. Chill it for at least four hours. This method gives you a smooth, creamy slice without any baking fuss. If you want a vegan cheesecake, you can use plant-based ingredients. For the crust, use vegan butter instead of regular butter. Swap the cream cheese with soaked cashews blended until creamy. Use maple syrup or agave instead of powdered sugar. Coconut cream is a great choice to replace heavy cream. This vegan option tastes rich and delicious and is perfect for plant-based diets. For a gluten-free version, you can use almond flour or gluten-free graham crackers. Mix them with coconut oil to create a crust that holds together well. Press it into your pan just like the regular crust. This way, you enjoy the same great taste without gluten. You can even try crushed nuts for a unique twist. Explore these variations to find your favorite way to enjoy Strawberry Cheesecake Delight! For the complete recipe, check out the Full Recipe. After you enjoy your strawberry cheesecake, store leftovers properly. First, cover it well. Use plastic wrap or a lid to keep it fresh. This keeps out air and moisture. Place it in the fridge. It helps maintain its taste and texture. Always put it on a flat surface to avoid spills. You can freeze strawberry cheesecake for later. First, let it cool completely. Then, wrap it tightly in plastic wrap. Next, place it in an airtight container or freezer bag. This protects it from freezer burn. You can freeze it for up to three months. When you are ready to enjoy it, thaw it in the fridge overnight. Strawberry cheesecake lasts about five days in the fridge. Keep it covered to maintain quality. If it looks or smells off, don’t eat it. If frozen, it stays good for three months. Always check for any signs of spoilage before serving. Knowing these tips helps you enjoy this delightful dessert longer. For the full recipe, visit the complete guide. To make strawberry cheesecake from scratch, follow these steps. First, prepare the crust by mixing graham cracker crumbs, sugar, and melted butter. Press this mix into a springform pan and bake. Next, beat cream cheese until smooth. Then, add powdered sugar and vanilla. In another bowl, whip heavy cream until soft peaks form. Fold this whipped cream into the cream cheese mixture gently. Add pureed strawberries and lemon juice. Mix until it’s a nice pink color. Pour this filling over the crust and chill for at least 4 hours. You can find the full recipe in the earlier sections. Yes, you can use frozen strawberries. Just remember to thaw them first. Drain any excess liquid to avoid a watery filling. Frozen strawberries work well in purees and can still give great flavor. They may change the texture slightly, but your cheesecake will still taste amazing. The best way to serve strawberry cheesecake is chilled. Once set, remove it from the springform pan. Top with fresh strawberries for a bright look. You can also add whipped cream or a drizzle of strawberry sauce. Slice into pieces and enjoy! This dessert is perfect for gatherings or a special treat. In this blog post, we explored the key ingredients for a perfect strawberry cheesecake, from the crust to fresh strawberries. I shared step-by-step instructions to make it easy for you. We looked at tips for a creamy texture and common mistakes to avoid. Plus, I offered tasty variations, storage tips, and answered frequently asked questions. Remember, practice makes perfect. Enjoy making this dessert, and share it with friends and family!
    Strawberry Cheesecake Delight Simple and Easy Recipe
  • - 1 pre-made graham cracker pie crust - 1 cup fresh lemon juice (about 4-5 lemons) - Zest of 2 lemons - 1 cup granulated sugar - 4 large eggs - 1/2 cup unsalted butter, melted - 1 cup heavy whipping cream - 1/4 cup powdered sugar (for the whipped cream) - Fresh mint leaves (for garnish) Having the right ingredients makes all the difference in making an easy lemon cream pie. I love using fresh lemon juice. It brings a bright, zesty flavor that makes the pie shine. The sweet and tart balance is key. The graham cracker crust adds a nice crunch, too. When selecting lemons, pick ones that feel heavy for their size. This usually means they have more juice inside. Don't forget the zest! It adds extra lemon flavor that makes this pie special. Melted butter helps bind the filling. Heavy cream is essential for the whipped topping. This creates a light and fluffy texture that complements the tangy filling. Lastly, fresh mint leaves add a pop of color and flavor. Garnishing with mint makes the pie look even more delightful. For the full recipe, check the detailed instructions above. To start, gather your ingredients. In a medium saucepan, you will whisk together: - 1 cup fresh lemon juice - Zest of 2 lemons - 1 cup granulated sugar - 4 large eggs - 1/2 cup unsalted butter, melted Cook this mixture over medium heat. Keep stirring until it thickens. This should take about 10 to 15 minutes. You want it thick enough to coat the back of a spoon. Be careful not to let it boil, as that can ruin the texture. Once your lemon filling thickens, remove it from the heat. Let it cool for about 15 to 20 minutes. Stir it occasionally so a skin does not form on top. After it cools, gently pour the lemon filling into the pre-made graham cracker pie crust. Use a spatula to smooth the top. Now, place the pie in the refrigerator. Let it chill for at least 3 hours. This helps the filling set properly. While the pie chills, you can whip the cream. In a mixing bowl, combine: - 1 cup heavy whipping cream - 1/4 cup powdered sugar Beat this mixture on medium-high speed. Stop when soft peaks form. Once the pie has set, spread the whipped cream evenly on top. Create swirls for an attractive finish. For a nice touch, add fresh mint leaves as garnish. You can also sprinkle some extra lemon zest on top if you like. For the full recipe, check out the entire guide. Enjoy making your Easy Lemon Cream Pie! To get the best flavor, always use fresh lemon juice. The taste brightens the pie. Fresh lemons make the filling zesty and vibrant. When cooking the filling, stir continuously. This keeps the mixture from boiling. Boiling can ruin the texture. If you see bubbles, lower the heat. The goal is to thicken it gently. You want it to coat the back of a spoon. Cold tools help create the best whipped cream. Chill your mixing bowl and beaters in the fridge. This makes your cream whip faster and fluffier. When you whip the cream, beat until soft peaks form. This gives you a light and airy texture. Don’t overbeat, or it will turn into butter. Just stop when it’s thick yet smooth. {{image_2}} You can easily change the flavor of your lemon cream pie. A splash of vanilla extract adds depth. Mix it into the lemon filling before cooking. It brings a lovely warmth that pairs well with the tartness. If you want to get creative, try other citrus fruits. Lime or orange zest can add a fun twist. Adjust the amount of lemon juice to keep the balance. This way, you can enjoy a whole new pie experience! For those who need a gluten-free option, don’t worry! You can switch the graham cracker crust. Use a gluten-free pie crust instead. Many brands now offer tasty options that work well. You won’t lose the great taste with this swap. This way, everyone can enjoy your easy lemon cream pie. It keeps the same creamy texture and zesty flavor. Everyone will love it, no matter their dietary needs! Store any leftover pie covered in the refrigerator. It stays fresh for up to 3 days. The cool air keeps the lemon cream firm and tasty. If you leave it out, it may spoil faster. To keep it safe, use plastic wrap or a pie dome. This way, you can enjoy the pie again without losing its flavor. Freezing the filled pie is not a good idea. The texture changes when you thaw it. The creamy filling may become watery or grainy. Instead, enjoy the pie fresh. If you have extra lemon filling, you can freeze that. Just remember to use it within a month. When you're ready, thaw it in the fridge overnight, then pour it into a fresh crust. This gives you a new pie without losing quality. Yes, you can prepare the lemon filling in advance. Just keep it in the fridge. Make sure it cools completely before covering it. This way, you save time on the big day. You can pour it into the crust just before serving. Bottled lemon juice is a good option. It works well in the recipe. Just use the same amount as fresh juice. You may miss some zest, but it still tastes great. Be sure to check the label for quality. This recipe makes about eight servings. You can slice the pie into even wedges. Use a sharp knife for clean cuts. Serve each piece on a plate with a mint leaf on top for a nice touch. Enjoy! You now have a simple and tasty lemon pie recipe. The fresh lemon juice and zest give it a bright flavor. Follow the steps to whip up this pie easily. Remember, freshness matters for the best taste. You can even make this pie your own by adding different flavors. Store leftovers properly for later enjoyment. Enjoy your time baking and sharing this delicious treat. Your friends and family will love it!
    Easy Lemon Cream Pie Delightful and Simple Recipe
  • To make an Easy Prawn Cutlet Burger, you need fresh and simple ingredients. Here’s the list: - 250g prawns, peeled and deveined - 1 small onion, finely chopped - 2 cloves garlic, minced - 1 green chili, finely chopped - 1/2 cup breadcrumbs - 1 egg - 2 tablespoons cornstarch - 1 tablespoon fresh coriander, chopped - 1 teaspoon cumin powder - 1/2 teaspoon salt - Black pepper to taste - 2 tablespoons oil (for frying) - Burger buns - Lettuce leaves - Sliced tomatoes - Mayonnaise or aioli (for serving) These ingredients come together to create a burger that is both tasty and easy to make. You can find the full recipe in the next section. Using fresh prawns will really enhance the flavor of your cutlet. Enjoy the process of gathering these ingredients. They are the foundation for your delightful meal! First, start by pulsing the prawns in a food processor. You want them coarsely chopped, not pureed. Next, take a large bowl and combine the chopped prawns with the finely chopped onion, minced garlic, green chili, and fresh coriander. This mix adds flavor and freshness to your patties. Now, it’s time to add the rest of the ingredients. Toss in the breadcrumbs, egg, cornstarch, cumin powder, salt, and black pepper. Mix everything well until you have a sticky mixture. This helps the patties hold together. Divide the mixture into four equal portions. Shape each portion into a patty. Make sure they are even for uniform cooking. Heat oil in a large skillet over medium heat. Once the oil is hot, carefully place your prawn patties in the skillet. Fry them for about three to four minutes on each side. Look for a golden brown color and a crispy texture. While they cook, you can toast the burger buns until they are lightly golden. This adds a nice crunch to your burger. Now, you have crispy prawn cutlet patties, ready to be assembled into your burger! For the full recipe, refer to the instructions above. To make great prawn patties, use fresh prawns. Fresh prawns give the best flavor. You want the mixture to be sticky. This helps the patties hold together well. When you mix the ingredients, don’t rush. Take your time to combine everything fully. This step is key for a good texture. Frying your patties at the right temperature is crucial. Heat your oil over medium heat. If the oil is too hot, the outside will burn. If it's too cool, the patties will soak up oil and become soggy. To keep your patties crispy, avoid crowding the pan. Fry them in batches if needed, and let them rest on a paper towel after cooking. This helps absorb extra oil. Now, let’s talk about toppings. Crisp lettuce and fresh tomato add nice crunch. For sauce, mayonnaise or aioli works great. You can add a slice of cheese if you like. Serve your burgers with fries or a simple salad. These sides complement the flavors and make a full meal. Enjoy your Easy Prawn Cutlet Burger! For the full recipe, check the section above. {{image_2}} You can easily switch the prawns for other seafood. Fish like cod or salmon works great. Crab meat also adds a sweet, rich flavor. Just chop the seafood into small pieces. Follow the same steps in the recipe. Your cutlet burger will taste amazing! For a veggie version, use mixed vegetables. You can blend carrots, peas, and corn for a colorful mix. Add mashed chickpeas for protein. Use the same spices from the original recipe. Shape the veggie mix into patties, and cook as described. A veggie burger can be just as delicious! Want more flavor? Add spices like paprika or cayenne pepper. Fresh herbs like dill or parsley can brighten the taste. You can also mix in zest from a lemon or lime. These small changes can make your prawn cutlet burger even tastier. Enjoy experimenting with different flavors! To keep your prawn cutlet burgers fresh, refrigerate any leftovers. Place them in an airtight container. They will last up to three days in the fridge. If you want to save them for later, freezing works well too. Wrap each burger in plastic wrap, then place them in a freezer bag. They can stay good for up to three months. When it’s time to eat your leftovers, reheating is key. The best way to warm them up is in a skillet. Heat a little oil over medium heat. Place the burgers in the pan, cooking for about 2-3 minutes on each side. This method keeps them crispy. You can also use an oven at 350°F. Bake for 10-15 minutes until hot. The shelf life of your prawn cutlet burgers is important for safety. If stored properly in the fridge, they are best eaten within three days. If frozen, aim to eat them within three months for the best taste. Always check for any signs of spoilage before consuming. To make your prawn cutlet burger crispy, use fresh breadcrumbs. The breadcrumbs create a nice crust when frying. Make sure the oil is hot before adding the patties. This helps seal the outside quickly. You can also double coat the patties by dipping them in egg, then breadcrumbs again. This adds extra crunch to each bite! Yes, you can prepare the patties in advance. Shape the patties and place them on a tray. Cover them with plastic wrap and refrigerate for up to 24 hours. This keeps the flavors fresh. When you're ready to cook, just heat the oil and fry them until golden. This saves you time and makes dinner easy! If you don’t have aioli, you can use mayonnaise as a simple substitute. You might also try garlic mayonnaise for extra flavor. For a spicy kick, mix some sriracha into the mayo. Other options include tartar sauce or even a yogurt-based dip. These choices keep your burger tasty and fun! Yes, you can freeze the prawn patties. After shaping them, place them on a baking tray. Freeze them for a few hours, then store in a freezer bag. They last for about three months. When ready to cook, just fry them straight from the freezer. This is a great way to have a quick meal on hand! Cook the patties for about 3-4 minutes on each side. This timing gives you a nice golden color and crispy texture. Keep an eye on them to avoid burning. If they brown too quickly, lower the heat a little. Perfectly cooked patties are key to a delicious prawn cutlet burger! Fresh toppings make your prawn cutlet burger even better! Try crisp lettuce and juicy tomato slices. You can also add pickles for a tangy crunch. Other great options are sliced avocado and shredded cabbage. These toppings add color and flavor to your meal, making it more exciting! In this post, we covered how to make tasty prawn patties. We looked at key ingredients and detailed steps for preparation, cooking, and serving. I shared tips for perfecting your patties and options for variations. Remember, fresh prawns make a big difference! Enjoy these patties with your favorite toppings to enhance the flavor. Whether you choose to fry them or try some fun substitutions, these burgers can fit any taste. Dive into this recipe and impress everyone at your next meal. Your culinary journey awaits!
    Easy Prawn Cutlet Burger Delightful and Tasty Meal
  • To make a great palak paneer, you need the following items: - 250g paneer, cubed - 500g fresh spinach leaves, washed and blanched - 1 large onion, finely chopped - 2 tomatoes, pureed - 2 green chilies, slit - 1 tablespoon ginger-garlic paste - 1 teaspoon cumin seeds - 1 teaspoon garam masala - ½ teaspoon turmeric powder - ½ teaspoon red chili powder - 2 tablespoons ghee or vegetable oil - Salt to taste These ingredients create a rich and flavorful dish. Each one plays an important role in the final taste. For instance, paneer adds a creamy texture, while spices bring warmth and depth. You can enhance your dish with these garnishes: - Fresh cream - Coriander leaves Fresh cream adds a rich finish. Coriander leaves give a fresh pop of color and flavor. They make your palak paneer look beautiful and taste even better. If you want to impress guests, use these garnishes. For the full recipe, check out the detailed cooking steps to create this delightful meal. Blanching the spinach: First, bring a pot of water to a boil. Add the fresh spinach leaves and let them boil for 2-3 minutes. This step helps keep the bright green color. Next, drain the spinach and quickly move it to a bowl of cold water. This stops the cooking process. Once cool, blend the spinach until it becomes a smooth paste. Set this aside for later. Preparing the spinach paste: The paste is key for our dish's flavor. When you blend the spinach, it should be silky and bright. This will make the Palak Paneer look and taste amazing. You can add a little water while blending if needed. Just don't add too much! Sautéing onions and spices: In a large pan, heat 2 tablespoons of ghee or vegetable oil over medium heat. Add 1 teaspoon of cumin seeds and wait for them to splutter. This releases their flavor. Next, toss in 1 large finely chopped onion and 2 slit green chilies. Cook them until the onions are golden brown. This usually takes around 5-7 minutes. Combining ingredients for optimal flavor: Now, stir in 1 tablespoon of ginger-garlic paste and cook for another minute. After that, add 2 pureed tomatoes, ½ teaspoon of turmeric powder, ½ teaspoon of red chili powder, and salt to taste. Cook this mix until it thickens and the oil separates from the mixture, about 5-7 minutes. Then, add the blanched spinach paste and mix it well. Let it simmer on low heat for about 4-5 minutes. Finally, gently fold in 250g of cubed paneer. Make sure the paneer is well-coated with the spinach sauce. Cook for another 3 minutes. Sprinkle in 1 teaspoon of garam masala and mix gently. You can adjust the salt if needed. If you like, drizzle fresh cream on top before garnishing with coriander leaves. Serve this dish warm for a delightful meal. For the full recipe, you can find it [here](#). To achieve the perfect spinach texture, start with fresh spinach. Wash it well and blanch it quickly for just 2-3 minutes. This keeps the vibrant green color and smooth texture. After blanching, cool it in cold water to stop the cooking process. Blend it into a fine paste for the best results. For the paneer, ensure it’s tender yet firm. Use fresh paneer, and cut it into cubes. You can fry the paneer lightly in ghee or oil before adding it to the dish. This gives a nice texture and flavor. Avoid overcooking the paneer, as it can become rubbery. For the best side dishes to pair with Palak Paneer, consider serving it with naan or basmati rice. Both absorb the delicious sauce well. You can also add a side of pickles or yogurt for extra flavor. When it comes to presentation, serve the Palak Paneer in a warm bowl. Drizzle a bit of cream on top for richness and color. Finish with a sprinkle of fresh coriander leaves. This makes the dish look inviting and appetizing. For more ideas, check the Full Recipe for detailed steps and variations. {{image_2}} You can easily adapt Palak Paneer to fit different diets. For a vegan option, replace paneer with tofu or a nut-based cheese. Tofu captures the flavors well and adds a nice texture. You can also use coconut cream instead of fresh cream for a creamy touch. If you need gluten-free options, don't worry. This dish is naturally gluten-free, so you can enjoy it without any changes. Just make sure to check any store-bought ingredients for hidden gluten. To change up the taste, consider adding spices. A pinch of fenugreek leaves gives a unique flavor. You can also add a touch of cardamom for warmth. Experimenting with spices adds depth and makes the dish your own. Incorporating extra vegetables is another fun way to play with flavors. Try adding peas for sweetness or bell peppers for crunch. These veggies blend well with the spinach and add color to your plate. You can explore these ideas in the Full Recipe for Palak Paneer. To store leftover Palak Paneer, let it cool first. Then, place it in an airtight container. This keeps it fresh for about 3-4 days in the fridge. When you’re ready to eat, just reheat it on the stove or in the microwave. Stir it often to heat it evenly. If you want to freeze Palak Paneer, use a freezer-safe container. Make sure to cool it fully before freezing. It can last up to 3 months in the freezer. When you want to enjoy it again, thaw it overnight in the fridge. Reheat in a pan on low heat to keep it tasty. If it seems thick, add a splash of water or cream. This keeps the dish creamy and delicious. How can I make Palak Paneer spicier? To add heat, you can include more green chilies. Chop them finely and add them to the dish early. You can also add a pinch of cayenne pepper or red chili powder. This will give your Palak Paneer a nice kick. Adjust spice to your taste as you cook. Can I use frozen spinach instead? Yes, frozen spinach works well in Palak Paneer. Just thaw it and squeeze out excess water. Then, blend it into a paste as you would with fresh spinach. It saves time and can still taste great. What are the health benefits of Palak Paneer? Palak Paneer is rich in iron, calcium, and vitamins A and C. Spinach offers antioxidants that help with health. Paneer adds protein, making this dish nutritious. It is a great option for a balanced meal. Is Palak Paneer high in calories? Palak Paneer can be moderate in calories. One serving has around 300-400 calories, depending on the amount of oil or cream. For a lighter version, use less ghee or skip the cream. Enjoy it with whole grains for a healthy meal. This article covered how to make Palak Paneer with ease. We explored the key ingredients needed and how to blend them for the best taste. I shared cooking tips to help you achieve the perfect texture. Don't forget to try the optional garnishes for added flair. Storage tips ensure you enjoy leftovers, while variations let you adapt to dietary needs. Cooking can be fun and satisfying. Experiment with flavors and enjoy your homemade Palak Paneer. Happy cooking!
    Palak Paneer Delightful Recipe for Flavorful Dish

Our Policies

  • Privacy Policy
  • GDPR Policy
  • Terms Of Use
  • Copyright Policy
  • Cookie Policy
  • Disclaimer

More Information

  • Home
  • Dinner
  • Appetizer
  • Desserts
  • Breakfast
  • Contact
  • About

  • Email: [email protected]
  • Address: 513 E Cuyahoga Falls Ave, Akron, OH 44310, United States
  • Phone: +1 (305) 275-4892
©2025 Themomdish All Rights Reserved