Skip to content
  • Disclaimer
  • Terms Of Use
  • GDPR Policy
  • Cookie Policy
themomdish.com
themomdish.com
  • Home
  • Drinks
  • Appetizer
  • Dinner
  • Desserts
  • Breakfast
  • About
  • Contact
  • Privacy Policy
  • Home
  • Drinks
  • Appetizer
  • Dinner
  • Desserts
  • Breakfast
  • About
  • Contact
  • Privacy Policy

Appetizer

To make Cajun Crab Pasta Salad, you need a few simple ingredients. Each piece plays a big role in creating that bold flavor. - Pasta and Salad Base - 8 oz. fusilli pasta - 1 cup cooked crab meat, shredded - Vegetables and Seasoning - 1/2 cup red bell pepper, diced - 1/2 cup celery, diced - 1/4 cup green onions, sliced - Dressing Components - 1/4 cup mayonnaise - 2 tablespoons sour cream - 1 tablespoon Dijon mustard - 1 tablespoon Cajun seasoning - 1 tablespoon lemon juice - Salt and pepper to taste - Fresh parsley for garnish Each ingredient adds a unique touch. The pasta provides a hearty base. The crab meat brings a sweet, ocean flavor. The veggies add crunch and color. The dressing ties it all together with creaminess and spice. This recipe is both vibrant and simple. You can find the full recipe above to guide you in making this delicious dish. Al Dente Cooking Method Start by boiling a pot of water. Add salt to the water to enhance flavor. Once the water is boiling, add 8 oz. of fusilli pasta. Cook it until it is al dente, which means it should be firm yet tender. Check the pasta box for exact cooking times, usually around 8 to 10 minutes. Cooling the Pasta After cooking, drain the pasta in a colander. Rinse it under cold water to stop the cooking process. This step helps keep the pasta from getting mushy. Set the cooled pasta aside in a large mixing bowl. Mixing the Ingredients In a separate bowl, combine 1/4 cup of mayonnaise, 2 tablespoons of sour cream, and 1 tablespoon of Dijon mustard. Then add 1 tablespoon of Cajun seasoning and 1 tablespoon of lemon juice. Stir everything together until the mixture is smooth and creamy. Adjusting the Flavor Taste your dressing. If you want more zing, add a bit more lemon juice. You can also sprinkle in salt and pepper to your liking. This is your chance to make it just right. Folding Techniques Now it's time to bring everything together. Add the cooled fusilli pasta to the bowl with the dressing. Then, gently fold in 1 cup of shredded crab meat, 1/2 cup of diced red bell pepper, 1/2 cup of diced celery, and 1/4 cup of sliced green onions. Be gentle to avoid breaking the pasta or crab. Ensuring Even Coating Make sure every piece of pasta and crab gets coated in the dressing. This step is key for flavor. If you want a creamier salad, feel free to add a bit more mayonnaise. Once everything is mixed well, cover the salad with plastic wrap and pop it in the fridge for at least 30 minutes. This wait allows the flavors to meld together beautifully. To boost the taste of your Cajun crab pasta salad, try adding more seasonings. You can use garlic powder or smoked paprika. These spices add a nice kick without being too strong. Using fresh ingredients makes a big difference. Fresh crab meat tastes better than canned. Also, fresh veggies like bell peppers and green onions add crunch. They make the dish colorful too. This pasta salad pairs well with grilled shrimp or chicken. The flavors blend nicely, making it a great meal. Serve it with crusty bread or a green salad for balance. When it comes to presentation, use a large bowl. Place the salad in the center and sprinkle fresh parsley on top. This makes it look inviting and fresh. You can prepare this salad a day in advance. Start by cooking the pasta and making the dressing. Mix everything and store it in the fridge. The flavors will deepen, making it tastier. Aim to let the salad chill for at least 30 minutes. This allows the ingredients to blend well. For best results, enjoy it within three days for freshness. {{image_2}} Different Types of Pasta You can change the pasta in this salad. Fusilli works well, but other shapes do too. Try penne, rotini, or even shells. Each pasta type brings a unique texture and shape. This change can add fun to your meal. Additional Proteins Want to switch things up? You can add different proteins. Shrimp or lobster can be great choices. If you like chicken, cooked pieces work well too. This will give your salad a new twist. Gluten-Free Options If you need a gluten-free dish, choose gluten-free pasta. Many stores sell good options now. Just cook it like regular pasta. The rest of the recipe stays the same. You won't lose any flavor with these swaps. Vegan Alternatives For a vegan version, swap the crab meat with jackfruit or tofu. Use vegan mayo instead of regular mayo. This keeps the salad creamy while being plant-based. You can still enjoy all the great flavors. Increasing Heat Levels If you love spice, add more Cajun seasoning. You can also include diced jalapeños or red pepper flakes. Start with a little, then taste and adjust. This way, you control the heat and enjoy your food. Flavor Profiles To create different flavors, think about adding smoked paprika or cayenne. These spices can boost the Cajun taste. You could also try adding lime juice for a zesty kick. Experimenting with spices makes cooking fun and exciting. For the full recipe, refer to the Cajun Crab Pasta Salad section. Store your Cajun crab pasta salad in a tight container. A glass or plastic container with a good lid works best. This keeps the salad fresh and safe from odors. Aim to eat the salad within three days for the best taste. If you keep it longer, it might lose flavor and texture. You may not need to reheat this salad, as it tastes great cold. If you prefer it warm, heat it gently. Use a microwave for quick reheating, but do it in short bursts. This way, you keep it fresh and avoid overheating. Leftovers can lose moisture. To fix this, add a bit of mayonnaise or sour cream. Stir gently to mix it in. This helps bring back creaminess and flavor. If it feels too thick, a splash of lemon juice can help lighten it up. Enjoy your salad again with these easy steps! Yes, you can use canned crab meat in your salad. Pros: - Canned crab is easy to find and save time. - It has a good flavor and is often cheaper. Cons: - Canned crab may have a softer texture. - It can lack the fresh taste of cooked crab meat. If you choose canned crab, look for high-quality brands. Drain it well to avoid excess liquid in your salad. You can store the Cajun Crab Pasta Salad in the fridge for about three days. Storage Duration Insights: - Make sure to keep it in an airtight container. - The flavors will blend and get better over time. However, avoid leaving it out at room temperature for more than two hours. This helps prevent spoilage. Freezing is not the best option for this salad. Freezing Tips and Considerations: - The pasta and dressing may change texture when thawed. - Fresh vegetables and crab meat may lose their quality. If you want to store it longer, consider freezing the pasta separately. You can prepare the dressing fresh when ready to eat. This keeps the flavors vibrant and tasty. For the full recipe, check out the details above. In this blog post, we explored making a delicious Cajun Crab Pasta Salad. We covered the ingredients, from the pasta base to the dressing components. I shared step-by-step cooking methods and how to combine all the flavors. We also discussed tips to enhance flavor and various serving ideas. In closing, this salad is a versatile dish perfect for gathering or meal prep. With smart substitutions and easy storage tips, you can enjoy it any time. Remember, fresh ingredients make all the difference.

Cajun Crab Pasta Salad Flavorful and Simple Recipe

May 6, 2025 by Emma

Are you ready to make a dish that shines at any picnic or potluck? This …

Learn more

Categories Appetizer
- 8 slices of whole grain bread - 4 ounces of sharp cheddar cheese, grated - 4 ounces of mozzarella cheese, grated - 1/4 cup cream cheese, softened For the perfect mini grilled cheese, I love using whole grain bread. It adds a nice flavor and texture. The sharp cheddar and mozzarella blend melts beautifully, creating a gooey center. The cream cheese mixture adds a rich, creamy touch that makes each bite special. - 4 tablespoons unsalted butter, softened - 1 tablespoon fresh chives, finely chopped - 1 teaspoon garlic powder - 1/2 teaspoon paprika - Salt and pepper to taste Seasoning is key to enhancing the taste. I mix garlic powder and paprika into the cream cheese for flavor. Fresh chives add a lovely touch. Don't forget to add salt and pepper for balance. - Skillet or griddle - Spatula - Knife for cutting sandwiches A skillet or griddle is essential for cooking the sandwiches. It helps achieve that golden crust. You will need a spatula to flip the sandwiches and a knife for cutting them into quarters. This makes them easy to eat and share. For the full recipe, check out the detailed steps that follow! Start by mixing the cream cheese, chives, garlic powder, paprika, salt, and pepper in a small bowl. Use a fork to blend these ingredients well. You want a smooth and creamy spread. This mixture adds great flavor to the sandwiches. Make sure there are no lumps in the cream cheese. A smooth texture makes spreading easy. Take two slices of whole grain bread. Spread a thin layer of the cream cheese mixture on one side of each slice. This will be the inside of your sandwich. Next, on the unspread side of one slice, layer a mix of sharp cheddar and mozzarella cheeses. The blend of these cheeses gives a nice flavor and texture. Place the second slice on top with the cream cheese side down. Press gently to keep everything together. Repeat this process until you have four sandwiches ready to cook. Now it's time to cook! Preheat your skillet or griddle over medium heat. Once hot, add one tablespoon of softened butter to the pan. Let it melt and coat the bottom. Carefully place the sandwiches into the skillet. Cook them for about 3-4 minutes on one side. You want them golden brown and crispy. After that, use a spatula to flip the sandwiches over. Add the remaining butter to the skillet. Cook for another 3-4 minutes until the other side is golden and the cheese melts. Remove the sandwiches from the pan and let them cool for a minute. Cut them into quarters for easier eating. Enjoy your mini grilled cheese sandwiches! To get that perfect crispy crust, aim for medium heat. This allows the bread to toast well without burning. Keep an eye on the time while cooking. Each side should cook for about 3-4 minutes. Check for a golden brown color before flipping. For the best flavor, I like to mix sharp cheddar and mozzarella. Cheddar gives a rich taste, while mozzarella adds stretch. You can melt cheese in the skillet or try the oven. If you use the oven, set it to 350°F. This helps the cheese melt evenly without burning the bread. Make your mini grilled cheese stand out! Arrange them on a wooden board. You can add small bowls of dipping sauces like marinara or ranch. A spicy mustard also pairs well. For sides, consider crunchy veggies or a fresh salad. This adds color and fun to your meal. {{image_2}} You can make your mini grilled cheese special with tasty add-ins. Try adding vegetables like spinach or tomatoes. These veggies add color and nutrients. They also give a fresh taste to your sandwiches. For a heartier option, incorporate proteins like crispy bacon or savory ham. These meats add flavor and make your sandwiches more filling. Switching up the bread can change your mini grilled cheese game. Use gluten-free bread for a light and fluffy texture. This option works for those who avoid gluten. You can also experiment with other breads like sourdough or ciabatta. Sourdough gives a tangy flavor, while ciabatta adds a nice crust. You can take mini grilled cheese to the next level with gourmet twists. Add spices and herbs to your cream cheese mixture. A dash of red pepper flakes or basil can give a kick. You might also try using flavored cream cheese. Options like garlic herb or jalapeño can make your sandwiches pop! For the full recipe, check out the detailed instructions. Enjoy crafting your own mini grilled cheese variations! To keep your mini grilled cheese sandwiches fresh, put them in an airtight container. Make sure they cool down first. Store them in the fridge for up to three days. When reheating, use a skillet over low heat. This way, you can regain that crispy outside and melty cheese inside. You can freeze mini sandwiches to enjoy later. Wrap each sandwich tightly in plastic wrap. Then, place them in a freezer bag. This keeps them from getting freezer burn. They can last up to three months in the freezer. To thaw, take them out and let them sit in the fridge overnight. When ready to eat, reheat them in a skillet for the best taste. For the best flavor and texture, eat your mini grilled cheese sandwiches within three days if stored in the fridge. If frozen, use them within three months. This will ensure you enjoy them at their freshest. For more details, check the Full Recipe for tips on making and storing these tasty treats. Yes, you can make mini grilled cheese sandwiches ahead of time. To do this, prepare the sandwiches as directed in the Full Recipe. After cooking, let them cool completely. Place the sandwiches in an airtight container. They can stay in the fridge for up to three days. When ready to eat, simply reheat them in a skillet over low heat. This keeps the bread crispy and the cheese melty. I love using sharp cheddar and mozzarella. Sharp cheddar gives a bold flavor, while mozzarella melts beautifully. Other good options include gouda and fontina. Each cheese brings its own taste and melt quality. Mixing cheeses can add depth to your sandwiches. Experiment with different types to find your favorite combo. You can add many fun flavors! Try adding sliced tomatoes or fresh spinach. For something meaty, add crispy bacon or ham. You can also sprinkle some herbs, like basil or oregano, inside. For a kick, mix in jalapeños or hot sauce. These add-ons can make your sandwiches unique and exciting. Dipping sauces can take your mini grilled cheese to the next level. Marinara sauce is a classic choice. It adds a sweet and tangy flavor. Ranch dressing is creamy and cool, perfect for dipping. You might also enjoy honey mustard for a sweet twist. Each dip brings out the cheesy goodness in the sandwiches. You learned how to make delicious mini grilled cheese sandwiches. We covered key ingredients like whole grain bread, cheeses, and spices. You found out how to prepare the cream cheese mix, assemble the sandwiches, and cook them to golden perfection. We also discussed storage tips and fun variations, plus how to serve them well. Now, you can create tasty snacks that impress. Enjoy trying different flavors, and share with friends!

Mini Grilled Cheese Sandwiches Simple and Delicious Treat

May 4, 2025 by Emma

Are you ready to take your snack game to the next level? Mini Grilled Cheese …

Learn more

Categories Appetizer
To make crispy oven baked sweet potato fries, gather these key items: - 2 large sweet potatoes, peeled and cut into thin fries - 2 tablespoons olive oil - 1 teaspoon cornstarch - 1 teaspoon garlic powder - 1 teaspoon paprika (smoked or sweet) - 1/2 teaspoon black pepper - 1/2 teaspoon salt These ingredients create a tasty base for your fries. The sweet potatoes give a sweet and creamy flavor. Olive oil helps them crisp up nicely in the oven. Cornstarch is key for that desired crunch. You can add extra touches to your fries with these options: - Fresh herbs (like parsley or cilantro) for garnish Garnishing with fresh herbs adds color and a burst of flavor. This step is not necessary but makes the dish look even more appealing. If you don’t have something on hand, here are some swaps: - Use canola or avocado oil instead of olive oil. - Replace garlic powder with onion powder for a different taste. - If you lack paprika, try chili powder for a kick. These substitutions still keep the fries tasty and enjoyable. Don't hesitate to get creative with what you have! You can find the full recipe for crispy oven baked sweet potato fries by following the link provided. To start, gather your ingredients. You need two large sweet potatoes, olive oil, cornstarch, garlic powder, paprika, black pepper, and salt. If you want, fresh herbs can be a nice touch for garnish. Next, preheat the oven to 425°F (220°C). This is key for crispiness. Line a large baking sheet with parchment paper. This makes cleanup easy and helps the fries cook evenly. Now, peel and cut the sweet potatoes into thin fries. They should be about the same size for even cooking. Soak the cut fries in cold water for about 30 minutes. This step helps remove excess starch, making the fries crispier. After soaking, drain the fries and pat them dry with paper towels. This removes moisture, which is important for getting that crunchy texture. In a large mixing bowl, combine the dry fry pieces with olive oil, cornstarch, garlic powder, paprika, black pepper, and salt. Toss until all the fries are coated evenly. Spread the fries in a single layer on the baking sheet. Make sure not to crowd them. This allows hot air to circulate, which helps them crisp up. Bake in the preheated oven for 25-30 minutes. Flip the fries halfway through for even browning. Keep an eye on them, as some ovens cook faster than others. Once they are golden brown and crispy, take them out of the oven. Let them cool for a couple of minutes. If you like, sprinkle fresh herbs on top for a burst of color. For the best results, ensure your sweet potatoes are cut evenly. This helps them cook at the same rate. Use a large enough baking sheet to prevent overcrowding. This is crucial for achieving that desired crunch. Don’t skip soaking the fries. This step is vital for removing extra starch. If you want more flavor, feel free to add your favorite spices to the mix. For a fun twist, try serving them with a dipping sauce like spicy mayo or garlic aioli. These add extra taste and make for a more enjoyable meal. Enjoy your crispy oven baked sweet potato fries! For the full recipe, refer to the earlier sections. To get crispy oven-baked sweet potato fries, start by soaking the fries. Soak them in cold water for about 30 minutes. This step removes extra starch and helps them crisp up. After soaking, drain the fries and dry them well with paper towels. Any moisture left will make them soggy. Next, use cornstarch in the mix. It creates a light coating that helps achieve that crunch. Finally, spread the fries out on the baking sheet. Make sure they are in a single layer and not touching. This allows for better airflow and even cooking. One mistake is not soaking the fries. Skipping this step will lead to less crispy fries. Another error is overcrowding the baking sheet. If fries touch, they will steam instead of bake. Also, be careful not to over-season them. Too much spice can mask the sweet potato flavor. Lastly, forget about the flipping! Flipping the fries halfway through baking is key. It ensures that both sides get nice and golden. Serve your crispy sweet potato fries with fun dips. Spicy mayo or homemade garlic aioli works great. You can also try classic ketchup or a tangy ranch. For an extra touch, add fresh herbs like parsley or cilantro as a garnish. This not only adds flavor but also makes the dish look beautiful. Pair the fries with a fresh salad or grilled meat for a complete meal. Enjoy your gourmet creation right at home! For the full recipe, check out the Crispy Oven Baked Sweet Potato Fries recipe above. {{image_2}} You can switch up the taste of your sweet potato fries by adding different spices. Here are some fun ideas: - Cinnamon and Sugar: For a sweet twist, mix cinnamon and sugar. - Cajun Spice: Add some heat with a Cajun spice blend. - Italian Herbs: Try dried oregano and basil for a fragrant touch. - Chili Powder: If you like it spicy, sprinkle chili powder for kick. These variations keep your fries exciting and full of flavor! Sweet potato fries have a sweeter taste and a unique texture. Regular fries use white potatoes and have a starchy, neutral flavor. Here are some key points: - Nutrition: Sweet potatoes are high in vitamins A and C. They also have more fiber. - Flavor: Sweet potato fries have a rich and sweet taste. Regular fries are salty and crispy. - Cooking Time: Sweet potato fries may take a bit longer to cook than regular fries. Both types are delicious, but sweet potato fries bring a fun twist to the table. If you want vegan or gluten-free sweet potato fries, this recipe is already a winner! Here’s how: - Vegan: All ingredients are plant-based. No animal products here! - Gluten-Free: The recipe uses cornstarch, which is gluten-free. - Add Veggies: You can mix in other veggies like zucchini or carrots for added flavor. These options make the recipe friendly for everyone, so everyone can enjoy! To store leftover fries, let them cool first. Place them in an airtight container. Keep them in the fridge. They stay fresh for up to three days. If you want extra crispiness, store them in a single layer. To reheat your fries, use an oven. Preheat it to 400°F (200°C). Spread the fries on a baking sheet. Heat for about 10-15 minutes. Watch them closely to avoid burning. This method keeps them crispy. You can also use an air fryer. Set it to 375°F (190°C) for about 5-7 minutes. If you want to freeze your fries, do it right after cooking. Let them cool completely. Spread them on a baking sheet in a single layer. Freeze for about an hour. Once frozen, place them in a freezer bag. They can last for up to three months. When ready to eat, bake them straight from the freezer. Just add a few extra minutes to the cooking time for the best results. Yes, you can make sweet potato fries in an air fryer. The air fryer cooks fries quickly and gives them a nice crunch. To do this, follow the same steps as the oven method. Preheat the air fryer to 400°F (200°C). Place the seasoned fries in a single layer in the basket. Cook for about 15-20 minutes, shaking the basket halfway through. Check for crispiness and cook longer if needed. Baked sweet potato fries last for about 3-5 days in the fridge. Store them in an airtight container to keep them fresh. If you want to keep them longer, you can freeze them. Just place the cooled fries in a freezer bag and remove as much air as possible. They can last up to 3 months in the freezer. Sweet potato fries taste great with many dips. Here are some popular choices: - Spicy mayo - Garlic aioli - Ketchup - Honey mustard - Chipotle ranch - Avocado dip These dips enhance the flavor and make your fries even more enjoyable. Try different ones to find your favorite! For the full recipe, check out the Crispy Oven Baked Sweet Potato Fries! Sweet potato fries are tasty and easy to make. We explored the key ingredients needed, from required to optional ones. I shared tips on baking them perfectly, avoiding common mistakes, and achieving crispiness. We also looked at flavor variations and ways to store fries for later. Enjoy your homemade sweet potato fries with the perfect dip. You can try new flavors while keeping it fun and simple. Remember, cooking is about exploring what you love!

Crispy Oven Baked Sweet Potato Fries Recipe Guide

May 4, 2025 by Emma

Are you ready to enjoy the crunchiest oven-baked sweet potato fries? This recipe guide will …

Learn more

Categories Appetizer
- Chicken wings and measurements - 2 pounds chicken wings - Essential spices and seasonings - 2 teaspoons baking powder - 1 teaspoon salt - 1 teaspoon black pepper - 1 teaspoon garlic powder - 1 teaspoon onion powder - 1 teaspoon smoked paprika - 1/2 teaspoon cayenne pepper (adjust to taste) - 1 teaspoon dried oregano - 1 teaspoon dried thyme - Optional garnish ideas - Fresh parsley for garnish Gather these ingredients before you start. The chicken wings are the star of the show. Make sure to buy fresh or frozen wings. If using frozen, remember to thaw them first. The spices create a bold flavor that makes these wings irresistible. You can adjust the cayenne pepper for heat. If you like it spicy, add more. For a milder taste, use less. The fresh parsley adds color and a nice touch at the end. This simple list ensures you have everything you need. For the full recipe, check the instructions in the next section. Enjoy the process of making these crispy dry rub chicken wings! - Preheating the oven: First, set your oven to 425°F (220°C). This high heat helps the wings get crispy. - Line the baking sheet and prepare the rack: Grab a baking sheet and cover it with aluminum foil. Place a wire rack on top. This setup allows hot air to circulate around the wings, making them crispy. - Drying the chicken wings: Use paper towels to pat the wings dry. Removing moisture is key to crispiness. - Combining spices in a bowl: In a large bowl, mix together the baking powder, salt, pepper, garlic powder, onion powder, smoked paprika, cayenne pepper, oregano, and thyme. - Importance of mixing thoroughly: Each spice adds flavor. Mixing well ensures every wing is seasoned evenly, giving you that perfect taste in every bite. - Coating the wings in the dry rub: Add the dry chicken wings to the spice mixture. Toss until they are fully coated. You want every inch of the wings covered to maximize flavor. - Properly arranging on the rack: Place the coated wings in a single layer on the wire rack. Avoid overcrowding. This allows them to cook evenly. - Timing and flipping the wings for even cooking: Bake the wings for 40-45 minutes. Flip them halfway through to ensure both sides get that golden brown color. - Broiling for added crispiness: If you want extra crunch, broil the wings on high for 2-3 minutes. Keep a close watch to avoid burning. - Tips for serving: Let the wings cool for a few minutes after baking. Serve them with fresh parsley on top for a nice touch. Pair with your favorite dipping sauce for an extra flavor boost. Enjoy these crispy dry rub chicken wings as a perfect snack or meal. For the full recipe, check out the details above! To get the best crunch on your wings, use baking powder. It helps create a crunchy skin. When you mix it with your spices, it pulls moisture away. This step is key to that crispy texture. Make sure your wings are dry before you coat them. Pat them down with paper towels. If they're wet, they won't crisp up well. Any moisture can steam the wings instead of crisping them. Set your oven to 425°F (220°C). This high heat helps the wings cook quickly. Use a wire rack on top of your baking sheet. This allows hot air to circulate all around the wings. It helps them cook evenly and get extra crispy. Want to kick up the flavor? Try adding extra spices to your dry rub. You can use chili powder for heat or brown sugar for a hint of sweetness. Experiment and find what you love. Marinating the wings can also boost their flavor. Mix the dry rub with a little oil and let the wings sit. A few hours in the fridge works wonders. It allows the spices to soak in, making every bite tasty. For the full recipe, check out the Crispy Dry Rub Chicken Wings section. {{image_2}} For a spicy kick, you can add more cayenne pepper or use a spicy chili powder. Try mixing some hot sauce into your dry rub for extra heat. You can even toss the wings in a spicy sauce after baking for an added layer of flavor. If you prefer sweet and savory options, consider adding brown sugar to your dry rub. It caramelizes beautifully during cooking. You can also mix in some honey or maple syrup after baking to make a glaze. This adds a nice, sticky sweetness that pairs well with the savory spices. You can use an air fryer for a quick and easy method. Simply preheat the air fryer to 400°F (200°C). Arrange the wings in a single layer and cook for 25-30 minutes. Shake the basket halfway through to ensure even cooking. This method gives you crispy wings without the need for oil. Grilling is another great option. Preheat your grill to medium heat. Place the seasoned wings directly on the grill grates. Cook for about 20-25 minutes, turning often until they are crispy and cooked through. This method adds a smoky flavor that’s hard to resist. For the complete process, check out the Full Recipe. To store leftover wings, first let them cool. Place them in an airtight container. You can also use a resealable plastic bag. Make sure to squeeze out as much air as possible. This helps keep the wings fresh. In the fridge, they last about 3 to 4 days. If you want to keep them longer, consider freezing them. In the freezer, they can last up to 3 months. When it’s time to reheat, you want to keep the wings crispy. For the best results, use an oven. Preheat it to 350°F (175°C). Place the wings on a baking tray and heat for about 10-15 minutes. This method helps restore their crunch. You can also use an air fryer if you have one. Set it to 350°F (175°C) and heat for about 5-8 minutes. Avoid using the microwave, as it can make them soggy. Enjoy your delicious wings just like they were fresh out of the oven! To make chicken wings extra crispy, use baking powder in your dry rub. Baking powder helps to draw moisture away from the skin. Also, make sure the wings are very dry before coating them. This is key! Cooking them on a wire rack allows air to circulate, which helps crisp them up all around. Broiling them for a few minutes at the end will give you that perfect crunch. Yes, you can use frozen wings! Just be sure to thaw them completely before cooking. Pat them dry to remove excess moisture. This will help achieve that crispy finish. You may need to adjust the cooking time slightly, so keep an eye on them as they bake. There are many great sauces for dry rub wings. Classic choices include ranch or blue cheese dressing. If you like heat, try a spicy buffalo sauce. Honey mustard or barbecue sauce also works nicely. Feel free to experiment with your favorite flavors for a fun twist! You can prepare the wings in advance! Season them with the dry rub and keep them in the fridge for a few hours or overnight. Just remember to bring them to room temperature before baking. This will help them cook evenly and stay crispy. For the full recipe, check the earlier section. You now have all the steps to make delicious chicken wings. We covered ingredients, from spices to garnishes. You learned how to prepare, coat, and bake your wings for perfect flavor. Crispiness tips and cooking variations will elevate your dish. With leftovers, storage and reheating tips ensure you enjoy them later. Whether you crave spicy or sweet, these wings are sure to please. I hope you feel excited to try this recipe at home!

Crispy Dry Rub Chicken Wings Flavorful and Easy Recipe

May 3, 2025 by Emma

Get ready for the ultimate game-day snack: crispy dry rub chicken wings! In this post, …

Learn more

Categories Appetizer
To make creamy potato puffs, you will need: - 2 large russet potatoes, peeled and cubed - 1 cup grated cheddar cheese - ½ cup cream cheese, softened - ¼ cup sour cream - 2 cloves garlic, minced - 1 teaspoon onion powder - 1 teaspoon paprika - Salt and pepper to taste - 1 cup breadcrumbs (for coating) - 2 eggs, beaten (for egg wash) - Vegetable oil (for frying) When measuring ingredients, accuracy is key. Use a dry measuring cup for solids like cheese and potatoes. For liquids, a liquid measuring cup works best. For spices, a teaspoon or tablespoon measure helps keep the flavors balanced. Quality matters in cooking. Fresh potatoes lead to better texture and taste. Aged cheddar cheese adds depth to the flavor. Cream cheese should be softened for easy mixing. Always use fresh garlic for a punch of flavor. Good quality spices can elevate your dish. The right ingredients make a big difference in your creamy potato puffs. For more details, refer to the Full Recipe. First, boil the cubed russet potatoes in salted water. This takes about 15 to 20 minutes. You want them soft enough to mash easily. Once they are tender, drain the water. Set the potatoes aside to cool for a few minutes. Now, grab a mixing bowl. Mash the cooked potatoes until smooth. The smoother, the better! Next, add your grated cheddar cheese, cream cheese, and sour cream. Toss in the minced garlic, onion powder, paprika, salt, and pepper. Mix everything together well. This blend creates a rich and creamy filling. Let the mixture cool slightly. Then, form small balls, about 1 to 1.5 inches wide. Prepare your coating station. Place the beaten eggs in one bowl and the breadcrumbs in another. Dip each potato puff into the egg wash, making sure it gets a nice coating. Then, roll it in the breadcrumbs until fully covered. Heat vegetable oil in a large skillet over medium heat. To test if it’s hot, drop in a small piece of bread; if it sizzles, you’re good to go! Fry the potato puffs in batches for about 3 to 4 minutes. Look for a golden brown color on all sides. Don’t overcrowd the pan; this helps them fry evenly. Once done, remove them and place on paper towels to drain excess oil. Enjoy these creamy potato puffs as a tasty snack! For the complete recipe, check out the Full Recipe section. To get creamy potato puffs, you need the right mix. Start with fluffy russet potatoes. They mash well and get light. After boiling them, let them cool. This helps keep the texture smooth. Add your cheeses and spices right after mashing. Mix gently; you want to keep the air in. Avoid over-mashing your potatoes. If you mash too much, they can get gummy. Also, don’t skip the cooling step. If the mixture is too hot, it will be hard to form puffs. Make sure your oil is hot enough before frying. If it’s not, your puffs will absorb too much oil. Fry in small batches. This lets each puff cook evenly and get crispy. Keep the heat steady. Medium heat works best; too high can burn the outside while the inside stays cold. Use a slotted spoon to remove the puffs. This helps drain the oil quickly. For a nice finish, let them rest on paper towels after frying. This keeps them crispy! {{image_2}} You can swap out russet potatoes for sweet potatoes. They add a nice sweetness. If you want to go dairy-free, use cashew cream instead of cream cheese or sour cream. You can also try using nutritional yeast for a cheesy flavor without dairy. For a healthier twist, you can replace breadcrumbs with crushed cornflakes or oats. Feel free to get creative with flavors. Add cooked bacon bits for a smoky taste. Fresh herbs like chives or parsley add brightness. If you enjoy spice, try adding jalapeños or cayenne pepper. You can also mix in cooked spinach or broccoli for extra nutrients. Each of these can change the taste and make your puffs unique. You can bake your creamy potato puffs if you want a lighter option. Preheat your oven to 400°F (200°C). Place your puffs on a baking sheet lined with parchment paper. Brush them with olive oil for a golden finish. Bake for about 20-25 minutes or until crispy. Frying gives a crunchier texture, while baking is easier and healthier. Both methods yield tasty results! After enjoying your creamy potato puffs, let them cool down. Place the leftover puffs in an airtight container. You can keep them in the fridge for up to three days. Make sure to separate layers with paper towels to absorb moisture. This keeps them crispy for your next snack. To reheat your creamy potato puffs, use an oven for the best results. Preheat the oven to 350°F (175°C). Place the puffs on a baking sheet. Bake them for about 10-15 minutes until they feel hot and crispy again. Avoid using a microwave, as it can make them soggy. You can freeze the un-fried potato puffs for later. Arrange them in a single layer on a baking sheet and freeze until firm. Then, transfer them to a freezer-safe bag. They can last up to two months. When you want to cook them, thaw in the fridge overnight. Then fry them as usual for a fresh taste. Yes, you can make Creamy Potato Puffs ahead of time. To do this, prepare the mixture and form the puffs. Then, place them on a tray and freeze them for later. Once frozen, you can store them in a bag. When you're ready to fry, just heat the oil and cook them straight from the freezer. This method keeps them fresh and tasty. Creamy Potato Puffs taste great with various dips. Here are some tasty options: - Ranch dressing - Spicy sriracha mayo - Garlic aioli - Sweet chili sauce - Ketchup These sauces add extra flavor and make your snack even better! To make Creamy Potato Puffs gluten-free, use gluten-free breadcrumbs. You can easily find these at most stores. Additionally, check that the other ingredients, like the cheese and sour cream, are also gluten-free. This way, everyone can enjoy them without worry. In this blog post, we explored how to make creamy potato puffs. We covered key ingredients, their measurements, and the need for quality. You learned the steps to prepare, mix, and fry. Tips helped you avoid common mistakes and achieve the right texture. Remember, you can add your own twist with substitutions and flavor mix-ins. Store your leftovers well for later enjoyment. Keep these insights in mind to create delicious potato puffs that everyone will love.

Creamy Potato Puffs Crispy and Simple Snack Idea

May 3, 2025 by Emma

Looking for a quick snack that’s crispy, creamy, and sure to please everyone? You’re in …

Learn more

Categories Appetizer
- 1 pound ground beef (or turkey) - 1 cup crushed tortilla chips - 1 cup shredded cheddar cheese - 1/2 cup ranch dressing - 1/2 cup black beans, rinsed and drained - 1/2 cup corn (frozen or canned) - 1/4 cup diced bell peppers (red and green) - 1/4 cup green onions, chopped - Fresh cilantro, for garnish (optional) To make Taco Ranch Bites, you need simple and tasty ingredients. The ground beef or turkey serves as the base. It gives each bite a savory, meaty flavor. The crushed tortilla chips add crunch and texture. They also help hold everything together. You'll want some shredded cheddar cheese. This melts beautifully and adds creaminess. Ranch dressing is key for a zesty kick. Black beans add protein and fiber. Corn brings a touch of sweetness, while diced bell peppers add color and freshness. For garnishes, chopped green onions give a bit of zing. Fresh cilantro can brighten the dish. Use these to make your bites look more appealing. This combination creates a fun and flavorful snack. You can follow the Full Recipe for exact amounts and cooking steps. Enjoy making these easy bites! 1. Preheat the Oven: Start by preheating your oven to 375°F (190°C). This step ensures even cooking. 2. Cook the Ground Meat: In a skillet, heat one tablespoon of olive oil over medium heat. Add one pound of ground beef or turkey. Season with salt and pepper. Cook until the meat turns brown, about 5 to 7 minutes. Drain any extra fat. 1. Add Taco Seasoning: Sprinkle in one packet of taco seasoning. Stir well and follow the packet's instructions, usually adding a little water. Let it simmer until it thickens. 2. Mix in the Remaining Ingredients: In a large bowl, combine the cooked meat with one cup of crushed tortilla chips, one cup of shredded cheddar cheese, half a cup of black beans (rinsed and drained), half a cup of corn (frozen or canned), and half a cup of ranch dressing. Mix everything until well blended. 1. Forming the Bites: Use a cookie scoop or your hands to shape the mixture into small balls or patties. Place them on a baking sheet lined with parchment paper. 2. Baking Process: Bake in your preheated oven for 15 to 20 minutes. Keep an eye on them until they are golden brown and the cheese has melted. Look for that perfect golden color, as it adds to both taste and appearance. Follow these steps, and you'll create tasty Taco Ranch Bites that everyone will love! For the complete recipe, check the Full Recipe section. Check your Taco Ranch Bites for doneness. You want them golden brown. Overcooking can make them dry. I recommend using ground beef for a rich flavor. Ground turkey works well, too. It gives a lighter taste but still packs a punch. These bites shine when served with dips. Try ranch dressing or guacamole. Both add a creamy touch. For presentation, use a bright platter. Place the bites on it and drizzle with extra ranch. You can also add salsa or guacamole on the side for more flair. Store any leftovers in an airtight container. Keep them in the fridge for up to three days. When reheating, use the oven for best results. Bake them at 350°F for about 10 minutes. This keeps them crispy and warm. {{image_2}} You can make Taco Ranch Bites even more fun by swapping some ingredients. If you want a vegetarian option, try using black beans and mushrooms instead of meat. This change keeps the bites hearty and tasty. For a gluten-free version, use corn chips or rice chips instead of regular tortilla chips. Both options keep the amazing flavor while meeting dietary needs. Want to spice things up? Add your favorite spices or a splash of hot sauce to the meat mixture. This tweak gives the bites a nice kick. You can also switch up the cheese. Try pepper jack for heat or a blend of cheeses for a new flavor. Experimenting with these tweaks keeps the dish exciting and fresh. You can serve Taco Ranch Bites in different ways. They make great appetizers at parties or can be a filling main dish. For a fun platter, arrange the bites with small bowls of ranch dressing, guacamole, and salsa. This setup invites guests to dip and enjoy. Get creative with your serving styles to make the meal more enjoyable. Taco Ranch Bites are fun, bite-sized snacks. They mix tasty ground beef or turkey with classic taco flavors. You combine meat with spices, cheese, and crunchy tortilla chips. Add ranch dressing for a creamy kick. Other ingredients like black beans and corn boost flavor and nutrition. These bites are baked until golden and gooey. They are perfect for parties or game day. You can easily change Taco Ranch Bites to fit your taste. Want a veggie version? Swap ground meat for black beans or mushrooms. Try different cheeses like pepper jack for a spicy twist. Add jalapeños for heat or swap ranch dressing for guacamole. You can even mix in your favorite veggies, like diced zucchini or corn. The options are endless! Yes, you can prepare Taco Ranch Bites in advance. To do this, form the bites and place them on a baking sheet. Cover them and store in the fridge for up to 24 hours. When ready to cook, just bake them as directed. If you want to freeze them, place them in a single layer on a tray. Once frozen, transfer to a freezer bag. They can last up to three months. Reheat them in the oven for the best results. Enjoy warm and fresh! Taco Ranch Bites are a fun and tasty snack. They are easy to make and full of flavor. You can serve them at parties or enjoy them for a quick meal. Here’s a quick look at what you need and how long it takes to make them. Ingredients List at a Glance - 1 pound ground beef (or turkey) - 1 packet taco seasoning - 1 cup crushed tortilla chips - 1 cup shredded cheddar cheese - 1/2 cup ranch dressing - 1/2 cup black beans, rinsed and drained - 1/2 cup corn (frozen or canned) - 1/4 cup diced bell peppers (red and green) - 1/4 cup green onions, chopped - 1 tablespoon olive oil - Salt and pepper to taste - Fresh cilantro, for garnish (optional) Quick Reference for Cooking Times and Servings - Prep Time: 15 minutes - Total Time: 35 minutes - Servings: 4-6 This recipe is perfect for a quick bite. You can find the full recipe above to make these tasty snacks. Enjoy making and sharing them! Taco Ranch Bites bring flavor and fun to your table. With simple steps, you can make these treats quickly. Remember to mix ground beef, cheese, and veggies for the best taste. You can even switch ingredients to suit your needs. Whether as a snack or meal, Taco Ranch Bites are sure to please everyone. Enjoy experimenting with different flavors and serving styles. With this recipe, you will impress your friends and family at any gathering. Happy cooking!

Taco Ranch Bites Flavorful and Easy Snack Idea

May 3, 2025 by Emma

Looking for a fun and tasty snack? Taco Ranch Bites are your answer! These bites …

Learn more

Categories Appetizer
To make crab cake egg rolls, gather these key ingredients: - 1 pound lump crab meat, picked over for shells - 1/2 cup crushed saltine crackers - 1/4 cup mayonnaise - 1 tablespoon Dijon mustard - 1 tablespoon Worcestershire sauce - 1 teaspoon Old Bay seasoning - 1/2 teaspoon garlic powder - 1/4 teaspoon black pepper - 1/4 cup green onions, finely chopped - 2 tablespoons fresh parsley, chopped - 1 package egg roll wrappers (about 20) - Vegetable oil for frying These ingredients come together to create a tasty filling that is both rich and savory. The crab meat gives a sweet taste that pairs perfectly with the spices and crunch of the egg roll wrapper. You can add extra flavor to your crab cake egg rolls with these optional ingredients: - 1/2 cup shredded cheese (like cheddar or pepper jack) - 1/4 cup diced red bell pepper - 1/4 cup corn for sweetness - A splash of hot sauce for a kick Experiment with these add-ins to make the rolls even more exciting. They can add a unique twist to the classic crab cake flavor. To enjoy your crab cake egg rolls, consider these dipping sauces: - Sweet chili sauce for a hint of sweetness - Tangy remoulade for a zesty bite - Soy sauce for a savory touch - Spicy mayo for those who love heat These sauces complement the egg rolls well and enhance their taste. You can mix and match to find your favorite pairing. For the full recipe, check the section above. Start by gathering your ingredients for the crab mixture. In a large bowl, add the lump crab meat, crushed saltines, mayonnaise, and Dijon mustard. Next, pour in the Worcestershire sauce and sprinkle the Old Bay seasoning. Add the garlic powder, black pepper, green onions, and fresh parsley. Mix all the ingredients gently. You want to combine them well, but be careful not to break the crab meat too much. The lumps give the egg rolls a nice texture. Now it’s time to wrap your egg rolls. Lay an egg roll wrapper on a clean surface. Point one corner towards you. Scoop about 2-3 tablespoons of the crab mixture into the center. Fold the bottom corner over the filling first. Then, fold the sides in toward the center. Roll the egg roll away from you until it is sealed tight. If the edges do not stick, use a little water to moisten them. Repeat this for the rest of the wrappers and filling. For the frying process, heat about 2 inches of vegetable oil in a deep skillet or fryer. Use medium-high heat until the oil reaches 350°F (175°C). Fry the egg rolls in batches to avoid crowding the pan. Cook them for about 3-4 minutes on each side. Look for a golden brown color to know they are done. Use a slotted spoon to remove them and place on paper towels to drain excess oil. Serve your crab cake egg rolls warm, and enjoy the crispy, flavorful delight! For the full recipe, check out the detailed instructions. To get crispy egg rolls, oil temperature is key. Heat your oil to 350°F (175°C). This hot oil will fry the wrappers quickly, giving them that golden crunch. Fry in small batches. This prevents the temperature from dropping. If the oil cools too much, the egg rolls will soak up oil and become greasy. When mixing your crab meat, be gentle. You want to combine the ingredients without breaking the lumps. Over-mixing will ruin the texture. Use your hands to fold the crab into the other ingredients. Keep those big chunks intact for a nice bite in every roll. Serving matters! Arrange your egg rolls on a platter with fresh parsley. This adds color and makes it look fancy. Pair with dipping sauces like sweet chili or tangy remoulade. These sauces will enhance the flavors of the crab. You can even offer a mix of sauces for fun. Each bite can be a new taste! {{image_2}} To make crab cake egg rolls healthier, you can try a few simple swaps. Use whole wheat wrappers instead of regular egg roll wrappers. This change adds fiber and nutrients. You can also bake the egg rolls instead of frying them. Baking gives you that crispy texture without excess oil. Brush them lightly with olive oil before baking to help them brown nicely. If you want to mix things up, feel free to use other seafood! Shrimp or lobster can replace the crab meat. Both options add a sweet, rich flavor. You can also try canned tuna or salmon. Just make sure to drain any excess liquid to avoid soggy filling. Add spices like lemon zest or fresh herbs to enhance the taste further. For a vegetarian twist, skip the seafood altogether. You can fill the egg rolls with sautéed vegetables. A mix of bell peppers, carrots, and cabbage works great. Add cream cheese or ricotta for creaminess in the filling. You can even include black beans for extra protein. These options make delicious egg rolls that everyone will love. Explore these variations to find your favorite version of crab cake egg rolls! Each twist makes for a unique and tasty treat. For the full recipe, check out the details above. To keep leftover egg rolls fresh, let them cool first. Place them in an airtight container. Use parchment paper to separate layers. This helps prevent sogginess. Store them in the fridge for up to three days. Enjoy the best taste within the first day. If you want to save egg rolls for later, freezing is a great option. First, let them cool completely after frying. Place them on a baking sheet in a single layer. Freeze for a couple of hours. Once frozen, transfer them to a freezer bag. Remove as much air as possible from the bag. They can stay frozen for about three months. To reheat frozen egg rolls, first, preheat your oven to 375°F (190°C). Place the egg rolls on a baking sheet. Bake for about 15-20 minutes until hot and crispy. You can also use an air fryer for 10 minutes at the same temperature. Avoid using a microwave, as it can make them soggy. You want that crispy texture back! You can use canned tuna or shredded chicken instead. Both options work well. Mix the meat with saltines and spices like Old Bay. The flavors will still shine through. Yes, you can bake them! Preheat your oven to 400°F (200°C). Arrange the egg rolls on a baking sheet. Brush them with oil for a crispy texture. Bake for 20-25 minutes until golden. Check local seafood restaurants or Asian fusion spots. Many serve crab cake egg rolls as an appetizer. Use apps like Yelp to find highly rated places. Here are a few mistakes to avoid: - Overmixing the crab meat can make it mushy. - Not sealing the wrappers properly leads to leaks. - Cooking at too low a heat can result in soggy rolls. For a complete guide, refer to the Full Recipe. It includes all the ingredients and steps you need to create this tasty dish. In this blog post, we covered everything you need to make delicious crab cake egg rolls. We explored the main ingredients and optional add-ins to boost flavor. You learned the steps for preparing, wrapping, and frying egg rolls to perfection. Plus, I shared tips to keep them crispy and ideas for healthy variations. Finally, we discussed storage methods and answered common questions. Now, you're ready to impress your friends and family with homemade egg rolls! Enjoy the process and the tasty results.

Crab Cake Egg Rolls Crispy and Flavorful Delight

May 3, 2025 by Emma

Crab Cake Egg Rolls are a crispy and flavorful delight you won’t want to miss. …

Learn more

Categories Appetizer
To make crispy dry rub chicken wings, you will need these main ingredients: - 2 pounds chicken wings - 2 tablespoons olive oil - 1 tablespoon paprika - 1 teaspoon garlic powder - 1 teaspoon onion powder - 1 teaspoon chili powder - 1 teaspoon ground cumin - 1 teaspoon dried oregano - 1 teaspoon salt - ½ teaspoon black pepper - ½ teaspoon cayenne pepper (optional for extra heat) These ingredients create a flavorful rub that coats the wings perfectly. The paprika adds a lovely color and sweetness. Garlic and onion powders give a savory kick. Cumin and oregano add depth, while cayenne pepper brings heat for those who like a little spice. You can enhance the flavor of your wings with these optional ingredients: - Lemon zest for freshness - Fresh herbs like parsley or cilantro for garnish - Honey for a sweet glaze Adding lemon zest brightens the taste. Fresh herbs make your dish look and taste great. A drizzle of honey at the end provides a sweet touch that balances the spices. Choosing the right olive oil can make a difference. Look for: - Extra virgin olive oil for the best flavor - Light olive oil if you prefer a milder taste Extra virgin olive oil is the best choice. It has rich flavors that enhance your wings. Light olive oil works well if you want a more subtle olive taste. You can find the full recipe for these crispy dry rub chicken wings within the article. First, preheat your oven to 400°F (200°C). This high heat helps the wings get crispy. Take a baking sheet and line it with aluminum foil. This makes cleanup easy. Place a wire rack on top of the baking sheet. The rack lets air circulate around the wings, making them crispier. Grab 2 pounds of chicken wings. Pat them dry with paper towels. This step removes moisture and helps the skin crisp. You want the wings as dry as possible. After that, drizzle 2 tablespoons of olive oil over the wings. Toss them to coat evenly. This oil helps the dry rub stick and adds flavor. In a small bowl, mix your dry rub. Combine 1 tablespoon of paprika, 1 teaspoon of garlic powder, 1 teaspoon of onion powder, 1 teaspoon of chili powder, 1 teaspoon of ground cumin, 1 teaspoon of dried oregano, 1 teaspoon of salt, ½ teaspoon of black pepper, and ½ teaspoon of cayenne pepper if you like heat. Stir the spices together well. Now, sprinkle the dry rub over the wings. Make sure to coat them evenly. Use your hands or tongs to rub the spice mix into the wings. This ensures every bite has flavor. Once done, it's time to bake them. Follow the full recipe for baking times and serving suggestions. To get wings that crunch, start by drying them well. Use paper towels to remove all moisture. This makes a big difference. Then, coat them with olive oil lightly. The oil helps the skin crisp up in the oven. Using a wire rack is key. It allows air to circulate all around the wings. This means even cooking and crispiness on all sides. Don’t crowd the wings on the rack. Give them space to breathe for the best results. If you want to fry your wings, heat oil to 350°F (175°C). Fry the wings in batches for about 8-10 minutes. This gives you a great crunch. Just watch them closely so they don’t burn. An air fryer is another great option. Preheat it to 375°F (190°C). Cook the wings for 25-30 minutes, shaking the basket halfway. Your wings will turn out crispy and golden, just like in the oven. You can also use the air fryer for less oil and quicker cooking. Dipping sauces can make these wings even better. Ranch dressing is a classic choice. It cools the heat and adds a creamy touch. Blue cheese is another favorite, adding a bold flavor. You can also try a honey mustard sauce for sweetness. BBQ sauce gives a smoky flavor that pairs well too. Experiment with different sauces to find your favorite. These choices will make your crispy dry rub chicken wings shine at any gathering! For the full recipe, check out the Crispy Dry Rub Chicken Wings section. {{image_2}} If you love heat, add more cayenne pepper. Start with 1 teaspoon. You can also use hot paprika for a smoky kick. For even more spice, try adding a few dashes of hot sauce to the oil before mixing it with the wings. This adds a nice tang and heat that makes each bite exciting. Most dry rub ingredients are gluten-free. Just check the labels to be sure. You can also make your own blend. Use spices like paprika, garlic powder, and cumin. Avoid any added fillers. This way, you keep your wings tasty and safe for those with gluten sensitivities. You can mix it up with herbs and spices. Try adding thyme or rosemary for a fresh taste. You can also use lemon zest for a bright flavor. Another option is to add brown sugar for a touch of sweetness. It balances the heat and gives a nice caramelization when baked. Get creative and find your perfect blend! After enjoying your crispy dry rub chicken wings, you might have some leftovers. To store them, let the wings cool down first. Place them in an airtight container. Make sure to cover them well. This keeps them fresh for up to three days in the fridge. If you want to keep them longer, freezing is a good option. When you're ready to eat the leftover wings, you want them crispy again. The best method is to use the oven. Preheat your oven to 375°F (190°C). Spread the wings on a baking sheet. Bake for about 10-15 minutes. This way, they will get warm and crispy without drying out. You can also use an air fryer for about 5-7 minutes for crispy results. If you want to freeze the wings, it's best to do this right after cooking. Place the wings in a single layer on a baking sheet. Freeze them for about an hour. Once frozen, transfer them to a freezer bag. When you're ready to eat, thaw them in the fridge overnight. Then, reheat them as mentioned earlier. This keeps the taste and texture intact, ensuring a delicious snack later on. For the full recipe, check out the original instructions. Yes, you can make these wings in an air fryer. Set your air fryer to 400°F (200°C). Arrange the wings in a single layer in the basket. Cook them for about 25-30 minutes. Shake the basket halfway through to ensure even cooking. The wings will turn out crispy and delicious! If you run out of spices, don't worry! Here are some easy swaps: - Use cayenne pepper for chili powder if you like heat. - Try smoked paprika instead of regular paprika for a deeper flavor. - If you lack garlic powder, fresh minced garlic works too. - You can replace ground cumin with curry powder for a unique taste. These swaps will still give you tasty wings! To check if your wings are done, look for a few signs: - The skin should be golden brown and crispy. - The meat should pull away from the bone easily. - Use a meat thermometer to check the internal temperature; it should reach 165°F (74°C). If you see all these signs, your wings are ready to eat! You can find the full recipe for crispy dry rub chicken wings above. Crispy dry rub chicken wings are simple and fun to make. We covered key ingredients, preparation steps, and tips for the best texture. Remember to choose your olive oil wisely and adjust flavors with unique spices. Whether you try frying or air frying, enjoy experimenting with new dips. Store leftovers properly so they stay tasty. In the end, making these wings gives you a tasty meal that everyone will love. Enjoy your cooking journey!

Crispy Dry Rub Chicken Wings Simple and Delicious Snack

May 3, 2025 by Emma

Craving a tasty snack that’s simple to make? You’ve come to the right place! Crispy …

Learn more

Categories Appetizer
- 2 large potatoes, peeled and cubed - 1/2 cup cream cheese, softened - 1 cup shredded cheddar cheese - 1/4 cup grated Parmesan cheese - 1/4 teaspoon garlic powder - 1/4 teaspoon onion powder - Salt and pepper to taste - 1 cup breadcrumbs - 1/4 cup fresh parsley, chopped (for garnish) - Oil for frying When making creamy potato puffs, you need the right ingredients. Start with two large potatoes. Peel and cube them for cooking. Cream cheese adds a rich, smooth texture. I love using sharp cheddar cheese for a strong flavor. Parmesan cheese brings a nice salty touch. Garlic and onion powders give depth to the taste. Don’t forget salt and pepper; they enhance all the flavors. For coating, breadcrumbs create a crispy outer layer. Fresh parsley makes a lovely garnish. You can switch out the cheeses if you want. Try mozzarella for a milder taste. Use vegan cream cheese for a plant-based option. If you need gluten-free puffs, choose gluten-free breadcrumbs. You can even add veggies to the mix, like spinach or broccoli. This way, you can keep the dish fresh and fun. There are many ways to enjoy creamy potato puffs! - Boiling Instructions: Start by filling a large pot with salted water. Bring it to a boil. Add the cubed potatoes. Cook them for about 15 to 20 minutes, or until they are tender. You can check by poking them with a fork. Once done, drain the water. - Cooling and Mashing Techniques: Let the potatoes cool slightly in the pot. Then, transfer them to a large bowl. Use a potato masher to mash them until smooth. Make sure to let the potatoes cool completely before moving to the next step. - Combining Cheese Mixtures and Seasonings: After the potatoes cool, add in the cream cheese, shredded cheddar cheese, and grated Parmesan cheese. Use a spatula or spoon to mix everything together until it is well combined. Add the garlic powder, onion powder, salt, and pepper. Taste the mixture and adjust the seasoning if needed. - Shaping the Potato Mixture into Puffs: Take a small amount of the potato mixture in your hands. Shape it into small balls or puffs. Aim for bite-sized pieces. Continue this process until you have used all the mixture. - Frying Tips for Perfect Texture: Roll each puff in breadcrumbs to coat them fully. In a deep skillet, heat about 1 to 2 inches of oil over medium heat. When the oil is hot, carefully add the potato puffs in batches. Fry them for about 3 to 4 minutes or until they turn golden brown. Use a slotted spoon to transfer them to a paper towel-lined plate to drain excess oil. Enjoy the crispy puffs! For the complete cooking instructions, check the Full Recipe. To fry the best potato puffs, heat the oil to 350°F (175°C). This temperature helps them cook evenly. Fry in small batches to avoid overcrowding. Each batch should take about 3-4 minutes until golden brown. If the oil is too cool, the puffs can absorb too much oil and become soggy. If it’s too hot, they may burn before cooking through. For a crispy texture, make sure to coat each puff well in breadcrumbs. This layer forms a barrier that keeps moisture in. Let your puffs rest for a minute before frying for a firmer bite. Pair your creamy potato puffs with tasty dips. Sour cream, ranch, or spicy ketchup work well. You can also serve them with a fresh herb sauce for a twist. For gatherings, arrange them on a platter with colorful garnishes like parsley. This makes them look inviting and festive. One common mistake is overcooking the potatoes. This can lead to a heavy mixture. Under-seasoning is another issue. Always taste your mixture before frying. If it lacks flavor, adjust the seasoning. Also, be mindful of consistency. If your mixture feels too wet, add more breadcrumbs. If too dry, a splash of cream can help. Fixing these issues early will lead to better results. Enjoy making your creamy potato puffs following these tips. For the full recipe, check out the details provided above. {{image_2}} You can make your creamy potato puffs more exciting by adding herbs and spices. Fresh herbs like chives or dill bring a bright taste. You can also use dried herbs like oregano or basil for a different twist. Spices like paprika or cayenne pepper add a kick. For added nutrition, think about mixing in vegetables. Finely chopped spinach or grated carrots enhance flavor and health. You can sneak in some peas or corn for sweetness and color. This way, your potato puffs are not just tasty but also packed with nutrients. If you want a healthier option, try baking your potato puffs. Preheat your oven to 400°F (200°C). Place the puffs on a baking sheet lined with parchment paper. Bake for 20-25 minutes until golden and crispy. You can also use an air fryer. This method gives you a crunchy texture with less oil. Set your air fryer to 375°F (190°C) and cook the puffs for about 12-15 minutes. Shake the basket halfway through for even cooking. Both methods create delicious puffs without frying. Take your creamy potato puffs on a global journey by adding international flavors. Swap out cheddar for feta cheese for a Mediterranean flair. You can also try using mozzarella for an Italian twist. Add spices like curry powder for an Indian taste or cumin for a Mexican vibe. These small changes make your dish unique and fun. By exploring different ingredients, you can create a variety of tasty puffs that are sure to impress. For the full recipe, check out the details above. To keep your creamy potato puffs fresh, store them properly. First, let the puffs cool to room temperature. Place them in an airtight container. You can keep them in the fridge for up to three days. If you want to keep them longer, freezing is a great option. Just layer them between parchment paper in a freezer-safe bag. This prevents them from sticking together. When you are ready to eat the leftovers, reheating correctly is key. For the best results, use an oven. Preheat it to 375°F (190°C). Place the potato puffs on a baking sheet. Bake for about 10-15 minutes. This will help them regain their crispy texture. You can also use an air fryer. Set it to 350°F (175°C) and cook for 5-7 minutes. This keeps them from getting soggy. In the fridge, potato puffs last about three days. If you freeze them, they can last up to three months. Just remember to check for freezer burn. If they start to look icy, they might not taste as good. For the best flavor, enjoy them sooner rather than later. Yes, you can prepare Creamy Potato Puffs ahead of time. Here are some tips for pre-preparation and storage: - Make the potato mixture and shape it into puffs. - Place the puffs on a baking sheet lined with parchment paper. - Freeze them until firm, then transfer to a freezer bag. - Store in the freezer for up to three months. - When ready to cook, fry them straight from the freezer. No need to thaw! If you want a different flavor, you can try these substitutes: - Ricotta cheese offers a lighter taste. - Sour cream provides a tangy twist. - Greek yogurt adds creaminess and protein. Each option will change the flavor a bit, but they all work well. Crispy potato puffs are a must! Here are key techniques to achieve perfect crunchiness: - Use enough oil for frying, about 1-2 inches deep. - Heat the oil to 350°F (175°C) before adding puffs. - Fry in small batches to avoid cooling the oil. - Avoid overcrowding the pan to keep puffs crispy. - Drain on paper towels to remove excess oil. For the full recipe, check out the section above! Creamy Potato Puffs with Cheese are a tasty treat. In this blog post, we covered the key ingredients, easy steps, and cooking tips. You learned how to mix potatoes and cheese for puffs that are crispy outside and soft inside. Remember, you can adapt the recipe for your needs and add cool flavors. Store your leftovers properly for later enjoyment. Now, get ready to impress your friends and family with your delicious potato puffs! Cook, share, and enjoy!

Creamy Potato Puffs with Cheese Tasty and Simple Delight

May 3, 2025 by Emma

Are you ready to elevate your snack game? Creamy Potato Puffs with Cheese are the …

Learn more

Categories Appetizer
For savory cheese scones, you need a simple yet flavorful mix of ingredients. Here’s what you’ll need: - 2 cups all-purpose flour - 1 tablespoon baking powder - ½ teaspoon salt - ½ teaspoon black pepper - ¼ teaspoon cayenne pepper (optional for a kick) - ½ cup unsalted butter, chilled and cubed - 1 cup shredded sharp cheddar cheese - 1 tablespoon fresh parsley, chopped (or 1 teaspoon dried) - ¾ cup milk - 1 large egg, beaten (for egg wash) These ingredients come together to create a cheesy delight. The combination of sharp cheddar and fresh parsley adds a rich flavor. The cayenne pepper brings a subtle heat, but feel free to skip it if you prefer milder scones. Using chilled butter is key for a flaky texture. Make sure to keep it cold until you mix it in. The milk and egg will help bind everything while adding moisture. You can find the Full Recipe to guide you through the steps to make these scones perfectly. Once you gather these ingredients, you’re ready to start baking. Trust me, your kitchen will smell amazing! 1. Preheat your oven to 400°F (200°C) and prepare a baking sheet. Line it with parchment paper. 2. In a large bowl, whisk together the dry ingredients. This includes 2 cups of all-purpose flour, 1 tablespoon of baking powder, ½ teaspoon of salt, ½ teaspoon of black pepper, and ¼ teaspoon of cayenne pepper if you like it spicy. 3. Add the cold, cubed butter to the flour mixture. Use your fingers or a pastry cutter to mix it until it looks like coarse crumbs. 4. Now, add the shredded cheddar cheese and chopped parsley to the mixture. Mix them in well so every bite has flavor. 5. Make a well in the center and pour in ¾ cup of milk. Stir gently with a spoon until it’s just combined. Be careful not to overwork the dough. 6. Turn the dough onto a floured surface and gently knead it a few times. Shape it into a circle about 1-inch thick. 7. Use a sharp knife to cut the dough into wedges, or use a round cutter for circles. Place them on the prepared baking sheet, leaving some space between each scone. 8. Brush the tops with the beaten egg for a nice golden color when they bake. 9. Bake in the preheated oven for 15 to 20 minutes. They should be risen and golden brown. 10. Remove them from the oven and let them cool slightly on a wire rack before serving. For the full recipe, check the ingredients and instructions above. Enjoy your savory cheese scones warm for the best taste! To get that perfect flaky texture, you need to start with cold butter. Cold butter helps create those lovely layers in the scone. When you mix in the butter, be sure to use your fingers or a pastry cutter. You want the mixture to look like coarse crumbs, not a paste. Avoiding overmixing is key. Mix the dough just until it comes together. If you mix too much, your scones will be dense, not fluffy. Savory cheese scones taste best warm. You can serve them with herbed butter or a sprinkle of sea salt. For a fun twist, pair them with spreads like hummus or a tangy cheese dip. They also go well with soups or salads. Don’t be afraid to experiment with different cheeses. Try gouda, feta, or even blue cheese for a unique flavor. You can also add fresh herbs like chives or thyme. A pinch of garlic powder or crushed red pepper can give your scones an extra kick. {{image_2}} For savory cheese scones, cheese is key. I love using sharp cheddar for its rich flavor. It melts perfectly and gives a nice tang. You can also try: - Gouda for a buttery taste - Parmesan for a nutty kick - Feta for a unique twist If you need dairy-free options, use nut-based cheeses. They melt well and add depth. Look for products made from cashews or almonds. Customize your scones with fun mix-ins. Try adding: - Cooked bacon bits for a meaty touch - Chopped sun-dried tomatoes for brightness - Fresh herbs like chives or thyme for added flavor You can even go sweet by mixing in dried fruits like cranberries. This will give your scones a unique flavor profile. Want to make gluten-free scones? Substitute all-purpose flour with a gluten-free blend. Look for one that has xanthan gum included. This helps keep the texture light. When using gluten-free flour, mix in more liquid. This helps the dough hold together. If it feels too dry, add a little more milk. Aim for a moist dough that still holds its shape. To keep your savory cheese scones fresh, store them in an airtight container. This helps maintain their soft texture and flavor. If you plan to eat them within a few days, keep them at room temperature. If you need more time, refrigerate them. Just remember, the fridge can change the texture slightly, making them a bit denser. You can easily freeze savory cheese scones for later. First, let them cool completely after baking. Then, wrap each scone tightly in plastic wrap. Place them in a freezer bag and remove as much air as possible. They will keep well for up to three months. When you're ready to enjoy them, remove the scones from the freezer. Reheat in the oven at 350°F (175°C) for about 10 to 15 minutes. This will help restore their original taste and texture. Savory cheese scones can be stored for about three days at room temperature. In the fridge, they last about a week. Always check for signs of spoilage before eating. If the scones feel dry or crumbly, or if you see mold, it's best to toss them out. How to make savory cheese scones from scratch? To make savory cheese scones, start with basic ingredients. In a bowl, mix flour, baking powder, salt, and spices. Then, add cold butter and mix until crumbly. Stir in cheese and parsley, and slowly add milk. Knead the dough gently and shape it. Cut into scones and bake at 400°F for 15-20 minutes. This method creates light, fluffy scones with rich cheese flavor. For the full recipe, see the section above. Can I use other types of cheese? Yes, you can use different cheeses! Sharp cheddar adds great flavor, but you can try feta, gouda, or even blue cheese. Each cheese brings a unique taste and texture. Experimenting will help you find your favorite combinations. What's the best way to reheat scones? To reheat scones, use the oven. Preheat it to 350°F. Place the scones on a baking sheet and warm for about 5-10 minutes. This method keeps them soft and tasty. You can also microwave them for about 10-15 seconds, but they might get a bit chewy. What to do if scones don’t rise? If your scones don’t rise, check your baking powder. It should be fresh and active. Make sure you mix the dry ingredients well before adding wet ones. Also, avoid overworking the dough, as it can make scones dense. How to fix dry scones? If your scones are dry, next time add a little more milk. You can also try using less flour or increase the butter amount. If they’re already baked, serve them with butter or a dip to add moisture. Alternatives for butter or milk If you need a substitute for butter, use margarine or coconut oil. For milk, you can use almond milk or soy milk. These alternatives work well and keep the scone's texture nice. Can I use self-rising flour? Yes, you can use self-rising flour! If you do, skip the baking powder. Self-rising flour has it included, which will help your scones rise nicely. Adjust the salt to taste since it may also contain salt. This blog post covered everything you need to make savory cheese scones. You learned about the key ingredients, preparation steps, and baking tips for perfect scones. Remember to experiment with different cheeses and herbs for unique flavors. Proper storage keeps your scones fresh, and freezing extends their shelf life. With these tips, you can enjoy delicious scones any time. Happy baking, and enjoy each tasty bite!

Savory Cheese Scones Simple and Tasty Recipe

May 1, 2025 by Emma

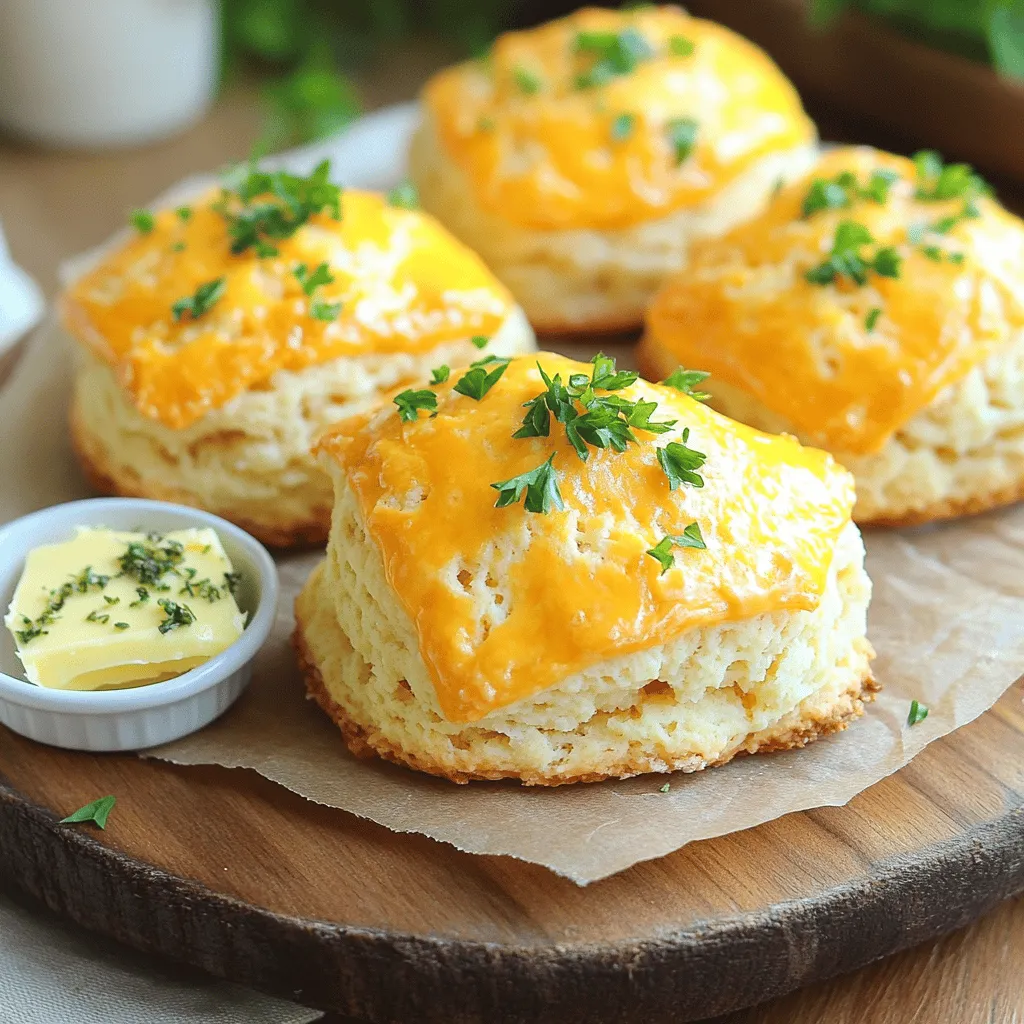
Get ready to bake some delightful savory cheese scones that are simple and tasty! This …

Learn more

Categories Appetizer
Older posts
Newer posts
← Previous Page1 Page2 Page3 … Page35 Next →

I’m Emma, and I love sharing a diverse range of both sweet and savory recipes, each inspired by my love for cooking and exploring new flavors.

Learn more

  • To make Florida Shrimp Pie, you need a few tasty ingredients. Here’s the list: - 1 pound fresh shrimp, peeled and deveined - 1 pre-made pie crust (9-inch) - 2 tablespoons butter - 1 medium onion, finely chopped - 2 cloves garlic, minced - 1 red bell pepper, diced - 1 cup corn (fresh or frozen) - 1 cup heavy cream - 2 large eggs - 1 cup shredded cheddar cheese - 1 teaspoon Old Bay seasoning - Salt and pepper to taste - Fresh parsley, chopped (for garnish) Each ingredient plays a role in giving the pie its rich flavor. The shrimp brings a sweet taste, while the cream adds a nice creaminess. The Old Bay seasoning gives it that classic seafood kick. You can use fresh corn for a burst of sweetness or frozen corn for convenience. When you choose your shrimp, look for fresh ones. They should smell like the sea, not fishy. The pie crust saves time, but you can also make your own if you prefer. This list will help you create a dish that is both tasty and filling. For the full recipe, check out the detailed cooking steps. - Preheat your oven to 375°F (190°C). This helps the pie cook evenly. - In a skillet, melt 2 tablespoons of butter over medium heat. Add 1 medium onion, chopped finely, and sauté until it turns clear. This usually takes about 3-4 minutes. - Next, stir in 2 cloves of minced garlic and 1 diced red bell pepper. Cook for another 2-3 minutes until they are soft. - Then, add 1 pound of peeled and deveined shrimp and 1 cup of corn to the skillet. Cook for about 5 minutes. The shrimp should turn pink and be cooked through. Once done, remove from heat and let it cool a bit. - In a mixing bowl, whisk together 1 cup of heavy cream, 2 large eggs, 1 teaspoon of Old Bay seasoning, and some salt and pepper to taste. This mixture gives the pie its rich flavor. - Now, take your pre-made pie crust and place it in a pie dish. Pour the shrimp and veggie mix evenly into the crust. - Finally, pour the cream mixture over the shrimp. Don’t forget to sprinkle 1 cup of shredded cheddar cheese on top for that gooey goodness. - Place the pie in the preheated oven and bake for 30-35 minutes. Look for a golden and bubbling top. That means it's ready! - Once it’s out of the oven, let it cool for about 10 minutes. This helps the pie set. - Before serving, garnish with fresh chopped parsley for a pop of color and flavor. This is the full recipe for Florida Shrimp Pie! Enjoy the delicious blend of flavors! To ensure your shrimp are perfectly cooked, pay attention to color. Raw shrimp is gray. When they turn pink, they are done. Overcooked shrimp can become rubbery. Cook them just until they change color, about 5 minutes in the skillet. Choosing the right pie crust is key. A pre-made pie crust saves time and effort. Look for one that is sturdy enough to hold the filling. A flaky crust adds texture and flavor. If you’re feeling adventurous, you can make your own crust from scratch. Pair your Florida Shrimp Pie with fresh sides. A simple green salad complements the rich pie well. You can also serve it with garlic bread or coleslaw. For dips, try a zesty cocktail sauce or a tangy remoulade for a fun twist. Best drinks to serve with Florida Shrimp Pie include chilled white wine or a light beer. A refreshing lemonade can also balance the flavors. For a non-alcoholic option, iced tea with lemon works wonderfully. Garnishing techniques can elevate your dish. Use fresh parsley to sprinkle on top. This adds color and freshness. You can also add slices of lemon on the side for a pop of brightness. For plating ideas, use a wide plate to show off your pie. Slice it into wedges for a clean look. Add a small salad next to the pie for a touch of green. This makes your meal look special, perfect for hosting friends or family. For the full recipe, check out the [Full Recipe]. {{image_2}} You can easily change the main protein in this dish. Crab or lobster work well. They add rich flavors and a different texture. If you want a vegetarian option, try using mushrooms or tofu. Both can soak up the seasonings and give a nice bite. To spice things up, consider using cayenne or paprika. These spices add a nice kick. You can also add a touch of lemon zest for brightness. Fresh herbs like dill or cilantro can enhance the taste. They bring a fresh note that pairs well with seafood. If you want to mix things up, make a seafood casserole instead. Just layer the cooked shrimp and veggies in a baking dish with cheese on top. You can also grill the pie instead of baking it. Grilling adds a smoky flavor that is truly unique. For more details on making this delicious dish, check out the Full Recipe. To store leftovers, let the pie cool first. Cover it tightly with plastic wrap or foil. You can also use an airtight container. This keeps the pie fresh and tasty. Leftovers stay good in the fridge for up to three days. After that, the quality may drop. Always check for any off smells or signs of spoilage before eating. If you want to freeze Florida Shrimp Pie, let it cool completely. Wrap it tightly in plastic wrap, then place it in a freezer bag. You can store it for up to three months. To reheat, thaw the pie in the fridge overnight. Preheat your oven to 350°F (175°C). Bake the pie for about 25-30 minutes, until hot. This way, it keeps its flavor and texture. Enjoy your delicious pie even later! You can use crab or scallops as a great swap. If you want a plant-based option, try chickpeas or jackfruit. Both will add a nice texture and flavor to your pie. Yes, you can make this pie in advance. Prepare it, then cover it well and store it in the fridge. You can bake it the next day. This saves time and makes meal planning easy. Leftovers will stay fresh for about three days. Keep the pie in an airtight container. If it smells off or looks strange, it’s best to throw it away. I love serving this pie with a fresh salad or steamed veggies. Garlic bread also makes a nice side. For something light, try a fruit salad. Each goes well with the rich flavors of the pie. This blog post covered everything you need for Florida Shrimp Pie. We discussed the main ingredients, easy instructions, and helpful tips. Variations let you customize this dish, while storage info keeps it fresh. I encourage you to experiment with flavors and ingredients. Cooking should be fun! Now, gather your shrimp and get started on this tasty recipe. Enjoy your culinary adventure and impress your family and friends with your skills!
    Florida Shrimp Pie Flavorful and Easy to Make
  • - 1 pound ground beef - 1 cup shredded cheddar cheese - 1/2 cup grated Parmesan cheese - 1 tablespoon minced garlic - 1 teaspoon onion powder - 1 teaspoon dried oregano - Salt and pepper to taste The main stars of this recipe are ground beef and cheese. The beef gives a rich flavor, while cheddar and Parmesan add creaminess and a nice bite. Garlic and onion powder bring out the essence of the beef. Dried oregano adds a touch of earthiness, making each bite a delight. Adjusting salt and pepper helps customize the flavor to your taste. - 1 package refrigerated biscuit dough (8 biscuits) I use refrigerated biscuit dough for ease and speed. This dough is soft and puffs up nicely during baking. You can use Southern-style biscuits if you want a flakier texture. For a homemade option, try making your own biscuit dough with flour, baking powder, and butter. - Fresh parsley, chopped (for garnish) Fresh parsley adds a pop of color and freshness. You can also use other herbs like chives or basil for a different taste. These herbs balance the richness of the cheeseburger bombs. A little sprinkle on top makes them look even more tasty. For a complete recipe, check out the Full Recipe. Prepping the oven and baking sheet First, you need to preheat your oven to 375°F (190°C). This heat ensures your cheeseburger bombs cook evenly. While the oven warms up, line a baking sheet with parchment paper. This step helps prevent sticking and makes cleanup easier. Preparing the filling In a large mixing bowl, combine the ground beef, shredded cheddar cheese, grated Parmesan cheese, minced garlic, onion powder, dried oregano, salt, and pepper. Mix these ingredients well with your hands or a spoon. You want a uniform mixture for great flavor in every bite. How to flatten biscuit dough Open the package of refrigerated biscuit dough. Take out each biscuit and place it on a clean surface. Use your hands or a rolling pin to flatten each biscuit to about 4 inches in diameter. Make sure they are even for the best results. Filling and sealing techniques Spoon about 2 tablespoons of the cheeseburger mixture into the center of each flattened biscuit. Carefully fold the edges over the filling. Pinch the seams tightly to seal them completely. This helps the filling stay inside while baking. Optimal baking time and temperature Place the stuffed biscuits seam-side down on the prepared baking sheet. Brush the tops with melted butter and sprinkle extra Parmesan cheese on top. Bake the bombs in your preheated oven for about 15 to 20 minutes. Signs of doneness Look for a golden brown color on the tops of the bombs. You can also check if they are cooked through by cutting one open. The filling should be hot and bubbly. When done, remove them from the oven and let cool slightly before serving. For the full recipe, check out the detailed instructions above. Enjoy your delicious Garlic Parmesan Cheeseburger Bombs! To make your garlic Parmesan cheeseburger bombs shine, adjust the seasonings to your taste. If you love heat, add a dash of cayenne pepper. For a zestier flavor, mix in a teaspoon of Worcestershire sauce. You can also try adding diced jalapeños for a spicy kick. Another great option is to include finely chopped green onions for extra crunch and flavor. Feel free to get creative with additional ingredients. For instance, you can add cooked bacon bits to the beef mixture for a smoky flavor. You could also swap out cheeses. Try using mozzarella for a gooey texture or pepper jack for some spice. Each change can make your bombs unique. These cheeseburger bombs pair well with a variety of dipping sauces. Classic ketchup and mustard are always a hit. You might also enjoy ranch dressing for a creamy touch. For something bolder, try a spicy aioli or barbecue sauce. When it comes to side dishes, keep it simple. A fresh salad with tangy vinaigrette complements the rich flavors of the bombs. You can also serve them with crispy sweet potato fries for a fun twist. These options balance the meal and keep it light. If you want to save time, cook in batches. You can make a large batch of these bombs and freeze them before baking. Just place the unbaked bombs on a baking sheet and freeze for about an hour. Once frozen, transfer them to a freezer bag. This way, you can bake them whenever you want a quick snack. When you're ready to eat, you can reheat them straight from the freezer. Just add a few extra minutes to your baking time. This makes meal prep easy and allows you to enjoy delicious snacks anytime. {{image_2}} You can switch up the meat in this recipe. Ground turkey or chicken works well. Each gives the bombs a lighter taste. If you want to try something different, use pork or lamb. For a vegetarian option, use plant-based ground meat. You can also use black beans or lentils. They add a hearty texture and flavor. Just mix with the cheeses and seasonings as you would with meat. Want some heat? Add diced jalapeños or red pepper flakes to the filling. These spicy additions bring a kick to each bite. You can also try sriracha or hot sauce for an extra zing. Mixing cheeses can take your bombs to the next level. Instead of cheddar, use pepper jack for a spicy twist. Or try mozzarella for a gooey texture. You can even blend cheeses for a tasty surprise. These cheeseburger bombs can shine as an appetizer or a main course. Serve them hot with dipping sauces like ranch or ketchup. They are also great at parties or game days. If you want smaller bites, make sliders. Use the same filling but cut the dough into smaller pieces. Full-sized bombs are great for a meal. Choose what fits your occasion best. For the full recipe, check out the ingredients and steps above. To keep your leftover garlic Parmesan cheeseburger bombs fresh, wrap them tightly. Use plastic wrap or aluminum foil for the best results. You can also place them in an airtight container. This method protects them from air and moisture. Refrigerator vs. Freezer In the refrigerator, these bombs last about 3 days. If you freeze them, they can last up to 3 months. Just make sure to label the container with the date. This way, you know when you made them. When you're ready to enjoy your leftovers, the oven is the best choice. Preheat it to 350°F (175°C). Place the bombs on a baking sheet and heat for about 10-15 minutes. This keeps them crispy. Microwave Option You can use the microwave, but they might get soggy. If you do, heat them for about 30 seconds. Check if they are warm enough and heat more if needed. Re-crisping Techniques If they lose their crunch, try broiling them for a minute or two after microwaving. This adds back some crispiness. These garlic Parmesan cheeseburger bombs stay fresh for about 3 days in the fridge. If frozen, they can last for about 3 months. Signs of Spoilage Watch for changes in color or texture. If they smell off or look dry, it’s best to throw them away. Always trust your senses when checking for freshness. For the full recipe, please refer to the [Full Recipe]. Can I use frozen ground beef? Yes, you can use frozen ground beef. Just thaw it first. You can do this overnight in the fridge. If you’re in a hurry, use the microwave. Make sure it is fully thawed before mixing it with the cheese and spices. What can I use instead of biscuit dough? If you want, you can use pizza dough or puff pastry. Both will give a nice texture. You can also try crescent roll dough for a different taste. Just make sure to adjust baking time if needed. Can I prepare these ahead of time? Yes, you can make them ahead. Prepare the cheeseburger bombs and seal them. Store them in the fridge for up to one day. When ready, bake them as directed. This saves time on busy days. What is the best temperature for baking? The best temperature for baking these bombs is 375°F (190°C). This heat cooks them evenly and gives a golden color. Always preheat your oven to ensure the best results. How to adjust for dietary restrictions? To adjust for dietary needs, use ground turkey or chicken instead of beef. You can also replace cheese with dairy-free options. Always check labels for hidden allergens. Tips for making them gluten-free? For a gluten-free option, use gluten-free biscuit dough. Many stores sell this now. You can also make your own using gluten-free flour. Just follow a trusted recipe to ensure they turn out well. In this blog post, we explored how to make delicious biscuit bombs from start to finish. We discussed key ingredients like ground beef, tasty cheeses, and seasonings. We covered biscuit dough choices, garnishes, and essential tips to enhance flavor. You learned how to assemble and bake these treats, plus options for variations and storage. Now, go ahead and make your own biscuit bombs. Enjoy them as a snack, meal, or share them with friends. Happy cooking!
    Irresistible Garlic Parmesan Cheeseburger Bombs Recipe
  • Huli Huli Chicken hails from Hawaii. It first appeared in the 1950s. The name "Huli" means "turn" in Hawaiian. This dish gets its name from the grilling method. You turn the chicken on the grill for even cooking. Locals often serve Huli Huli Chicken at luaus and gatherings. Its sweet and savory flavor makes it a favorite among many. People love Huli Huli Chicken for its unique taste. The mix of pineapple juice and soy sauce gives it a great balance. The dish is simple to make and full of flavor. It appeals to both kids and adults, making it perfect for family meals. Plus, grilling adds a smoky touch that enhances the dish. You can serve it at barbecues, parties, or just for a nice dinner at home. The key ingredients bring Huli Huli Chicken to life. Here’s what you need: - 4 chicken thighs, bone-in and skin-on - 1 cup pineapple juice - 1/4 cup soy sauce - 1/4 cup brown sugar - 2 tablespoons sesame oil - 2 garlic cloves, minced - 1 tablespoon fresh ginger, grated - 1 teaspoon red pepper flakes - 1 green onion, chopped (for garnish) - 1/4 cup fresh cilantro, chopped (for garnish) These ingredients create a delicious marinade. They work together to tenderize the chicken and add layers of flavor. You can find the full recipe [here]. To make Huli Huli chicken, gather these simple items: - 4 chicken thighs, bone-in and skin-on - 1 cup pineapple juice - 1/4 cup soy sauce - 1/4 cup brown sugar - 2 tablespoons sesame oil - 2 garlic cloves, minced - 1 tablespoon fresh ginger, grated - 1 teaspoon red pepper flakes - 1 green onion, chopped (for garnish) - 1/4 cup fresh cilantro, chopped (for garnish) Using fresh ingredients makes a big difference. Fresh chicken enhances the taste and texture. Fresh garlic and ginger also add vibrant flavors. Pineapple juice can be fresh or canned. I prefer fresh for a brighter flavor. Pre-packaged sauces can save time but may contain preservatives. If you use them, check the label for quality. Each serving provides a burst of flavor along with key nutrients. Here’s what you get per serving: - Calories: 300 - Protein: 24g - Carbohydrates: 25g - Fat: 15g - Fiber: 1g - Sugars: 10g This dish gives you a balanced meal with protein and some natural sugars. When you use the Full Recipe, you can enjoy a tasty meal that's both healthy and satisfying. To start, gather your ingredients. You need chicken thighs, pineapple juice, soy sauce, brown sugar, sesame oil, garlic, ginger, and red pepper flakes. In a mixing bowl, combine the pineapple juice, soy sauce, brown sugar, sesame oil, minced garlic, grated ginger, and red pepper flakes. Whisk it all together until well mixed. This marinade gives the chicken a sweet and tangy flavor. Place the chicken thighs in a large zip-top bag or a shallow dish. Pour the marinade over the chicken. Seal the bag or cover the dish. Refrigerate for at least 2 hours, or better yet, overnight. This step is key for the best taste. When you are ready to grill, preheat your grill to medium-high heat. This is important to get perfect grill marks and a nice sear on the chicken. Make sure your grill grates are clean. You can oil the grates lightly to prevent sticking. This small step can save you from a messy cooking experience later. Now, it’s time to grill! Remove the chicken from the marinade and let any excess drip off. Keep the leftover marinade for basting later. Place the chicken skin-side down on the grill. Grill for about 7-8 minutes until the skin is crispy and golden. Flip the chicken carefully, then baste it with the reserved marinade. Grill for another 7-8 minutes. You want the internal temperature to reach 165°F (75°C) for safe eating. Once done, remove the chicken from the grill and let it rest for 5 minutes. This will help keep it juicy. Before serving, garnish with chopped green onions and fresh cilantro. Enjoy your flavorful Huli Huli chicken! For the full recipe, check out the previous section. {{image_2}} Marinating chicken is key to great flavor. I recommend marinating for at least two hours. For the best taste, leave it overnight. The longer you marinate, the more delicious the chicken becomes. The pineapple juice tenderizes the meat and adds a sweet taste. Grill marks make your dish look amazing. To get those perfect lines, set your grill to medium-high heat. Place the chicken skin-side down on the grill. Don't move it for about 7-8 minutes. Once you see nice grill marks, flip the chicken carefully. This helps keep the juices inside. Using the right tools makes cooking easier. A good grill is essential for Huli Huli chicken. I also suggest using tongs to flip the chicken. A meat thermometer is important too. It ensures your chicken reaches 165°F (75°C) for safety. Lastly, have a basting brush ready for the marinade. This will keep the chicken juicy and full of flavor. For the full recipe and detailed steps, check out the [Full Recipe]. You can cook Huli Huli chicken in two main ways: grilling or baking. Grilling gives a smoky flavor and crispy skin. The heat from the grill adds nice char marks. For fun, try using a charcoal grill for extra flavor. Bake it for a more hands-off method. Just set your oven to 375°F (190°C). Place the chicken in a baking dish and pour the marinade over it. Bake for about 45 minutes. Check that the chicken reaches 165°F (75°C) for safety. Huli Huli chicken is great in bowls. Start with a base of rice or quinoa. Add grilled veggies like bell peppers and zucchini. Slice the chicken and place it on top. Drizzle with extra marinade or teriyaki sauce for added flavor. You can also sprinkle chopped green onions and cilantro for a fresh touch. Add slices of avocado or mango for a tropical twist. This makes for a colorful and tasty meal. You can easily adapt this recipe for different diets. For gluten-free options, use tamari instead of soy sauce. If you want a lower-sugar version, try using a sugar substitute like stevia. For a vegan option, swap the chicken for tofu or tempeh. Marinate it in the same sauce. Cooking times will vary, so check for doneness. These swaps keep the dish flavorful while meeting your dietary needs. For the full recipe, check out the details above! Yes, you can use different cuts. Huli Huli chicken works great with chicken breasts or drumsticks. Each cut offers a unique taste and texture. Keep in mind that cooking times may change. Breasts may cook faster than thighs. Always check the internal temperature to ensure it reaches 165°F (75°C). To store leftovers, let the chicken cool first. Place it in an airtight container. It will keep well in the fridge for up to four days. You can also freeze it for up to three months. When reheating, make sure the chicken is hot all the way through. You can find great Huli Huli chicken at Hawaiian restaurants. Look for local spots that specialize in island cuisine. Some food trucks also serve this dish. Check reviews online to find the best places. If you can't find a restaurant nearby, try making it at home using the Full Recipe. Huli Huli chicken is a tasty dish with rich history. We explored its origins, key ingredients, and why people love it. You learned how to marinate, grill, and serve this dish perfectly. I shared helpful tips and tasty variations to try. Enjoy making Huli Huli chicken in your kitchen. Each bite brings a taste of Hawaii to your home. Whether grilling or baking, have fun and get creative with flavors!
    Huli Huli Chicken Flavorful Recipe to Try Today
  • To make a tasty strawberry cheesecake, you need the following items: - 1 ½ cups graham cracker crumbs - ⅓ cup granulated sugar - ½ cup unsalted butter, melted - 16 oz cream cheese, softened - 1 cup powdered sugar - 1 teaspoon vanilla extract - 2 cups heavy cream - 1 cup fresh strawberries, pureed - 1 tablespoon lemon juice - Fresh strawberries for topping You can swap some ingredients if needed. Here are a few ideas: - Instead of graham cracker crumbs, use crushed cookies or nuts. - For granulated sugar, you can use brown sugar for a deeper flavor. - Use coconut oil in place of unsalted butter for a dairy-free option. - If you want a lighter version, use low-fat cream cheese. - You can substitute fresh strawberries with frozen ones, but fresh is best for flavor. Choosing ripe strawberries is key for great flavor. Here’s how: - Look for bright red berries. They should feel firm and plump. - Check for green, leafy tops; this shows they are fresh. - Avoid berries with soft spots or mold. This means they are past their prime. - If possible, buy local strawberries for the best taste. To start, preheat your oven to 325°F (163°C). Take a mixing bowl and add the graham cracker crumbs, granulated sugar, and melted butter. Mix these together until all crumbs feel wet. This step is key for a tasty crust. Next, press this mixture into the bottom of a 9-inch springform pan. Make sure it is even. Bake it in the oven for about 10 minutes. Once done, take it out and let it cool completely. Now, let’s make the filling. In a large bowl, beat the softened cream cheese with an electric mixer. You want it to be smooth and creamy. Slowly add the powdered sugar and vanilla extract. Keep mixing until everything is blended well. This process gives the cheesecake its rich taste. Next, take another bowl and whip the heavy cream. You want to whip it until soft peaks form. This adds lightness to your cheesecake. Carefully fold the whipped cream into the cream cheese mixture. Do this gently, so it stays fluffy. Time to add some flavor! Fold in the pureed strawberries and lemon juice. Mix until the color is uniformly pink. This will make your cheesecake taste fresh and fruity. Now, pour this strawberry cheesecake filling over the cooled crust in the springform pan. Smooth the top with a spatula to make it nice and neat. Cover it with plastic wrap and place it in the fridge. For the best flavor, chill it for at least 4 hours, or even overnight. Follow these steps, and you’ll have an amazing strawberry cheesecake. For exact measurements and more details, check the Full Recipe. To make your cheesecake creamy, use softened cream cheese. Cold cream cheese can cause lumps. Beat it well until smooth before adding any sugar. Mixing in the powdered sugar slowly helps keep the creaminess. Always fold in the whipped cream gently. This keeps the mixture light and fluffy. One common mistake is overmixing the filling. Overmixing can add too much air and cause cracks. Make sure to mix just until combined. Another mistake is not chilling long enough. Chilling for at least four hours helps set the cheesecake. Don’t skip the fresh strawberry topping. It adds flavor and looks great! To whip cream perfectly, start with cold heavy cream. Use a clean bowl and beaters for best results. Beat on medium speed until soft peaks form. This takes only a few minutes. Don’t overwhip, or it may turn into butter. Fold it into your cheesecake mixture gently to keep the light texture. You can find the full recipe for this delightful dessert to guide you in making the best strawberry cheesecake! {{image_2}} A no-bake version is simple and quick. You skip the oven and save time. Start with the same crust made from graham cracker crumbs. Mix the cream cheese, powdered sugar, and vanilla like in the original recipe. Instead of baking, spread the filling over the crust. Chill it for at least four hours. This method gives you a smooth, creamy slice without any baking fuss. If you want a vegan cheesecake, you can use plant-based ingredients. For the crust, use vegan butter instead of regular butter. Swap the cream cheese with soaked cashews blended until creamy. Use maple syrup or agave instead of powdered sugar. Coconut cream is a great choice to replace heavy cream. This vegan option tastes rich and delicious and is perfect for plant-based diets. For a gluten-free version, you can use almond flour or gluten-free graham crackers. Mix them with coconut oil to create a crust that holds together well. Press it into your pan just like the regular crust. This way, you enjoy the same great taste without gluten. You can even try crushed nuts for a unique twist. Explore these variations to find your favorite way to enjoy Strawberry Cheesecake Delight! For the complete recipe, check out the Full Recipe. After you enjoy your strawberry cheesecake, store leftovers properly. First, cover it well. Use plastic wrap or a lid to keep it fresh. This keeps out air and moisture. Place it in the fridge. It helps maintain its taste and texture. Always put it on a flat surface to avoid spills. You can freeze strawberry cheesecake for later. First, let it cool completely. Then, wrap it tightly in plastic wrap. Next, place it in an airtight container or freezer bag. This protects it from freezer burn. You can freeze it for up to three months. When you are ready to enjoy it, thaw it in the fridge overnight. Strawberry cheesecake lasts about five days in the fridge. Keep it covered to maintain quality. If it looks or smells off, don’t eat it. If frozen, it stays good for three months. Always check for any signs of spoilage before serving. Knowing these tips helps you enjoy this delightful dessert longer. For the full recipe, visit the complete guide. To make strawberry cheesecake from scratch, follow these steps. First, prepare the crust by mixing graham cracker crumbs, sugar, and melted butter. Press this mix into a springform pan and bake. Next, beat cream cheese until smooth. Then, add powdered sugar and vanilla. In another bowl, whip heavy cream until soft peaks form. Fold this whipped cream into the cream cheese mixture gently. Add pureed strawberries and lemon juice. Mix until it’s a nice pink color. Pour this filling over the crust and chill for at least 4 hours. You can find the full recipe in the earlier sections. Yes, you can use frozen strawberries. Just remember to thaw them first. Drain any excess liquid to avoid a watery filling. Frozen strawberries work well in purees and can still give great flavor. They may change the texture slightly, but your cheesecake will still taste amazing. The best way to serve strawberry cheesecake is chilled. Once set, remove it from the springform pan. Top with fresh strawberries for a bright look. You can also add whipped cream or a drizzle of strawberry sauce. Slice into pieces and enjoy! This dessert is perfect for gatherings or a special treat. In this blog post, we explored the key ingredients for a perfect strawberry cheesecake, from the crust to fresh strawberries. I shared step-by-step instructions to make it easy for you. We looked at tips for a creamy texture and common mistakes to avoid. Plus, I offered tasty variations, storage tips, and answered frequently asked questions. Remember, practice makes perfect. Enjoy making this dessert, and share it with friends and family!
    Strawberry Cheesecake Delight Simple and Easy Recipe
  • - 1 pre-made graham cracker pie crust - 1 cup fresh lemon juice (about 4-5 lemons) - Zest of 2 lemons - 1 cup granulated sugar - 4 large eggs - 1/2 cup unsalted butter, melted - 1 cup heavy whipping cream - 1/4 cup powdered sugar (for the whipped cream) - Fresh mint leaves (for garnish) Having the right ingredients makes all the difference in making an easy lemon cream pie. I love using fresh lemon juice. It brings a bright, zesty flavor that makes the pie shine. The sweet and tart balance is key. The graham cracker crust adds a nice crunch, too. When selecting lemons, pick ones that feel heavy for their size. This usually means they have more juice inside. Don't forget the zest! It adds extra lemon flavor that makes this pie special. Melted butter helps bind the filling. Heavy cream is essential for the whipped topping. This creates a light and fluffy texture that complements the tangy filling. Lastly, fresh mint leaves add a pop of color and flavor. Garnishing with mint makes the pie look even more delightful. For the full recipe, check the detailed instructions above. To start, gather your ingredients. In a medium saucepan, you will whisk together: - 1 cup fresh lemon juice - Zest of 2 lemons - 1 cup granulated sugar - 4 large eggs - 1/2 cup unsalted butter, melted Cook this mixture over medium heat. Keep stirring until it thickens. This should take about 10 to 15 minutes. You want it thick enough to coat the back of a spoon. Be careful not to let it boil, as that can ruin the texture. Once your lemon filling thickens, remove it from the heat. Let it cool for about 15 to 20 minutes. Stir it occasionally so a skin does not form on top. After it cools, gently pour the lemon filling into the pre-made graham cracker pie crust. Use a spatula to smooth the top. Now, place the pie in the refrigerator. Let it chill for at least 3 hours. This helps the filling set properly. While the pie chills, you can whip the cream. In a mixing bowl, combine: - 1 cup heavy whipping cream - 1/4 cup powdered sugar Beat this mixture on medium-high speed. Stop when soft peaks form. Once the pie has set, spread the whipped cream evenly on top. Create swirls for an attractive finish. For a nice touch, add fresh mint leaves as garnish. You can also sprinkle some extra lemon zest on top if you like. For the full recipe, check out the entire guide. Enjoy making your Easy Lemon Cream Pie! To get the best flavor, always use fresh lemon juice. The taste brightens the pie. Fresh lemons make the filling zesty and vibrant. When cooking the filling, stir continuously. This keeps the mixture from boiling. Boiling can ruin the texture. If you see bubbles, lower the heat. The goal is to thicken it gently. You want it to coat the back of a spoon. Cold tools help create the best whipped cream. Chill your mixing bowl and beaters in the fridge. This makes your cream whip faster and fluffier. When you whip the cream, beat until soft peaks form. This gives you a light and airy texture. Don’t overbeat, or it will turn into butter. Just stop when it’s thick yet smooth. {{image_2}} You can easily change the flavor of your lemon cream pie. A splash of vanilla extract adds depth. Mix it into the lemon filling before cooking. It brings a lovely warmth that pairs well with the tartness. If you want to get creative, try other citrus fruits. Lime or orange zest can add a fun twist. Adjust the amount of lemon juice to keep the balance. This way, you can enjoy a whole new pie experience! For those who need a gluten-free option, don’t worry! You can switch the graham cracker crust. Use a gluten-free pie crust instead. Many brands now offer tasty options that work well. You won’t lose the great taste with this swap. This way, everyone can enjoy your easy lemon cream pie. It keeps the same creamy texture and zesty flavor. Everyone will love it, no matter their dietary needs! Store any leftover pie covered in the refrigerator. It stays fresh for up to 3 days. The cool air keeps the lemon cream firm and tasty. If you leave it out, it may spoil faster. To keep it safe, use plastic wrap or a pie dome. This way, you can enjoy the pie again without losing its flavor. Freezing the filled pie is not a good idea. The texture changes when you thaw it. The creamy filling may become watery or grainy. Instead, enjoy the pie fresh. If you have extra lemon filling, you can freeze that. Just remember to use it within a month. When you're ready, thaw it in the fridge overnight, then pour it into a fresh crust. This gives you a new pie without losing quality. Yes, you can prepare the lemon filling in advance. Just keep it in the fridge. Make sure it cools completely before covering it. This way, you save time on the big day. You can pour it into the crust just before serving. Bottled lemon juice is a good option. It works well in the recipe. Just use the same amount as fresh juice. You may miss some zest, but it still tastes great. Be sure to check the label for quality. This recipe makes about eight servings. You can slice the pie into even wedges. Use a sharp knife for clean cuts. Serve each piece on a plate with a mint leaf on top for a nice touch. Enjoy! You now have a simple and tasty lemon pie recipe. The fresh lemon juice and zest give it a bright flavor. Follow the steps to whip up this pie easily. Remember, freshness matters for the best taste. You can even make this pie your own by adding different flavors. Store leftovers properly for later enjoyment. Enjoy your time baking and sharing this delicious treat. Your friends and family will love it!
    Easy Lemon Cream Pie Delightful and Simple Recipe
  • To make an Easy Prawn Cutlet Burger, you need fresh and simple ingredients. Here’s the list: - 250g prawns, peeled and deveined - 1 small onion, finely chopped - 2 cloves garlic, minced - 1 green chili, finely chopped - 1/2 cup breadcrumbs - 1 egg - 2 tablespoons cornstarch - 1 tablespoon fresh coriander, chopped - 1 teaspoon cumin powder - 1/2 teaspoon salt - Black pepper to taste - 2 tablespoons oil (for frying) - Burger buns - Lettuce leaves - Sliced tomatoes - Mayonnaise or aioli (for serving) These ingredients come together to create a burger that is both tasty and easy to make. You can find the full recipe in the next section. Using fresh prawns will really enhance the flavor of your cutlet. Enjoy the process of gathering these ingredients. They are the foundation for your delightful meal! First, start by pulsing the prawns in a food processor. You want them coarsely chopped, not pureed. Next, take a large bowl and combine the chopped prawns with the finely chopped onion, minced garlic, green chili, and fresh coriander. This mix adds flavor and freshness to your patties. Now, it’s time to add the rest of the ingredients. Toss in the breadcrumbs, egg, cornstarch, cumin powder, salt, and black pepper. Mix everything well until you have a sticky mixture. This helps the patties hold together. Divide the mixture into four equal portions. Shape each portion into a patty. Make sure they are even for uniform cooking. Heat oil in a large skillet over medium heat. Once the oil is hot, carefully place your prawn patties in the skillet. Fry them for about three to four minutes on each side. Look for a golden brown color and a crispy texture. While they cook, you can toast the burger buns until they are lightly golden. This adds a nice crunch to your burger. Now, you have crispy prawn cutlet patties, ready to be assembled into your burger! For the full recipe, refer to the instructions above. To make great prawn patties, use fresh prawns. Fresh prawns give the best flavor. You want the mixture to be sticky. This helps the patties hold together well. When you mix the ingredients, don’t rush. Take your time to combine everything fully. This step is key for a good texture. Frying your patties at the right temperature is crucial. Heat your oil over medium heat. If the oil is too hot, the outside will burn. If it's too cool, the patties will soak up oil and become soggy. To keep your patties crispy, avoid crowding the pan. Fry them in batches if needed, and let them rest on a paper towel after cooking. This helps absorb extra oil. Now, let’s talk about toppings. Crisp lettuce and fresh tomato add nice crunch. For sauce, mayonnaise or aioli works great. You can add a slice of cheese if you like. Serve your burgers with fries or a simple salad. These sides complement the flavors and make a full meal. Enjoy your Easy Prawn Cutlet Burger! For the full recipe, check the section above. {{image_2}} You can easily switch the prawns for other seafood. Fish like cod or salmon works great. Crab meat also adds a sweet, rich flavor. Just chop the seafood into small pieces. Follow the same steps in the recipe. Your cutlet burger will taste amazing! For a veggie version, use mixed vegetables. You can blend carrots, peas, and corn for a colorful mix. Add mashed chickpeas for protein. Use the same spices from the original recipe. Shape the veggie mix into patties, and cook as described. A veggie burger can be just as delicious! Want more flavor? Add spices like paprika or cayenne pepper. Fresh herbs like dill or parsley can brighten the taste. You can also mix in zest from a lemon or lime. These small changes can make your prawn cutlet burger even tastier. Enjoy experimenting with different flavors! To keep your prawn cutlet burgers fresh, refrigerate any leftovers. Place them in an airtight container. They will last up to three days in the fridge. If you want to save them for later, freezing works well too. Wrap each burger in plastic wrap, then place them in a freezer bag. They can stay good for up to three months. When it’s time to eat your leftovers, reheating is key. The best way to warm them up is in a skillet. Heat a little oil over medium heat. Place the burgers in the pan, cooking for about 2-3 minutes on each side. This method keeps them crispy. You can also use an oven at 350°F. Bake for 10-15 minutes until hot. The shelf life of your prawn cutlet burgers is important for safety. If stored properly in the fridge, they are best eaten within three days. If frozen, aim to eat them within three months for the best taste. Always check for any signs of spoilage before consuming. To make your prawn cutlet burger crispy, use fresh breadcrumbs. The breadcrumbs create a nice crust when frying. Make sure the oil is hot before adding the patties. This helps seal the outside quickly. You can also double coat the patties by dipping them in egg, then breadcrumbs again. This adds extra crunch to each bite! Yes, you can prepare the patties in advance. Shape the patties and place them on a tray. Cover them with plastic wrap and refrigerate for up to 24 hours. This keeps the flavors fresh. When you're ready to cook, just heat the oil and fry them until golden. This saves you time and makes dinner easy! If you don’t have aioli, you can use mayonnaise as a simple substitute. You might also try garlic mayonnaise for extra flavor. For a spicy kick, mix some sriracha into the mayo. Other options include tartar sauce or even a yogurt-based dip. These choices keep your burger tasty and fun! Yes, you can freeze the prawn patties. After shaping them, place them on a baking tray. Freeze them for a few hours, then store in a freezer bag. They last for about three months. When ready to cook, just fry them straight from the freezer. This is a great way to have a quick meal on hand! Cook the patties for about 3-4 minutes on each side. This timing gives you a nice golden color and crispy texture. Keep an eye on them to avoid burning. If they brown too quickly, lower the heat a little. Perfectly cooked patties are key to a delicious prawn cutlet burger! Fresh toppings make your prawn cutlet burger even better! Try crisp lettuce and juicy tomato slices. You can also add pickles for a tangy crunch. Other great options are sliced avocado and shredded cabbage. These toppings add color and flavor to your meal, making it more exciting! In this post, we covered how to make tasty prawn patties. We looked at key ingredients and detailed steps for preparation, cooking, and serving. I shared tips for perfecting your patties and options for variations. Remember, fresh prawns make a big difference! Enjoy these patties with your favorite toppings to enhance the flavor. Whether you choose to fry them or try some fun substitutions, these burgers can fit any taste. Dive into this recipe and impress everyone at your next meal. Your culinary journey awaits!
    Easy Prawn Cutlet Burger Delightful and Tasty Meal
  • To make a great palak paneer, you need the following items: - 250g paneer, cubed - 500g fresh spinach leaves, washed and blanched - 1 large onion, finely chopped - 2 tomatoes, pureed - 2 green chilies, slit - 1 tablespoon ginger-garlic paste - 1 teaspoon cumin seeds - 1 teaspoon garam masala - ½ teaspoon turmeric powder - ½ teaspoon red chili powder - 2 tablespoons ghee or vegetable oil - Salt to taste These ingredients create a rich and flavorful dish. Each one plays an important role in the final taste. For instance, paneer adds a creamy texture, while spices bring warmth and depth. You can enhance your dish with these garnishes: - Fresh cream - Coriander leaves Fresh cream adds a rich finish. Coriander leaves give a fresh pop of color and flavor. They make your palak paneer look beautiful and taste even better. If you want to impress guests, use these garnishes. For the full recipe, check out the detailed cooking steps to create this delightful meal. Blanching the spinach: First, bring a pot of water to a boil. Add the fresh spinach leaves and let them boil for 2-3 minutes. This step helps keep the bright green color. Next, drain the spinach and quickly move it to a bowl of cold water. This stops the cooking process. Once cool, blend the spinach until it becomes a smooth paste. Set this aside for later. Preparing the spinach paste: The paste is key for our dish's flavor. When you blend the spinach, it should be silky and bright. This will make the Palak Paneer look and taste amazing. You can add a little water while blending if needed. Just don't add too much! Sautéing onions and spices: In a large pan, heat 2 tablespoons of ghee or vegetable oil over medium heat. Add 1 teaspoon of cumin seeds and wait for them to splutter. This releases their flavor. Next, toss in 1 large finely chopped onion and 2 slit green chilies. Cook them until the onions are golden brown. This usually takes around 5-7 minutes. Combining ingredients for optimal flavor: Now, stir in 1 tablespoon of ginger-garlic paste and cook for another minute. After that, add 2 pureed tomatoes, ½ teaspoon of turmeric powder, ½ teaspoon of red chili powder, and salt to taste. Cook this mix until it thickens and the oil separates from the mixture, about 5-7 minutes. Then, add the blanched spinach paste and mix it well. Let it simmer on low heat for about 4-5 minutes. Finally, gently fold in 250g of cubed paneer. Make sure the paneer is well-coated with the spinach sauce. Cook for another 3 minutes. Sprinkle in 1 teaspoon of garam masala and mix gently. You can adjust the salt if needed. If you like, drizzle fresh cream on top before garnishing with coriander leaves. Serve this dish warm for a delightful meal. For the full recipe, you can find it [here](#). To achieve the perfect spinach texture, start with fresh spinach. Wash it well and blanch it quickly for just 2-3 minutes. This keeps the vibrant green color and smooth texture. After blanching, cool it in cold water to stop the cooking process. Blend it into a fine paste for the best results. For the paneer, ensure it’s tender yet firm. Use fresh paneer, and cut it into cubes. You can fry the paneer lightly in ghee or oil before adding it to the dish. This gives a nice texture and flavor. Avoid overcooking the paneer, as it can become rubbery. For the best side dishes to pair with Palak Paneer, consider serving it with naan or basmati rice. Both absorb the delicious sauce well. You can also add a side of pickles or yogurt for extra flavor. When it comes to presentation, serve the Palak Paneer in a warm bowl. Drizzle a bit of cream on top for richness and color. Finish with a sprinkle of fresh coriander leaves. This makes the dish look inviting and appetizing. For more ideas, check the Full Recipe for detailed steps and variations. {{image_2}} You can easily adapt Palak Paneer to fit different diets. For a vegan option, replace paneer with tofu or a nut-based cheese. Tofu captures the flavors well and adds a nice texture. You can also use coconut cream instead of fresh cream for a creamy touch. If you need gluten-free options, don't worry. This dish is naturally gluten-free, so you can enjoy it without any changes. Just make sure to check any store-bought ingredients for hidden gluten. To change up the taste, consider adding spices. A pinch of fenugreek leaves gives a unique flavor. You can also add a touch of cardamom for warmth. Experimenting with spices adds depth and makes the dish your own. Incorporating extra vegetables is another fun way to play with flavors. Try adding peas for sweetness or bell peppers for crunch. These veggies blend well with the spinach and add color to your plate. You can explore these ideas in the Full Recipe for Palak Paneer. To store leftover Palak Paneer, let it cool first. Then, place it in an airtight container. This keeps it fresh for about 3-4 days in the fridge. When you’re ready to eat, just reheat it on the stove or in the microwave. Stir it often to heat it evenly. If you want to freeze Palak Paneer, use a freezer-safe container. Make sure to cool it fully before freezing. It can last up to 3 months in the freezer. When you want to enjoy it again, thaw it overnight in the fridge. Reheat in a pan on low heat to keep it tasty. If it seems thick, add a splash of water or cream. This keeps the dish creamy and delicious. How can I make Palak Paneer spicier? To add heat, you can include more green chilies. Chop them finely and add them to the dish early. You can also add a pinch of cayenne pepper or red chili powder. This will give your Palak Paneer a nice kick. Adjust spice to your taste as you cook. Can I use frozen spinach instead? Yes, frozen spinach works well in Palak Paneer. Just thaw it and squeeze out excess water. Then, blend it into a paste as you would with fresh spinach. It saves time and can still taste great. What are the health benefits of Palak Paneer? Palak Paneer is rich in iron, calcium, and vitamins A and C. Spinach offers antioxidants that help with health. Paneer adds protein, making this dish nutritious. It is a great option for a balanced meal. Is Palak Paneer high in calories? Palak Paneer can be moderate in calories. One serving has around 300-400 calories, depending on the amount of oil or cream. For a lighter version, use less ghee or skip the cream. Enjoy it with whole grains for a healthy meal. This article covered how to make Palak Paneer with ease. We explored the key ingredients needed and how to blend them for the best taste. I shared cooking tips to help you achieve the perfect texture. Don't forget to try the optional garnishes for added flair. Storage tips ensure you enjoy leftovers, while variations let you adapt to dietary needs. Cooking can be fun and satisfying. Experiment with flavors and enjoy your homemade Palak Paneer. Happy cooking!
    Palak Paneer Delightful Recipe for Flavorful Dish

Our Policies

  • Privacy Policy
  • GDPR Policy
  • Terms Of Use
  • Copyright Policy
  • Cookie Policy
  • Disclaimer

More Information

  • Home
  • Dinner
  • Appetizer
  • Desserts
  • Breakfast
  • Contact
  • About

  • Email: [email protected]
  • Address: 513 E Cuyahoga Falls Ave, Akron, OH 44310, United States
  • Phone: +1 (305) 275-4892
©2025 Themomdish All Rights Reserved