
Ready to elevate your breakfast game? This Overnight Crème Brûlée French Toast is a showstopper! In just a few simple steps, you can whip up a luscious dish that combines creamy custard and sweet caramelized toppings. Perfect for lazy mornings or special occasions, this recipe promises to impress. Let me guide you through the easy ingredients and steps to create your new favorite brunch delight!
Ingredients
Detailed list of ingredients
To make Overnight Crème Brûlée French Toast, you will need:
– 1 loaf of brioche bread, sliced (about 12 slices)
– 4 large eggs
– 2 cups whole milk
– 1 cup heavy cream
– ½ cup granulated sugar
– 2 teaspoons vanilla extract
– 1 teaspoon cinnamon
– A pinch of salt
– ¼ cup brown sugar (for caramelizing)
– Fresh berries (for garnish)
– Whipped cream (optional, for serving)
Each ingredient plays an important role in the dish. The brioche adds a soft, rich texture. Eggs provide structure and creaminess. Milk and heavy cream create a smooth custard base. Sugar sweetens while vanilla adds depth. Cinnamon gives warmth, and salt balances flavors.
Ingredient substitutes for lactose-free or gluten-free options
If you want a lactose-free version, swap whole milk and heavy cream for almond or oat milk. Use lactose-free cream if you can find it. For gluten-free options, choose gluten-free bread. Always check labels to ensure the bread is truly gluten-free.
Importance of quality ingredients for flavor enhancement
Quality ingredients make a big difference in flavor. Fresh brioche gives a buttery taste. Using organic eggs and real vanilla extract enhances the overall flavor. High-quality sugar caramelizes better and adds a rich taste. When you use top-notch ingredients, your French toast will shine. Trust me, it’s worth it!
Step-by-Step Instructions
Preparation process for the custard mixture
To start, grab a large mixing bowl. Add four large eggs to the bowl. Next, pour in two cups of whole milk and one cup of heavy cream. Then, add half a cup of granulated sugar. Include two teaspoons of vanilla extract, one teaspoon of cinnamon, and a pinch of salt. Whisk this mixture well until it looks smooth and creamy. This is your custard mixture. It adds rich flavor to your French toast.
Tips for arranging brioche slices
Now, take your loaf of brioche bread and slice it into about twelve pieces. In a greased 9×13 inch baking dish, arrange the slices. Place them in two overlapping rows. This helps each piece soak up the custard. Make sure to fit them snugly without gaps. If some slices float, gently press them down after pouring the custard. This ensures each slice gets soaked.
Baking and caramelization techniques
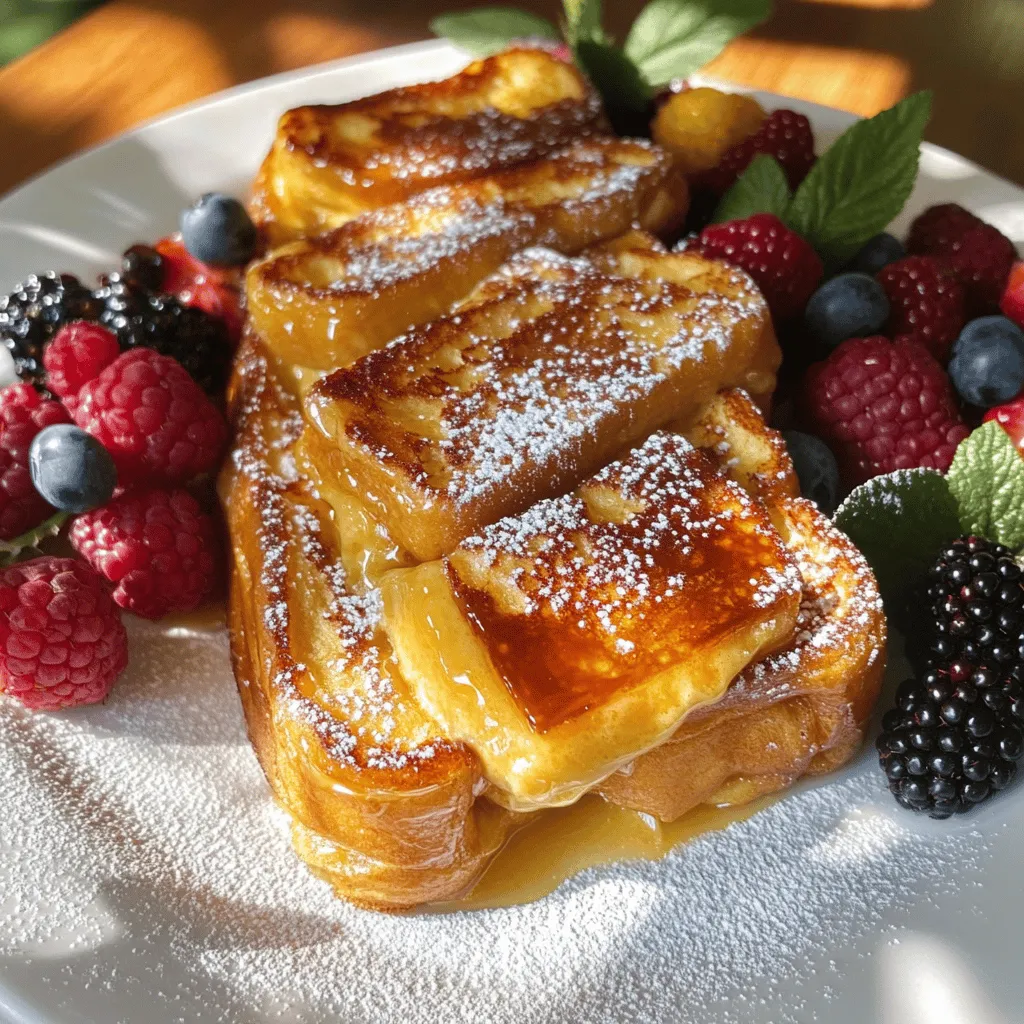
When your custard has soaked overnight, it’s time to bake. Preheat your oven to 350°F (175°C). Remove the plastic wrap from the dish. Bake for 30 to 35 minutes. You’re looking for a golden top and a firm custard. After baking, let it cool slightly. Sprinkle a layer of brown sugar evenly over the top. Use a kitchen torch to caramelize the sugar. This gives you that crisp, glass-like crust. If you don’t have a torch, broil it for a minute, but keep a close eye. Finally, let it cool again before serving for the best texture.
Enjoy this delightful treat with fresh berries and whipped cream if you like!
Tips & Tricks
How to achieve the perfect texture
To get the best texture, use fresh brioche bread. It soaks up the custard well. Slice it thick, about one inch. This helps it retain a soft inside while baking. Make sure to let it soak overnight. This extra time lets the bread absorb more flavors. When you bake it, aim for a golden top. This shows the custard is set and creamy inside.
Common mistakes to avoid
One big mistake is not soaking the bread long enough. If you skip this step, the bread may end up dry. Another mistake is baking at too high a temperature. This can burn the top before the inside cooks. Lastly, don’t skip the caramelizing step. The crispy sugar on top adds a nice crunch. It makes your dish look and taste gourmet!
Suggestions for serving and garnishing
Serve this dish warm for the best taste. Place each slice on a plate. Add fresh berries on the side for color and flavor. A sprinkle of powdered sugar can make it look fancy. If you like, add a dollop of whipped cream. This adds creaminess and pairs well with the crisp top. For a fun twist, drizzle maple syrup over the top.
Variations
Flavor variations (adding fruits or nuts)
You can easily boost the flavor of your Overnight Crème Brûlée French Toast. Adding fruits like berries, bananas, or apples brings freshness. These fruits add a nice balance to the creamy custard. Nuts like walnuts or pecans give a delightful crunch. You can mix these in the custard or add them as a topping.
Alternative bread types to use
While brioche is classic, you can try other bread types. Challah works well too, offering a rich flavor. For a healthier option, use whole grain or sourdough bread. Each bread type changes the texture and taste of your dish. Just make sure the bread is sturdy enough to soak in the custard.
Dessert-inspired twists (like chocolate or matcha)
For a fun twist, you can add chocolate or matcha. Swirl in chocolate spread for a rich, decadent treat. Matcha powder can give your French toast a unique green hue and flavor. These dessert-inspired variations turn breakfast into a special occasion. You can even combine flavors, like chocolate with nuts for added depth.
Storage Info
Best practices for storing leftovers
To keep your Overnight Crème Brûlée French Toast fresh, store it in an airtight container. Make sure to let it cool down first. This helps seal in the flavor. You can keep it in the fridge for up to three days. If you have leftovers, avoid stacking the slices. This prevents sogginess and helps maintain texture.
Reheating instructions for optimal freshness
When you’re ready to enjoy the leftovers, preheat your oven to 350°F (175°C). Place the slices on a baking sheet. Cover them loosely with foil to keep them from drying out. Heat for about 10-15 minutes or until warmed through. If you want that crispy top, remove the foil for the last few minutes. You can also reheat individual slices in a microwave for about 30 seconds, but the oven method gives better results.
Freezing options and tips
You can freeze Overnight Crème Brûlée French Toast if you want to save some for later. Slice the cooled dish and wrap each piece tightly in plastic wrap. Then, place the wrapped pieces in a freezer bag. This keeps the air out and prevents freezer burn. It can last up to two months in the freezer. To thaw, move slices to the fridge overnight before reheating.
FAQs
How long can Overnight Crème Brûlée French Toast sit in the fridge before baking?
You can keep Overnight Crème Brûlée French Toast in the fridge for up to 12 hours. It’s best to let it soak overnight. This allows the bread to absorb all the rich custard flavors. If you need to bake it earlier, aim for at least 4 hours of soaking time.
Can I make this recipe vegan?
Yes, you can make a vegan version of Overnight Crème Brûlée French Toast! Use plant-based milk, like almond or oat milk, instead of whole milk. Replace the eggs with flaxseed meal or a commercial egg replacer. You can also use coconut cream for a rich flavor. Just ensure your bread is vegan-friendly, too.
What are the best toppings for Overnight Crème Brûlée French Toast?
Great toppings can elevate your French toast. Here are some delicious options:
– Fresh berries, like strawberries, blueberries, or raspberries
– A sprinkle of powdered sugar for sweetness
– Maple syrup for extra flavor
– Whipped cream to add creaminess
– Caramel sauce for a rich finish
Feel free to mix and match these toppings for a fun treat!
This blog post offered a clear guide to making Overnight Crème Brûlée French Toast. We discussed key ingredients and useful substitutes for dietary needs. I shared specific steps for perfect preparation and baking. Knowing common mistakes helps you avoid failures. Plus, I provided tasty variations and storage tips to keep your dish fresh. Remember, quality ingredients and careful technique make all the difference. Now you can enjoy a delicious breakfast with confidence and creativity. Happy cooking!


