Introduction
The holiday season is a time for joy, celebration, and of course, delicious treats. One such delightful creation is the No-Bake Peppermint Oreo Truffles. These little bites of joy are not only festive in appearance but also bursting with the beloved flavors of chocolate and peppermint. Perfect for holiday gatherings, gift-giving, or simply enjoying at home, these truffles offer a sweet escape from the usual baked goods. The best part? They require no baking, making them an ideal choice for those who want to whip up something special without spending hours in the kitchen.
As the hustle and bustle of the holiday season begins, finding quick and easy recipes becomes essential. No-bake desserts like these truffles stand out for their simplicity and convenience. They allow you to spend less time preparing and more time celebrating with family and friends. Whether you are an experienced baker or a novice in the kitchen, this recipe is straightforward and ensures a delectable result that will impress everyone.
The combination of rich chocolatey Oreos and refreshing peppermint creates a harmonious flavor profile that captures the essence of the season. This recipe is not just about taste; it’s about creating a festive atmosphere that brings warmth and happiness to your home. So, let’s dive into the world of No-Bake Peppermint Oreo Truffles and discover how to bring this delightful treat to life.
The Appeal of No-Bake Desserts
One of the standout features of no-bake recipes is their incredible convenience. For cooks at every skill level, these desserts provide an accessible way to indulge in sweet creations without the need for extensive baking knowledge or equipment. The process typically involves simple mixing, chilling, and shaping, making it an inviting option even for those who may feel intimidated by traditional baking.
Time-saving is another significant advantage of no-bake desserts, especially during the busy holiday season. With gatherings, parties, and family visits on the horizon, the last thing anyone wants is to spend hours in the kitchen. No-bake recipes allow you to create delicious treats in a fraction of the time it takes to bake, with minimal cleanup required. This means you can enjoy the festivities without sacrificing precious moments with loved ones.
Moreover, no-bake desserts can be just as decadent and visually appealing as their baked counterparts. With the right ingredients and presentation, you can create stunning desserts that look as impressive as they taste. The No-Bake Peppermint Oreo Truffles exemplify this perfectly, combining ease of preparation with an elegant finish that will elevate your holiday dessert table.
Ingredients Overview
To create these delightful No-Bake Peppermint Oreo Truffles, you’ll need a few essential ingredients. Each component plays a crucial role in achieving the perfect balance of flavor and texture:
Oreo Cookies
As the foundational element of this recipe, Oreo cookies provide both flavor and texture. The rich, chocolatey flavor pairs beautifully with the creamy filling, creating a delicious base for the truffles. The cookies are crushed to form fine crumbs, which will be mixed with cream cheese to create a cohesive mixture that can be shaped into truffles.
Cream Cheese
Cream cheese is the secret ingredient that adds creaminess and richness to the truffles. It binds the crushed Oreos together and gives the truffles their smooth, melt-in-your-mouth texture. Ensure that the cream cheese is softened to room temperature for easy mixing and to achieve the right consistency.
Peppermint Extract
To enhance the festive flavor profile, peppermint extract is essential. A little goes a long way in imparting that refreshing minty taste that complements the chocolate perfectly. Be cautious with the amount, as peppermint extract is potent and can easily overpower the other flavors if used excessively.
White Chocolate Chips
White chocolate chips provide a sweet coating for the truffles, creating a beautiful contrast against the dark cookie mixture. The creamy sweetness of the white chocolate adds another layer of flavor and richness, making the truffles irresistible.
Coconut Oil
While optional, coconut oil can be added to the melted white chocolate for a smoother texture. It helps the chocolate melt more evenly and creates a glossy finish on the truffles. If you prefer not to use coconut oil, you can simply melt the white chocolate chips on their own.
Crushed Peppermint Candies
For the finishing touch, crushed peppermint candies make the perfect garnish. Not only do they add a burst of color and festive flair, but they also enhance the peppermint flavor and provide a delightful crunch that contrasts with the creaminess of the truffles. These can be sprinkled on top of the melted white chocolate coating or used as a decorative touch on the finished truffles.
Step-by-Step Instructions
Now that we have an overview of the ingredients, let’s dive into the step-by-step instructions for preparing your No-Bake Peppermint Oreo Truffles. The process is straightforward and rewarding, allowing you to create a delicious treat that will delight everyone this holiday season.
Step 1: Crushing the Oreos
The first step in making these truffles is to crush the Oreo cookies. To achieve fine crumbs that will hold together well, you can use one of the following methods:
– Food Processor: Place the Oreo cookies in a food processor and pulse until they are finely crushed. This method is quick and ensures uniform crumbs.
– Ziplock Bag and Rolling Pin: Place the cookies in a ziplock bag and use a rolling pin to crush them until they reach the desired consistency. This method is great for those without a food processor and can be a fun way to involve kids in the kitchen.
Once the cookies are crushed, transfer the crumbs to a mixing bowl and set them aside.
Step 2: Mixing with Cream Cheese
Next, it’s time to mix the crushed Oreos with cream cheese. In a large mixing bowl, combine the crushed cookies with softened cream cheese. Use a spatula or your hands to mix the ingredients together until fully combined. The mixture should be thick and slightly sticky, making it easy to form into balls.
Make sure to break up any large clumps of cream cheese to achieve a smooth mixture. If the mixture seems too dry, you can add a little more cream cheese to help bind it together. Conversely, if it is too sticky, a small amount of crushed Oreos can be added to balance the consistency.
Step 3: Shaping the Truffles
Once the Oreo and cream cheese mixture is well combined, it’s time to shape the truffles. Using your hands, take small portions of the mixture and roll them into bite-sized balls, about 1 inch in diameter. Place the formed truffles on a baking sheet lined with parchment paper. Be sure to leave some space between each truffle to allow for easy coating later on.
After shaping all the truffles, place the baking sheet in the refrigerator for about 30 minutes. Chilling the truffles will help them firm up, making them easier to coat in chocolate.
Step 4: Melting the White Chocolate
While the truffles are chilling, it’s time to melt the white chocolate. In a microwave-safe bowl, combine the white chocolate chips and optional coconut oil. Microwave in 30-second intervals, stirring in between, until the chocolate is fully melted and smooth. Be careful not to overheat the chocolate, as it can seize and become unusable.
Once melted, the white chocolate should have a glossy finish, ideal for coating the truffles.
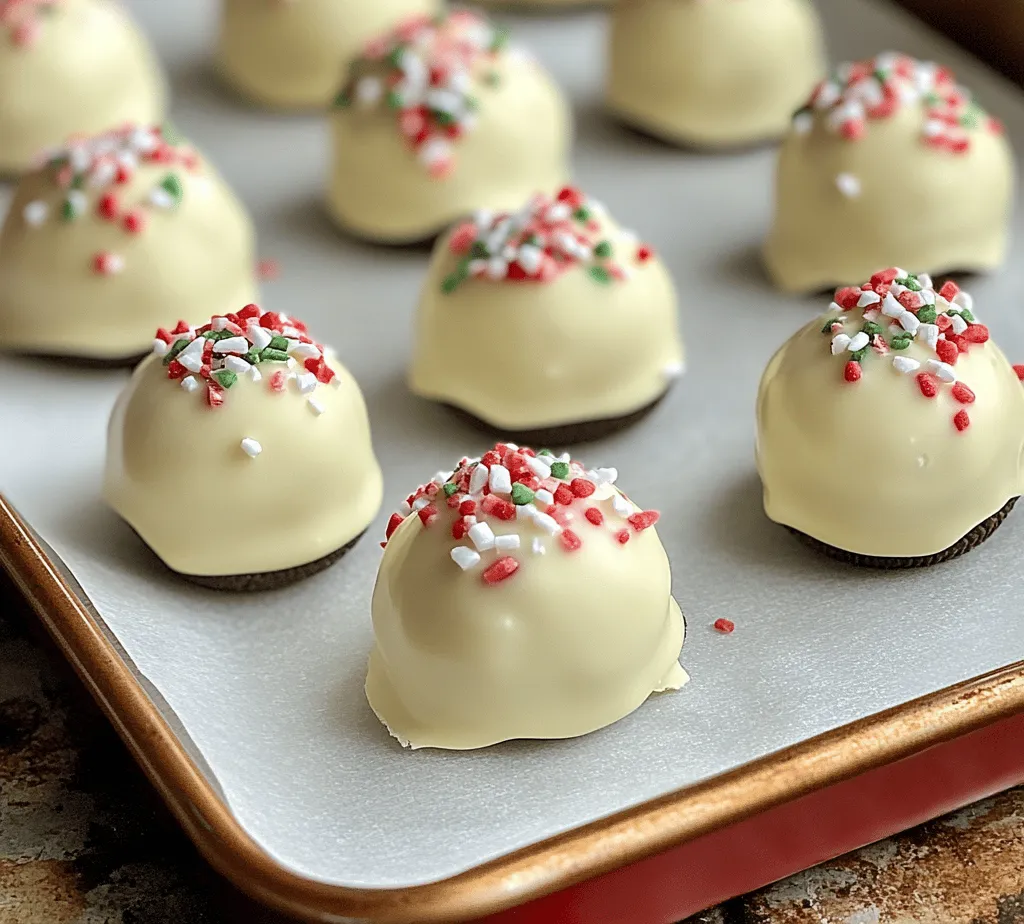
Step 5: Coating the Truffles
After the truffles have chilled, remove them from the refrigerator. Using a fork or a toothpick, dip each truffle into the melted white chocolate, ensuring it is fully coated. Tap off any excess chocolate before placing the coated truffle back onto the parchment-lined baking sheet.
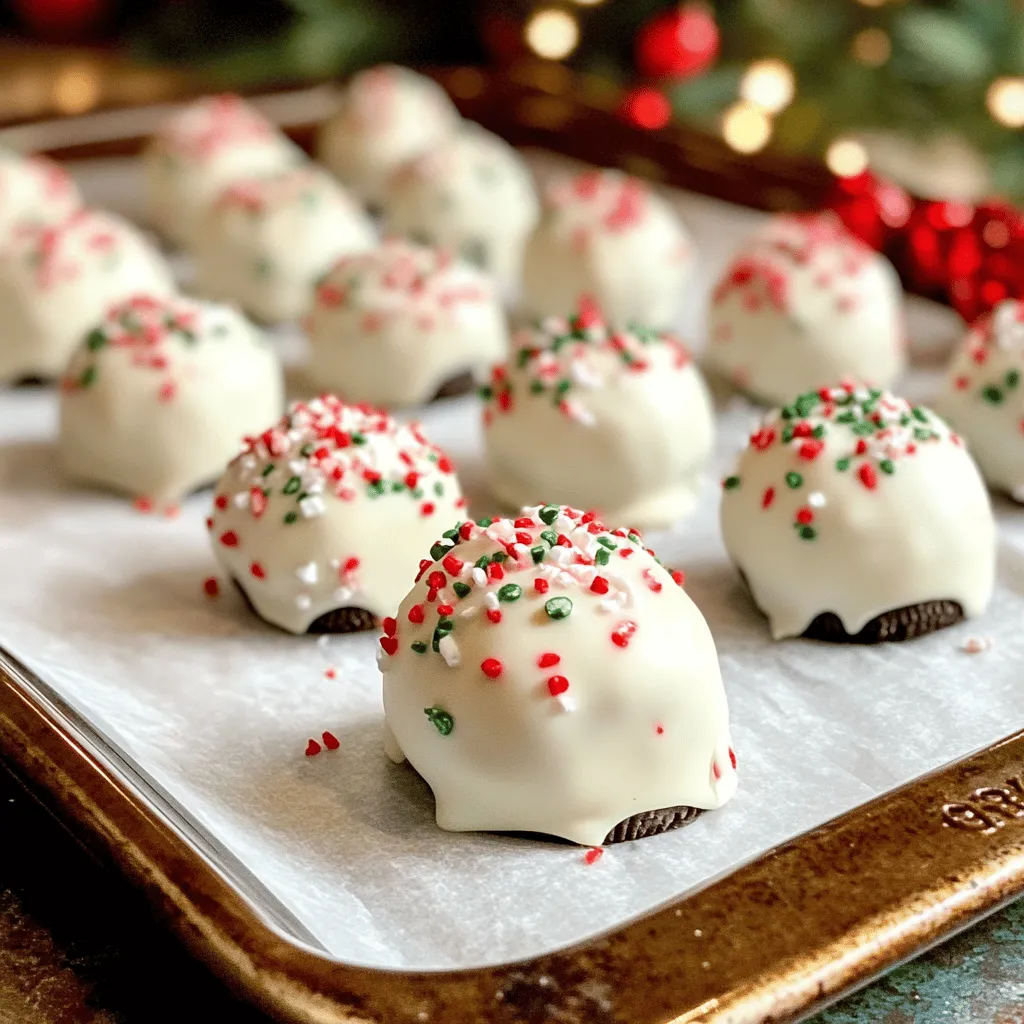
Step 6: Garnishing with Crushed Peppermint Candies
While the white chocolate is still wet, sprinkle the crushed peppermint candies over the top of each truffle. This will not only add a festive touch but also enhance the peppermint flavor. Allow the truffles to set at room temperature or place them back in the refrigerator until the chocolate coating is firm.
These initial steps prepare you for a delicious and festive treat that embodies the spirit of the holiday season. Stay tuned for the continuation of this recipe, where we will cover additional tips for making the perfect No-Bake Peppermint Oreo Truffles and answer some common questions about this delightful dessert.
Forming the Truffles
Once your peppermint Oreo mixture is well combined, it’s time to shape them into truffles. For uniform sizes, use a small cookie scoop or your hands to measure out equal portions. A standard tablespoon works well if you prefer to scoop them by hand. Roll the mixture between your palms into smooth balls, about one-inch in diameter. This process can be a bit messy, so keep a damp cloth nearby to clean your hands as needed.
To ensure your truffles are uniform in size, consider using a kitchen scale. Weighing out each portion can help you achieve consistency, which is especially important if you’re planning to give these as gifts. If you notice that the mixture is too soft to hold its shape, place it in the refrigerator for about 15 minutes. This will help firm it up, making it easier to roll into perfect spheres.
Chilling the Truffles
Chilling the truffles is an essential step that should not be overlooked. Once you’ve formed all your truffles, place them on a parchment-lined baking sheet and chill them in the refrigerator for at least 30 minutes. This chilling period allows the truffles to firm up, ensuring they hold their shape during the chocolate coating process.
Chilling the truffles also enhances the flavors as the ingredients meld together. It’s a simple yet effective trick that can significantly improve your final product. If you’re in a hurry, a 15-minute stint in the freezer can work as well, but be cautious not to freeze them longer than needed, as they may become too hard to coat.
Melting the Chocolate
The key to a beautiful chocolate coating is to melt the chocolate smoothly. You can use either the microwave or a double boiler method. If you’re using the microwave, place your chocolate in a microwave-safe bowl and microwave it in 30-second intervals, stirring in between until fully melted. This helps prevent overheating, which can cause the chocolate to seize.
If you prefer the double boiler method, fill a pot with a couple of inches of water and bring it to a simmer. Place a heatproof bowl on top, ensuring it doesn’t touch the water. Add your chocolate to the bowl and stir until melted. Once melted, remove it from heat and let it cool slightly before dipping your truffles to ensure the chocolate doesn’t melt the truffles’ creamy centers.
Coating the Truffles
Coating the truffles calls for a bit of finesse. Use a fork or a toothpick to dip each truffle into the melted chocolate. Allow the excess chocolate to drip off before transferring the truffles back to the parchment-lined baking sheet. For an even coating, consider using two forks – one to dip and the other to help lift the truffle out of the chocolate.
If desired, you can sprinkle crushed peppermint candies on top of the truffles before the chocolate sets. This not only adds a festive touch but also enhances the peppermint flavor. For a smooth finish, ensure that each truffle is completely coated before placing it back on the baking sheet.
Garnishing
Garnishing your truffles can elevate their appearance and flavor profile. A simple yet effective way to garnish is to drizzle melted white chocolate over the cooled truffles. This adds a beautiful contrast against the dark chocolate and offers a delightful creamy taste.
Crushed peppermint candies or holiday sprinkles can also be used to add color and texture. If you want to get creative, consider rolling some of your truffles in crushed nuts, shredded coconut, or cocoa powder for a different flavor and presentation. These garnishes can make your truffles look more festive and inviting, perfect for holiday gatherings.
Final Chill
After coating and garnishing, it’s essential to let the truffles chill once more. This final chill allows the chocolate coating to set properly, ensuring that your truffles are neat and presentable. Place the truffles back in the refrigerator for at least 15 minutes or until the chocolate has completely hardened. This step is crucial, as it prevents the chocolate from smudging when you handle the truffles for serving.
Flavor Profile and Texture
The combination of flavors in No-Bake Peppermint Oreo Truffles is nothing short of delightful. The rich chocolate blends harmoniously with the creamy center, while the peppermint adds a refreshing kick. Each bite offers a perfect balance of sweetness and minty freshness, making them an irresistible treat.
In terms of texture, these truffles present a wonderful contrast. The outer layer of chocolate is smooth and glossy, while the interior is creamy and soft, reminiscent of a cheesecake filling. This duality in texture creates a satisfying mouthfeel that keeps guests coming back for more. The addition of peppermint garnish not only enhances the visual appeal but also intensifies the minty flavor, making each truffle a festive delight.
Serving Suggestions
When it comes to serving your No-Bake Peppermint Oreo Truffles, presentation is key. Consider placing them in festive cupcake liners and arranging them on a decorative platter for a charming display. For an added touch, sprinkle some crushed peppermint or cocoa powder around the platter to create a winter wonderland effect.
These truffles pair beautifully with various beverages. They work particularly well with hot chocolate or coffee, creating a cozy dessert experience. Additionally, they can complement a cheese platter or serve as a sweet addition to a charcuterie board during holiday parties. Their versatility extends beyond the holiday season, making them suitable for birthdays, weddings, or any celebration where a sweet treat is welcome.
Storing and Shelf Life
To maintain the freshness of your No-Bake Peppermint Oreo Truffles, store them in an airtight container in the refrigerator. They can last for up to two weeks when stored properly, making them ideal for preparing in advance for parties or holiday gatherings. If you find yourself with leftovers, you can also freeze the truffles for up to three months. To freeze, place them in a single layer on a baking sheet until solid, then transfer them to a freezer-safe container or bag. Just remember to let them thaw in the refrigerator for a few hours before serving.
Conclusion
No-Bake Peppermint Oreo Truffles are a simple yet delightful treat that can bring joy to any occasion. Their ease of preparation makes them suitable for both novice and experienced bakers, allowing anyone to create an impressive dessert. The combination of rich chocolate, creamy peppermint filling, and festive garnishes makes these truffles a perfect addition to your holiday celebrations.
Whether you’re sharing them with friends and family, giving them as gifts, or simply enjoying them yourself, these truffles are sure to be a hit. Take the time to make these delightful treats, and you’ll find that they not only please the palate but create lasting memories of festive gatherings filled with joy and laughter. Enjoy the sweet taste of the season with every bite!


