Are you ready to discover a fun and tasty dessert? Banana mochi rolls combine sweet, ripe bananas with chewy mochi dough for an amazing treat. These delicious rolls are easy to make and perfect for any occasion. In this guide, I’ll take you through the simple steps to create your own banana mochi rolls, complete with tips and tricks for making them just right. Let’s dive in!
Ingredients
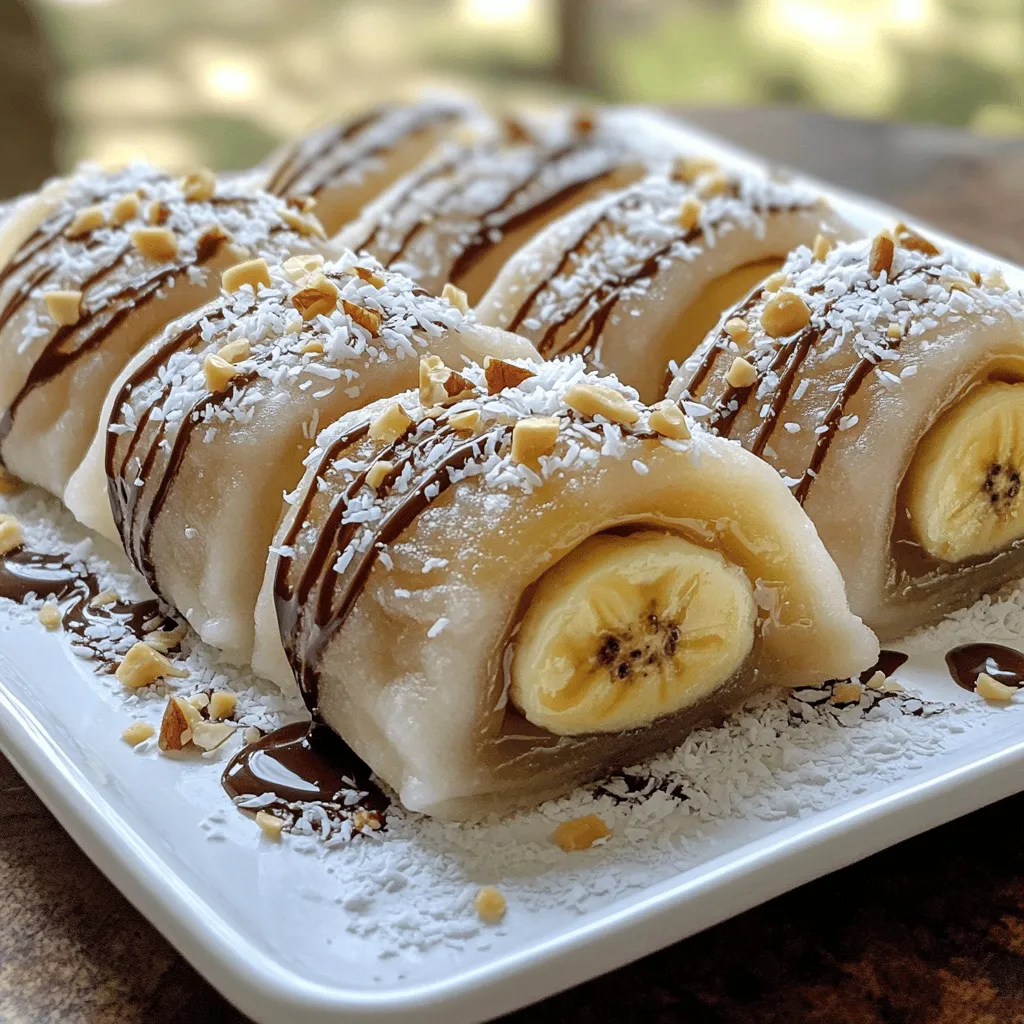
Here are the ingredients you need for delicious banana mochi rolls. Gather these items before you start:
– 1 cup sweet rice flour (mochi flour)
– 1/4 cup sugar
– 1/2 cup water
– 1/4 teaspoon salt
– 2 ripe bananas, sliced
– 1/4 cup shredded coconut (unsweetened)
– 1/4 cup chopped nuts (e.g., almonds or walnuts)
– Cornstarch or potato starch (for dusting)
– Chocolate syrup or honey (for drizzling)
These ingredients create a fun and tasty dessert. The sweet rice flour gives the mochi its unique chewy texture. Ripe bananas add natural sweetness, while nuts and coconut enhance the flavor and crunch. Don’t forget the chocolate syrup or honey for a tasty finish. For the best results, use fresh and ripe ingredients.Now, let’s enjoy making these rolls together!
Step-by-Step Instructions
Preparation Method
1. Mixing dry ingredients: Start by placing 1 cup of sweet rice flour, 1/4 cup of sugar, and 1/4 teaspoon of salt in a microwave-safe bowl. Stir the dry ingredients well to combine.
2. Creating the mochi batter: Gradually pour in 1/2 cup of water while stirring. Keep mixing until you have a smooth batter. This is the base for your mochi.
3. Cooking the mixture in the microwave: Cover the bowl loosely with plastic wrap. Microwave on high for 1 minute. After this, stir the mixture, then microwave for another 1-2 minutes. The mochi should become sticky and slightly clear.
4. Kneading and rolling the mochi dough: Once cooked, transfer the mochi onto a clean surface dusted with cornstarch or potato starch. Let it cool for a few minutes. When safe to handle, knead the mochi for about a minute. Roll it out into a rectangle about 1/4 inch thick. Dust with more starch if it’s still sticky.
Assembling the Rolls
1. Cutting the mochi into strips: Use a sharp knife to cut the mochi into long strips, each about 4 inches wide.
2. Filling the rolls with banana, coconut, and nuts: Place banana slices along one edge of each mochi strip. Sprinkle with 1/4 cup of shredded coconut and 1/4 cup of chopped nuts.
3. Rolling and cutting the finished rolls: Carefully roll the mochi dough over the filling, tucking it in gently. Repeat this process for all strips. After rolling, cut each roll into bite-sized pieces.
Final Touches
1. Drizzling chocolate syrup or honey: Once your rolls are ready, drizzle chocolate syrup or honey over the top. This adds sweetness and makes it look extra yummy.
2. Plating suggestions: Arrange the rolls on a serving platter. Dust lightly with more shredded coconut. Garnish with extra banana slices and a small bowl of chocolate syrup or honey for dipping.
Tips & Tricks
Enhancing Flavor and Texture
– Choosing the best bananas: Look for ripe bananas with a few brown spots. They should feel soft but not mushy. Ripe bananas are sweet and add great flavor to your mochi rolls.
– Tips for achieving the right mochi consistency: To get the perfect mochi, mix your sweet rice flour well with water. The batter should be smooth and slightly thick. When you microwave it, the mixture will become sticky and shiny. This is a good sign!
– Dusting techniques to prevent sticking: Use cornstarch or potato starch to dust your work surface as well as the mochi dough. This keeps it from sticking and makes rolling easier. Don’t be shy with the starch; it helps a lot!
Serving Suggestions
– Ideal pairings and complements: Serve your banana mochi rolls with chocolate syrup or honey. They add a sweet touch. You can also try a scoop of vanilla ice cream on the side for a fun twist.
– Creative presentation ideas: Arrange the rolls on a colorful platter. Dust them with more shredded coconut for a beautiful look. Add some banana slices and a small bowl of syrup for dipping. This makes your dessert more inviting!
Health Benefits
– Nutritional information of key ingredients: Each banana mochi roll packs in nutrients. Bananas offer potassium, which is good for your heart. Nuts add healthy fats and protein, making this dessert not just tasty but also nourishing.
– Potential health benefits of bananas and nuts: Eating bananas can boost your mood and energy. Nuts can help keep your brain sharp. Together, they make a great combo for your health while you enjoy a fun dessert!

Variations
Alternative Fillings
You can be creative with fillings in your banana mochi rolls. Try using different fruits like strawberries, mangoes, or even apples. Each fruit adds a unique taste and color.
– For a sweet twist, use honey or maple syrup instead of sugar.
– If you love nut butter, spread some almond or peanut butter on the mochi. It pairs well with bananas.
– Adding chocolate chips gives a fun, rich flavor. Just sprinkle them with your banana and nuts.
Dietary Modifications
If you need gluten-free options, sweet rice flour is naturally gluten-free. You can enjoy mochi without worry.
– For vegan adaptations, simply replace honey with agave syrup. It keeps the dessert plant-based.
– You can also use a dairy-free chocolate for drizzling.
Seasonal Variations
Seasonal fruits can change the mood of your mochi rolls. During summer, ripe strawberries or juicy peaches work wonderfully.
– In fall, try adding thin slices of apples or pears for a fresh crunch.
– For winter, consider using citrus fruits like oranges or mandarins for a bright flavor.
These variations make banana mochi rolls fun and exciting for everyone.
Storage Info
Short-term Storage
To keep your banana mochi rolls fresh for a few days, refrigerate them. Place the rolls in an airtight container. This method helps keep moisture at bay. If you notice some rolls getting sticky, dust them lightly with cornstarch. This extra step helps maintain their texture.
Long-term Storage
For longer storage, freeze the banana mochi rolls. Wrap each roll in plastic wrap and then place them in a freezer bag. This way, they stay fresh for months. When you want to enjoy them, simply take them out and thaw them in the fridge or at room temperature. Avoid microwaving directly from the freezer, as this can change their texture.
Shelf Life
Banana mochi rolls can last up to a week in the fridge. If frozen, they can be stored for up to three months. Make sure to check for any signs of freezer burn before using them. Proper storage will keep your tasty treats ready for a sweet moment anytime!
FAQs
Common Questions
What is the difference between mochi and regular rice?
Mochi uses sweet rice flour. This flour is sticky and chewy. Regular rice does not have the same texture.
Can I make mochi dough ahead of time?
Yes, you can make mochi dough ahead. Store it in the fridge for up to one day. Just make sure to cover it well.
What can I substitute for sweet rice flour?
You can use regular rice flour in a pinch. However, it won’t give the same chewy texture. For the best results, stick with sweet rice flour.
How can I make banana mochi rolls less sticky?
Dust your work surface with cornstarch or potato starch. This will help keep the dough from sticking. You can also dust the dough itself to make it easier to handle.
Troubleshooting Tips
Why did my mochi turn out too hard or soft?
If your mochi is too hard, it may have cooked too long. Keep an eye on it in the microwave. If it is too soft, try adding a bit more sweet rice flour.
What to do if the fillings leak out?
Make sure to roll the mochi tightly. If it still leaks, try using less filling next time. This will help keep everything inside.
Additional Resources
– For more delicious dessert ideas, check out my other recipes.
– Recommended tools: a microwave-safe bowl, a rolling pin, and a sharp knife. These will help you create perfect banana mochi rolls.
This blog post shared a simple recipe for banana mochi rolls. You learned about key ingredients and step-by-step instructions. We also discussed tips for flavor and storage. Variations and substitutions help you customize your rolls.
Remember, cooking can be fun and creative. Enjoy trying this recipe and making it your own. Happy cooking!


